
Scaffold Your Clean DDD Web Application - Part 1: Set Up the UI

Image credit: Capri23auto @ Pixabay
Introduction
This is the first in a multi-part series in which I will be building off the Foundational Concepts Series. If you haven’t read those yet, then I highly recommend you go back and familiarize yourself with the ideas I present in those entries. Going forward, I’ll make the assumption that you’re relatively familiar with basic programming concepts as well as those related to architecture, such as Layers of Abstraction, Loose-Coupling, etc. Especially important are the patterns and practices focused around Domain-Driven Design, Clean Architecture, and CQRS, as those inform the high-level design of the demo solution.
My objective is to present actual, procedural steps that you can follow and apply to your own web projects using ASP.NET Core. As I present these steps, I will be updating the demo application accordingly, the goal being to evolve it into a working web application by the end of this series.
Just to be totally transparent: the finished application will be a little rough around the edges. Actually, VERY rough around the edges. That’s okay. My intent is simply to demonstrate that Clean Domain-Driven Design works in modern web applications built on the ASP.NET Core stack. The desired end-product will be a multi-tenant SaaS product which can scale to accommodate complex business logic. I intend to revisit different areas of functionality in future blog series’, at which point we can make it more robust and enterprise worthy.
Another point I wanted to mention as we embark upon this phase of our journey is that I’ll be building out the user interface as a SPA (Single Page Application) using Angular 10. This choice is somewhat arbitrary and based upon my own preferences, and you may want to build your front end using a different framework, such as React, Blazor, or whatever you’re comfortable with.
(For any of you who may not be familiar with SPAs and how they work, there are plenty of resources out there to help you get familiar with the basic concepts. In a nutshell, the way they work is that a simple HTML page is rendered to the user with a single element on it, which acts as a placeholder for where the SPA will be loaded. After that, the SPA, which is essentially just a series of JavaScript libraries, gets loaded into the user’s browser and bootstraps itself. From there on, the application runs entirely in the user’s browser and dynamically manipulates the DOM (Domain Object Model) of the browser in order to present a user interface which resembles a watered-down desktop application. A high-level web protocol such as REST or GraphQL is used by the SPA to communicate back and forth to the server application from the user’s browser.)
Using my particular interpretation of Clean Domain-Driven Design, I’ll develop an architecture which is loosely-coupled enough that you can “peel off” the UI from the Presentation layer, and replace it with anything else that’s compatible with the web protocol of the SPA/server-side controllers (in the case of the demo app, REST).
Scaffolding Tools and Projects—Do Not Reinvent the Wheel
As it currently stands, the Presentation layer and user interface for our OrgManager demo application is a simple .NET Core console application with a bunch of hard-coded calls to CQRS workflows. That’s not very useful in practice, is it?
We’ll start moving the solution in the direction of actual web application by:
- Scaffolding a new ASP.NET Core Web API project into our solution, and
- Removing the web UI from the ClientApp folder and replacing it with a pre-built starter project.
Step A is fairly easy, as the web scaffolding tools are built right into Visual Studio. Step B is much more involved, as we will be removing features that aren’t useful to us at this time, changing around the structure of the project, and adding new components to communicate with our web API and present an interface to the user. Still, I prefer this approach rather than building the UI from scratch because:
- It saves us from having to write a lot of boilerplate code (and Angular is unfortunately a boilerplate-heavy framework).
- We get a lot of features “for free,” which in theory eases the learning curve and accelerates development.
So, without further adieu, let’s get started by scaffolding out the Web API.
Using Visual Studio to Create a Web Api Project
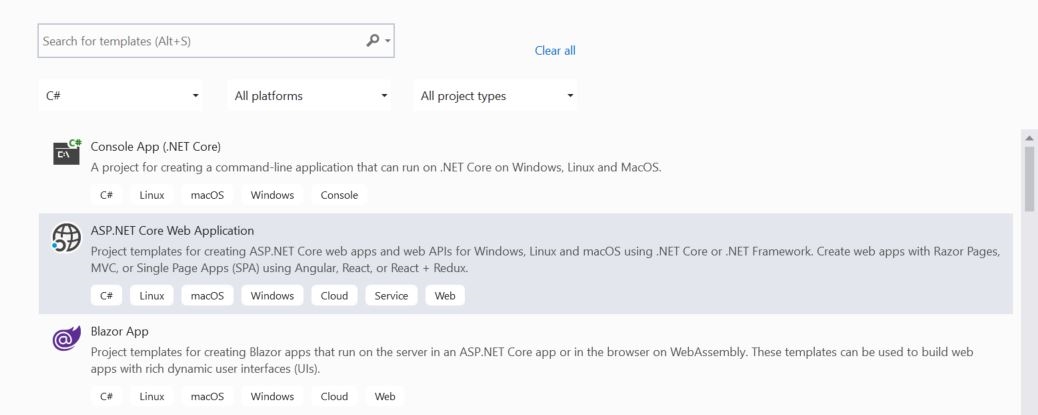
First, we’ll click on the solution and select “Add New Project”. From the list of project templates that comes up, we select “ASP.NET Core Web Application” and click Next.
The name of this project will be JDS.OrgManager.Presentation.WebApi.
Click Create.
We are now presented with a series of specific web project templates. Select Angular and then click on “Change” under the Authentication section.

A new dialog box appears allowing you to select either “No Authentication” or “Individual User Accounts.” Select “Individual User Accounts.” This will add the ASP.NET Core Identity packages and scaffolding to our Web Api project.

When we click OK and then Create, it’ll scaffold our Web Api project.
Now we will set JDS.OrgManager.Presentation.WebApi as our startup project and run our solution.
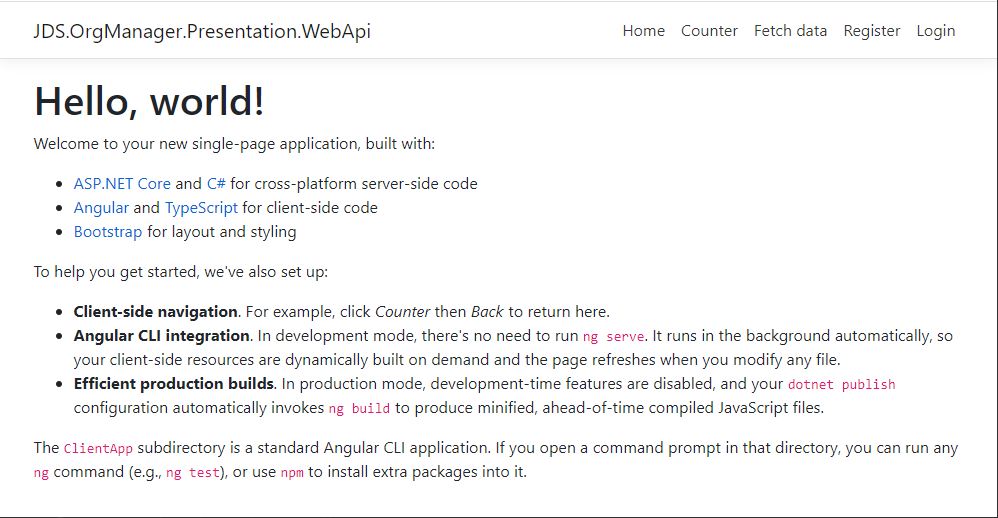
As you can see, we have the standard “Hello World” application that gets scaffolded by default. All well and good, but not super useful for what we’re trying to do.
Pay attention; here’s where things can get a little tricky.
Replacing the Default SPA User Interface with an Out-Of-Box Starter Project
The plan is to blow away 90% of the default ClientApp UI and replace it with a starter UI project, while maintaining the critical login and user account components which are auto generated by ASP.NET Core. Specifically, I’m referring to the components inside ClientApp/src/api-authorization.
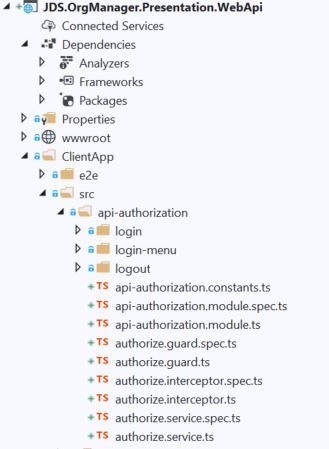
These components use OIDC (OpenID Connect)/Oauth2 to authenticate users into our system.
![]() Pro tip: Trying to roll your own login and authentication components will lead you down the path of pain, guaranteed. Don’t do it. I highly, highly recommend you use out of the box solutions whenever possible. As far as security components go, like password hashers and the like, DON'T EVER TRY TO ROLL YOUR OWN, as that is just downright dangerous and is a good way for your web app to get hacked.
Pro tip: Trying to roll your own login and authentication components will lead you down the path of pain, guaranteed. Don’t do it. I highly, highly recommend you use out of the box solutions whenever possible. As far as security components go, like password hashers and the like, DON'T EVER TRY TO ROLL YOUR OWN, as that is just downright dangerous and is a good way for your web app to get hacked.
Getting back on track. Our approach will be to set aside the ClientApp folder for now, replace it with a starter UI project, and then frankenstein splice the OIDC/authentication components back into it at some future point.
Rename the ClientApp folder “ClientApp-old,” or something to that effect. You may need to exit from Visual Studio to do this.
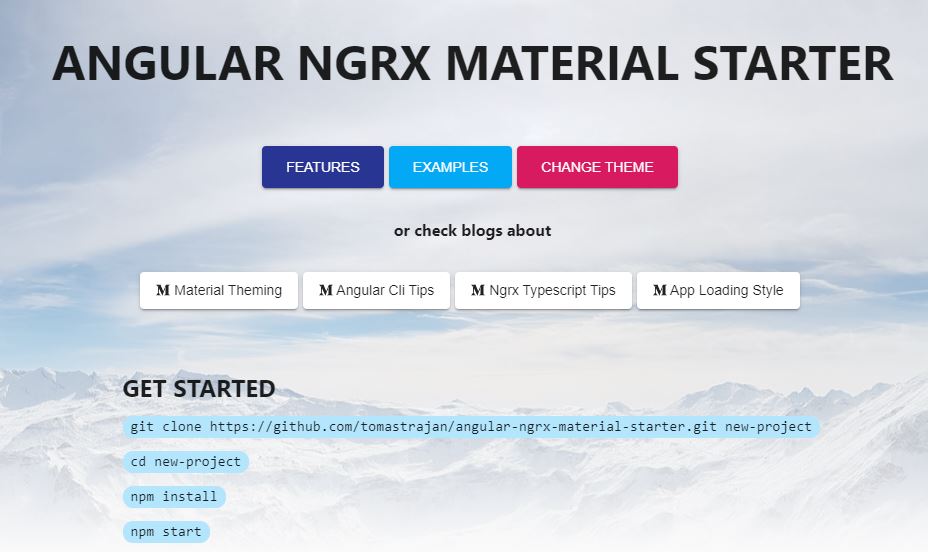
Now let’s install the UI starter project. For the demo application, I picked a project called Angular NgRx Material Starter. I think this is a good solution to use because it’s clean, neatly maintained, and provides a solid foundation for us to work off of. Additionally, I wanted to get a nice, professional-looking user experience (UX), and Angular Material provides that. Another great thing about starter kits like this is that if you have trouble understanding how to implement certain patterns or functionalities, you can just look at the code that’s already there for guidance, which is exactly what we are going to do.
Angular itself can be a daunting framework to use, and the various sub-frameworks and packages that are incorporated into it, such as Angular Material, NgRx, Reactive Forms, etc. take that complexity to a whole new level entirely. Once again, that’s why it’s great to have some working demos/examples to use as a reference, and ANMS includes those as well.
Inside the root folder for the WebApi project, we have renamed ClientApp to ClientApp-old and moved it to a different folder. Following the instructions from the above link, we now execute the following commands from a Developer Command Prompt window to install the new UI:
git clone https://github.com/tomastrajan/angular-ngrx-material-starter.git ClientApp

npm install

npm start
If all goes well, then the UI should compile and a browser window should pop up pointing to http://localhost:4200/#/about. You should see something that looks like this.
Hooray, we now have a UI!
Now comes the aggravating fun part.
First, we will customize details of the new UI to fit our project, following the guidelines on the ANMS GitHub page.
Then we will remove components and features that we don’t need, or which are not important at this point in time from the UI project. At that time, we’ll also perform other cleanup tasks, upgrade the Node packages, etc.
In a future blog post, we will splice the authentication/OIDC components into the new UI, but let’s not get too far ahead of ourselves.
The second step (cleanup) might seem trivial on the surface, but it isn’t. Since we are early on in the development process, it is crucial that we stay diligent, keeping our patterns and practices in mind, and work to manage complexity in the solution so that we don’t get bogged in minutiae and distractions that detract from our ultimate goal: to ship a working product.
“A designer knows he has achieved perfection not when there is nothing left to add, but when there is nothing left to take away.” - Antoine de Saint-Exupery
With this philosophy in mind, let’s get moving. Rather than posting copious screenshots every inch of the way, I’m just going to list out the steps that I take to get the UI into a working state. Remember those tools that I told you to download way back at the very beginning, like TextCrawler, KDiff, etc.? They come in very handy for tasks like this, as you may need to perform operations like doing a regular expression replace across files nested in directory structures or diffing two files and merging parts of one into the other. These are tools of the trade, and I recommend you familiarize yourself with them.
Customizing the UI
1. First, I follow the instructions under the “Make It Your Own” section on the ANMS GitHub page. These are pretty self-explanatory. For convenience, I’ve reposted them below:
- use search and replace functionality of your favorite IDE to replace anms with <your-app-prefix> [I did this using TextCrawler inside the OrgManager\JDS.OrgManager\JDS.OrgManager.Presentation.WebApi\ClientApp\ folder—recursively scanning through subfolders]
- rename project in package.json name property and set appropriate version (eg 0.0.0 or 1.0.0)
- remove / rename context path config -- --deploy-url /angular-ngrx-material-starter/ --base-href /angular-ngrx-material-starter in package.json, this is used to configure url (context path) on which the application will be available (eg. https://www.something.com/<context-path>/) [I removed the context path entirely because we only have one project]
- rename app in /environments/ files (will be shown in browser tab)
- delete pre-existing CHANGELOG.md (you will generate your own with future releases of your features)
- delete CODE_OF_CONDUCT.md, CONTRIBUTING.md and BUILT_WITH.md files as they are relevant only if project is open sourced on Github
- edit the title and Open Graph metadata properties in index.html
- remove or adjust links in the footer
- replace logo in /assets folder ( currently 128 x 128 pixel png file )
- adjust colors in /themes/default-theme.scss
- [NOT DOING] create a pull request in the original repository to update BUILT_WITH.md file with a link and short description of your project
2. Perform additional cleanup on ClientApp which is not specified in the above steps. This can be tedious.
- Remove .git and .github folders so that we don’t end up checking this in as a submodule, but as a folder in our own solution.
- Remove extraneous build targets that don’t make sense from project.json like “contributors:add” etc.
- Delete unnecessary files such as LICENSE, README.MD, travis files, all-contributors*, etc.
- Modify “start” target in package.json to stop “did not start listening for requests” error.
- Rather than using Google’s palettes that are provided out of the box, use a color wheel tool such as this one to come up with our own custom colors and then generate our own custom Angular Material palettes from those using this tool. Copy the custom palettes into default-theme.scss and update the primary/accent/warn variables accordingly.
- Move the contents from the “projects/<project name>” folder to the root folder of the ClientApp. Merge the tslint.json files. Delete the server/server.js file. Delete the now empty projects folder because we only have one project and don’t need it. Update paths in tsconfig.app.json and tsconfig.spec.json. Update paths in karma.conf.js. Update paths in environments/*.ts. Update package.json to remove references to the “projects” folder. Update angular.json to remove references to the “projects” folder.
- Find any remaining references to “angular-ngrx-material-starter” in our project and replace with “org-manager.”
- Update tslint.json: change quotemarks from single to double. Also change quotes from single to double in .prettierrc.
- Blow away the “features” folder/modules entirely and remove all references to it in the various Angular modules of the project. If you want, you can just cut and paste the folder somewhere else if you want to use it as a reference.
- Get rid of the references to the modules we just blew away from the app-routing.module.ts file. We’re not going to use the loadChildren() approach anyway (at least not at this time).
- Remove all internationalization features (i18n) from the project such as ngx-translate—it’s just way too much complexity at this point in our development process. Blow away the assets/i18n folder. We can add these back later if we want. Unfortunately, this means we also have to remove all calls to the “translate” pipe in remaining components and replace those with the actual text.
- Remove big-input and rtl-support components. We don’t need those at this time.
- Remove the lazy reducers and component calls to Ngrx/store (namely in app.component). It’s just too much complexity at this point and we can always add it back in later.
- Replace the default logo with something we create in Paint.NET. It’s not forever—we will be replacing it with an actual component at some point.
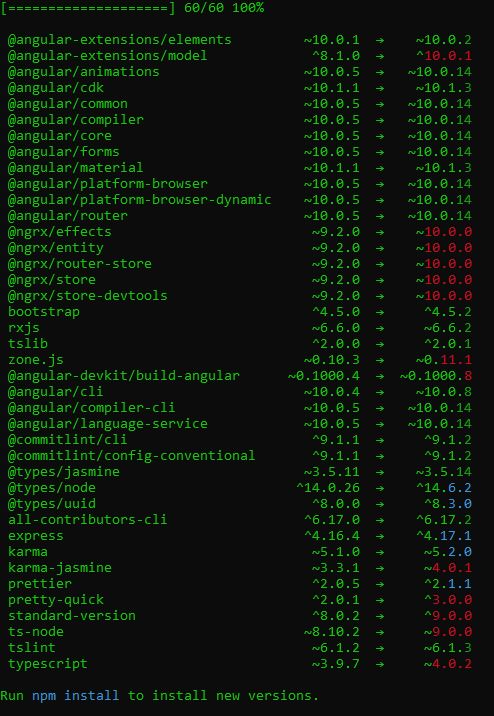
Finally, it’s a good idea to update all Node packages.
pm install -g npm-check-updates

ncu -u

npm install
You should see some output like the following:
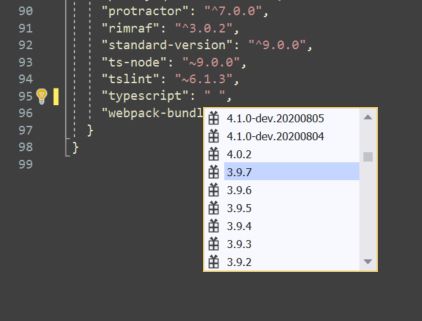
After doing this, we should definitely do an npm run build inside the ClientApp folder to make sure that we didn’t break the UI by updating all the packages.
Guess what? We broke Typescript!

Fortunately, we can locate the offending package and downgrade it to the prior version. Visual Studio provides IntelliSense for this, which is really nice.
Are We There Yet?
At the end of this long slog we should *hopefully* have a barebones UI that looks something like this:
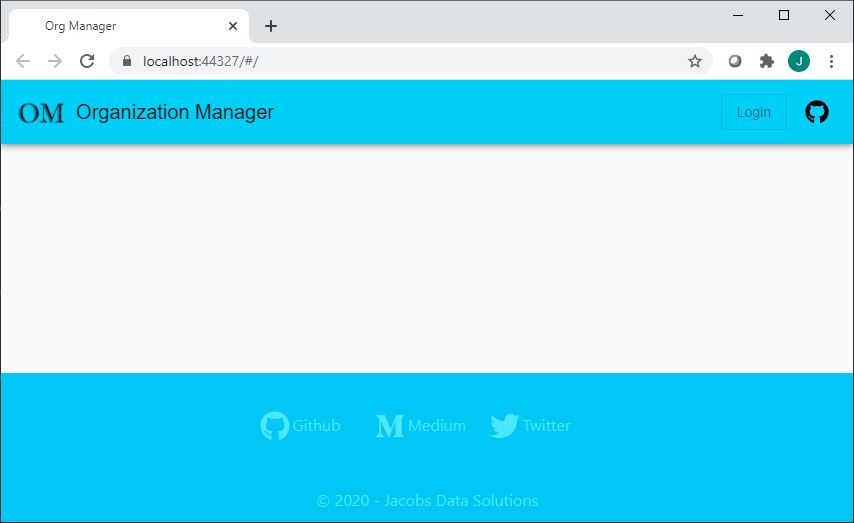
It doesn’t look like much. In fact, it doesn’t look like anything—it’s just a header, a footer, and an empty space in the middle where the Angular router outlet resides. There is no authentication/authorization. We’ve also removed some power features such as translations, ngrx/store, lazy child module loading, and so on. However, these are basically UI optimizations which are not necessary at this point and will only distract us from our primary goal, which is to use the UI as a vehicle to drive development of our web application (back end API) while we focus on building functionality around our Domain layer. That’s our game plan in a nutshell, and this is a good place to stop.
Conclusion
In this blog entry I demonstrated how to set up a basic ASP.NET Web Application project in a Visual Studio 2019 solution using their out-of-the-box Angular template. Then I showed how to replace the scaffolded Angular UI with a starter project from Github, with the intent that we can save some time, have a working code base as a reference, and get some features “for free” without having to proverbially reinvent the wheel. Finally, I gave some insight into how to customize the UI by updating certain configuration elements and removing features, kind of like what a sculptor does when they create their artworks through a process of subtraction. Hopefully this tedious process has left us in a better place, and we can get back to building the bulk of our solution. Going forward, we will look to start adding features back in and evolving the UI alongside our Web API as we work to meet the business needs of our fictional client.
Experts / Authorities / Resources
UI Frameworks
Tools
Tomas Trajan
- Angular, NgRx, Angular CLI & Angular Material Starter Project, by Tomas Trajan
- Tomas Trajan (Medium)
- Tomas Trajan (GitHub)
- Tomas Trajan (Twitter)
More Information
- Single Page Application (Wikipedia)
This is entry #1 in the Scaffold Your Clean DDD Web App Series
If you want to view or submit comments you must accept the cookie consent.