
Scaffold Your Clean DDD Web Application - Part 2: Authentication and Identity
- Posted in:
- Scaffold Clean DDD Web App
- ASP.NET Core
- C#
- Visual Studio
- Angular

Image by PublicDomainPictures from Pixabay
Introduction
In my previous blog entry we left off with a Web API project that doesn’t really do anything, and a UI that has been stripped of all non-essential features and is essentially bare bones. In this entry, we’ll start to add in more structural elements, namely the authentication components of the UI and Identity Model classes in our Web API. Fortunately, ASP.NET Core and Visual Studio do a lot of this work for us via scaffolding tools. Our main concern is to take this auto-generated code, modify it where needed, and move it into the appropriate layers of our Clean Architecture solution, namely the Infrastructure and Presentation layers.
Step 1: Relocate and Customize the Identity Model Classes
As you can see by looking at Solution Explorer, ASP.NET Core has generated a few different components automatically.
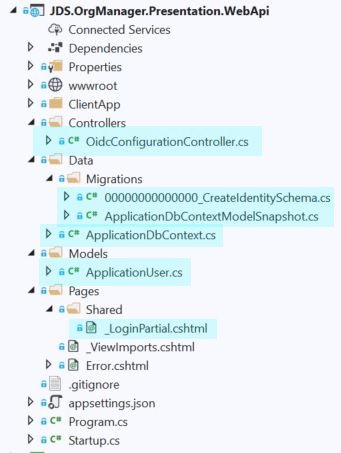
These include a login partial view, OIDC controller, and Entity Framework Core classes which represent the data model for Identity. As in previous versions of ASP.NET, an ApplicationUser class is also added which inherits from IdentityUser, but otherwise has no properties. This class is a hook, or extension point, from which we can provide additional properties for users of the application, and which will be persisted to the database which we will generate from our EF Core Identity model.
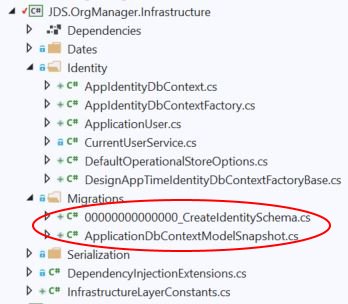
In keeping with our Clean DDD approach, it doesn’t make sense to keep the Identity Model classes in the Web API project, as that represents our Presentation layer, and Identity is not a Presentation concern. The next logical step, then, is to move these classes into the Infrastructure project. Obviously, we will change the namespaces of those classes along the way, and we will add in additional helper classes to integrate with Entity Framework Core.
As part of this transition, we’ll be adding in some more NuGet packages, as well, namely those having to do with ASP.NET Core Identity, though now is a good time to toss in MediatR as well.
Rather than talk about each change in excruciating detail, I’d suggest you simply look at the code yourself on GitHub, which you can access here. By clicking on the link to the commit corresponding to this blog entry, you can see a nice diff of the code changes.
There is one design decision worth mentioning, however, which is changing the data type of the Id column of the AspNetUsers table. Without getting too deep into the weeds, this is the table which corresponds to the Identity model’s IdentityUser class, and which gets created by EF Core migrations.
Pay attention: this is important. By default, the ApplicationUser class inherits from IdentityUser, which itself is basically equivalent to IdentityUser<string>. That generic parameter specifies the data type of the primary key. By default, ASP.NET Core Identity uses a string (varchar(450)) and slams a GUID (Globally Unique Identifier) in there for each user that signs up. This doesn’t work for our use case, because we will be using the user ID as a member of a composite primary key on a number of tables (such as the TenantAspNetUsers table, once we get to that point), and there are hard restrictions imposed by SQL Server on the size of primary keys. For this and other reasons that will become clear as we evolve the solution, we must change the ID type from string to int.
We do this by changing the declaration of the ApplicationUser class from this:
    public class ApplicationUser : IdentityUser
    {
    }
to this:
    public class ApplicationUser : IdentityUser<int>
    {
    }
On the surface it seems like a trivial change, however, we have fundamentally changed the referential structure of our data schema going forward, and this has wide-reaching design implications for the architecture of the entire solution. As I stated at the very beginning, there is no silver bullet in software development. One downside to this decision is that it will make it harder to maintain data consistency across database boundaries (i.e. referencing the same ASP.NET Core user in multiple tenant databases). However, being able to use the user ID in composite primary keys is well worth that cost. Furthermore, there is nothing stopping us from adding a non-key GUID column alongside the integer user ID.
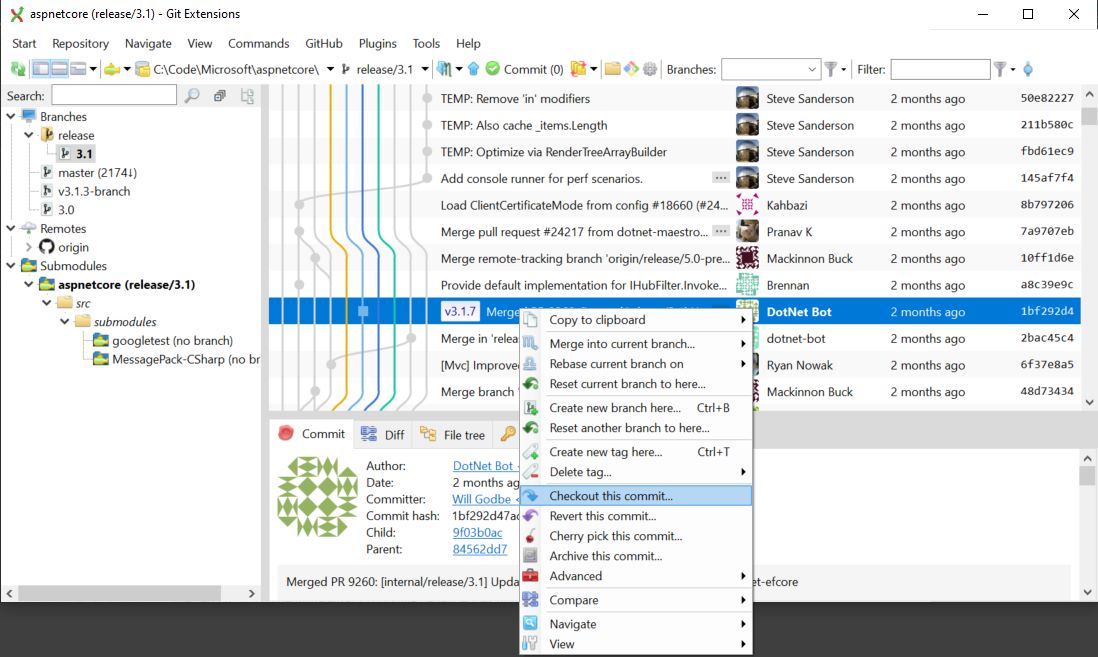
There’s another pain point associated with this change. Since the default Identity DbContext that ASP.NET Core scaffolds for us derives from ApiAuthorizationDbContext, it still expects IdentityUser types which have a string primary key for the ID column. We need to overhaul the AppIdentityDbContext (which we renamed from ApplicationDbContext) as well. Once again, I’m not going to go into great detail, but in a nutshell all I did was look at the source code for ASP.NET Core, which you can find on GitHub here, and I customized it to fit my needs.
The source for AppIdentityDbContext has now gone from this:
    public class AppIdentityDbContext : ApiAuthorizationDbContext<ApplicationUser>
    {
        public AppIdentityDbContext(
            DbContextOptions options,
            IOptions<OperationalStoreOptions> operationalStoreOptions) : base(options, operationalStoreOptions)
        {
        }
    }
to this:
    public class AppIdentityDbContext : IdentityDbContext<ApplicationUser, IdentityRole<int>, int>, IPersistedGrantDbContext
    {
        private readonly IOptions<OperationalStoreOptions> _operationalStoreOptions;

        public DbSet<DeviceFlowCodes> DeviceFlowCodes { get; set; }

        public DbSet<PersistedGrant> PersistedGrants { get; set; }

        public AppIdentityDbContext(
            DbContextOptions options,
            IOptions<OperationalStoreOptions> operationalStoreOptions) : base(options)
        {
            _operationalStoreOptions = operationalStoreOptions;
        }

        Task<int> IPersistedGrantDbContext.SaveChangesAsync() => base.SaveChangesAsync();

        protected override void OnModelCreating(ModelBuilder builder)
        {
            base.OnModelCreating(builder);
            builder.ConfigurePersistedGrantContext(_operationalStoreOptions.Value);
        }
    }
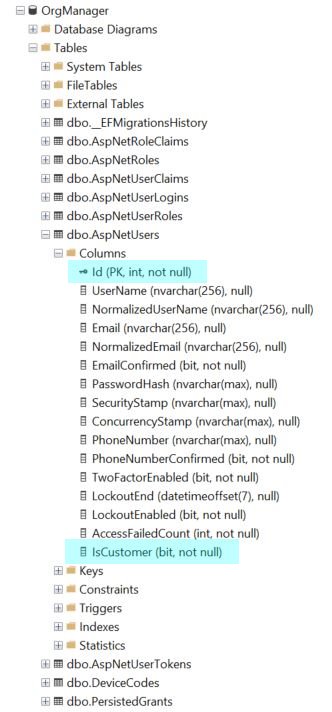
OK, great. Before moving forward, there’s one more change we’ll make, which is adding a boolean property to ApplicationUser called IsCustomer. This is the first application-specific change we’ll make to the Identity schema, but it’s important. As the application evolves, this will differentiate between paying users of our system—literally, our SaaS customers—and ordinary users of the system.
The ApplicationUser class now looks like this:
    public class ApplicationUser : IdentityUser<int>
    {
        public bool IsCustomer { get; set; }
    }
However, our work isn’t done yet. If you look at the code from the demo solution, you’ll notice that I added some EF Core helper classes like AppIdentityDbContextFactory and so on. We will be blowing away the default EF migrations that got scaffolded with our project and then using those helper classes to create new migrations from the command line. Only then will we see the database changes that we implemented by altering the ApplicationUser class.
Delete these files.
For these next steps, you’ll likely need to drop the OrgManager database and then recreate it.
Hit CTRL-B to make sure that the solution builds, then go to a developer command prompt. Inside the JDS.OrgManager.Infrastructure directory, type the following:
dotnet ef migrations add Initial
dotnet ef database update
If everything goes according to plan, you should see something like this:

and this

If we look at the database, we can see that our customizations are now reflected in the schema of the Identity tables.
Great, what’s next?
Step 2: Move the Authentication/Login Components Back Into the UI
Now that we’ve moved the Identity model classes into their proper place in the Infrastructure project and customized them to fit our needs, at least for the time being, we’re now ready to splice back in the authentication components that we set aside in the previous blog entry.
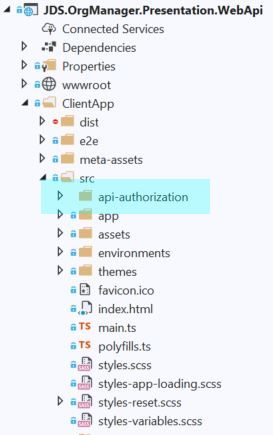
In the ClientApp-old folder that we set aside, which contains the SPA that Visual Studio created for us by default, we’ll take the api-authorization folder and copy it back in to our solution in ClientApp/src folder.
Here it is:
There are a couple more Angular-specific tweaks that are required to make this work, such as wiring these components into the core module, but I won’t go into too much detail here since these are basically just boilerplate changes. Rather, it’d be more intuitive to look at the GitHub tag that I’ve provided here so you can see a diff of those changes.
One notable change that I’ll post here is the login buttons on the app.component template. Angular Ngrx Material Starter puts placeholders there by default that don’t really do anything. Since it’s a starter kit, the point of course is that we’re supposed to wire in our own authentication components. That’s exactly what we’ll do.
This will go away:
  <button mat-button mat-stroked-button color="accent" *ngIf="!isAuthenticated" (click)="onLoginClick()">Login
  </button>

  <button *ngIf="isAuthenticated"
		  mat-icon-button
		  [matMenuTriggerFor]="toolbarUserMenu">
	<fa-icon icon="user-circle"></fa-icon>
  </button>
  <mat-menu #toolbarUserMenu="matMenu">
	<button mat-menu-item (click)="onLogoutClick()">
	  <mat-icon><fa-icon icon="power-off"></fa-icon></mat-icon>
	  <span>Logout</span>
	</button>
  </mat-menu>
and get replaced with this
  <span class="d-none d-md-inline" *ngIf="!isAuthenticated">
	<button mat-button mat-stroked-button color="accent" [routerLink]='["/authentication/login"]'>
	  Sign in
	</button>
  </span>

  <span class="d-none d-md-inline" *ngIf="isAuthenticated">
	<button mat-button mat-stroked-button color="accent" [routerLink]='["/authentication/profile"]'>
	  Profile
	</button>
	<button mat-button mat-stroked-button color="accent" [routerLink]='["/authentication/logout"]' [state]='{ local: true }'>
	  Logout
	</button>
  </span>
Now when we click on the login button…

It should take us to the standard server-hosted login page that we get by default when using the ASP.NET Core project template, like you see here:
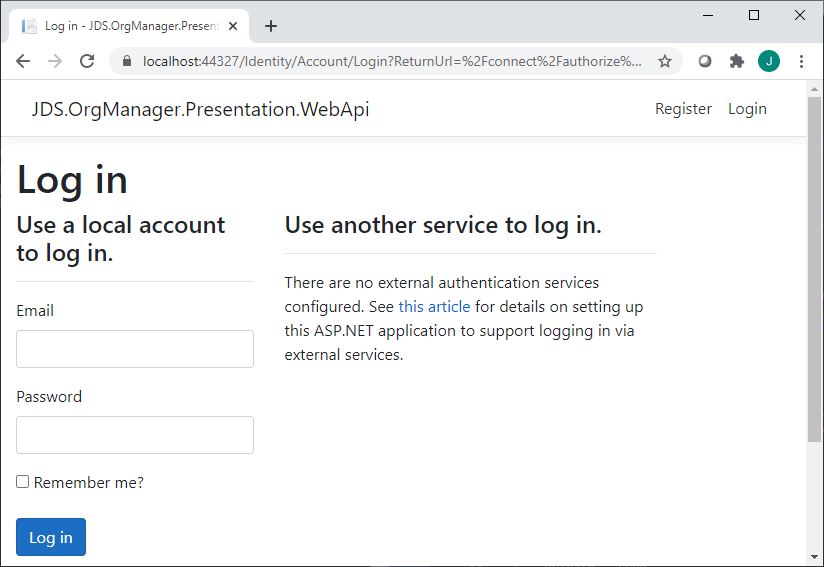
If we click on the Register link above, we should be able to navigate to the out-of-the-box ASP.NET Core registration page, like you see here:
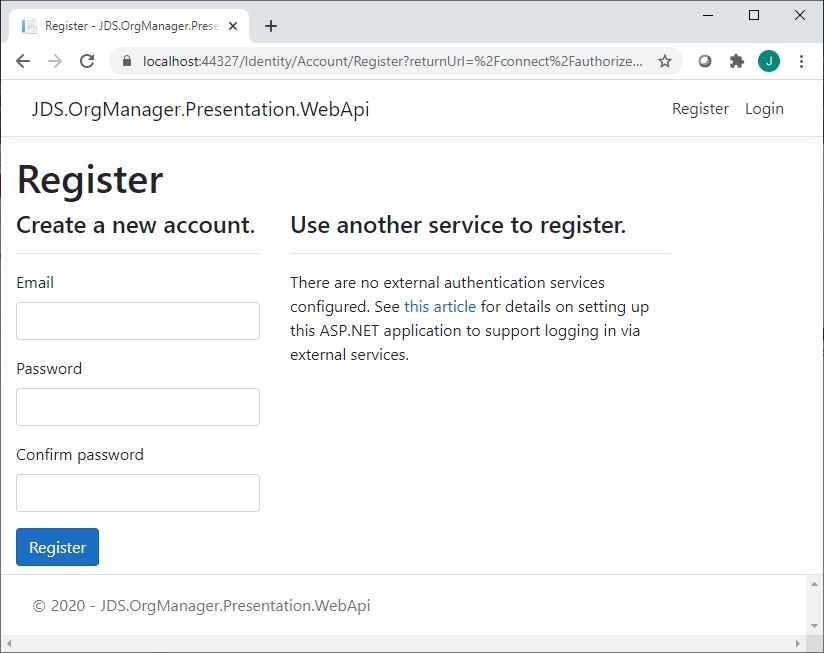
We should be able to sign up and do a fake email confirmation (since no email senders are hooked up to the solution at this point).
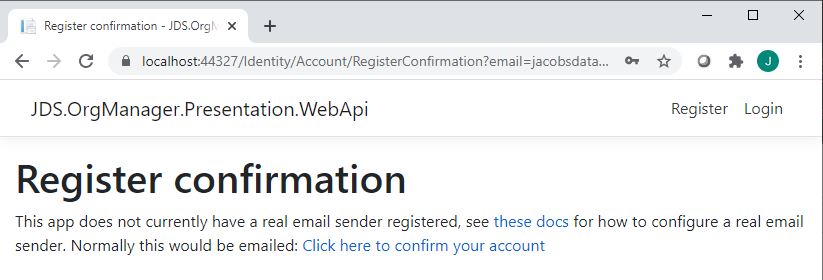
Now we can go back to the login page and login with the email/password combination that we just entered. If everything goes well, then when we go back to the root path of our application, the login buttons will have changed to show us that we’re logged in.

Congratulations! We have successfully spliced together two different UI starter kits and created a working web application that provides registration, login, and logout functionality. The look and feel still leaves a lot to be desired, but that’s okay. At this time, we’re only concerned with getting the basic functionality working. If we pay a visit to our database, we can see that, indeed, our test user was persisted and we are good to go.

As stated earlier, there’s a lot going on under the hood in these OIDC components, and we don’t want to reinvent the wheel (and this is a wheel that you REALLY do not want to reinvent). So instead, we have put on our application architect hats and figured out a way to create a synthesis of two different UI starters so that we can leverage their respective features that we get "for free" right out of the box.
Now, as always, this blog entry has run a little bit long. However, there’s one more trick I want to show you before we wrap up.
Step 3: Override Default Identity Views/Components
As you’ve probably figured out, the login/OIDC views and boilerplate authentication logic are baked into the Microsoft.AspNetCore.Identity.* packages that get included in the Web API project when you click on "Change" under the authentication tab in the project setup wizard. But what if you want to change these views? Or customize the login behavior? Here’s how you do that.
In a nutshell, we will be piggybacking off the instructions presented here.
Visual Studio provides the capability for us to scaffold individual Identity views and components into our solution, effectively allowing us to override the default UI and functionality that are compiled into the package.
Detour: When Everything Doesn’t Go as Planned (Or Murphy’s Law in the Real World)

Image by sdmacdonaldmiller from Pixabay
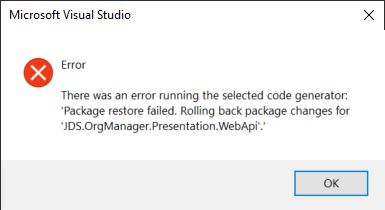
Now, just to be totally transparent with you, the steps I’m about the outline didn’t go smoothly when I was applying them to the demo application. I thought everything was pretty cut and dry, yet when I tried to scaffold the ASP.NET Identity components using Visual Studio I kept getting an uninformative error stating, "There was an error running the selected code generator: ‘Package restore failed. Rolling back package changes…’"
These sorts of situations happen all the time, even to senior developers and architects, and this is why our profession is so hard—we are frequently confronted with novel, challenging obstacles which test our problem-solving capabilities to the max and often require a markedly right-brained, or creative process to overcome them.
One approach we could take to solve this type of problem is to try to debug into Visual Studio itself, or dig through various error logs (if we’re lucky enough to have logged the error). However, that can be painful and may or may not be a good use of our time.
Words of wisdom: beware of time sinks, or fruitless activities that lead nowhere. Strive to develop an innate knowing of when to grind through to a workable solution to the problem, and when to cut losses and try something else.
Another tool in our mental toolbox could be to use heuristics, or mental shortcuts, to arrive at an answer fast. This method of problem-solving is great as long as the potential impact to the system and your business is low (i.e. you aren’t making seat-of-your-pants changes to a system in production) and also if you’re not short-changing yourself the opportunity to learn a valuable lesson. After all, your goal is to learn software development at a deeper level and not just rely on Stack Overflow for all your answers, right?
As implied above, one heuristic is to simply plug the error message into Google/Bing/Stack Overflow and see if there’s a simple solution to the problem. I tried this, and only wound up with answers that were vague, or otherwise didn’t apply to my specific scenario.
Another heuristic is to make sure everything is up to date (NuGet packages, tools, everything). I tried this approach, and it did fix the problem for me. Rather than plow through and waste a bunch of time trying to figure out what the error message really meant, fully grok the root cause and all that, I simply updated all the NuGet packages in the solution to their latest versions and then I updated Visual Studio itself to the latest version. Guess what? It worked! I was able to start scaffolding components again, and all in all it took maybe 20-30 minutes to get back on track.
![]() Pro tip: when something breaks or isn’t working that otherwise seems straightforward, the first question you should ask yourself is, "What changed?" In this case, the NuGet package versions apparently had been updated to a newer version and were out of sync with the version of Visual Studio I was using.
Pro tip: when something breaks or isn’t working that otherwise seems straightforward, the first question you should ask yourself is, "What changed?" In this case, the NuGet package versions apparently had been updated to a newer version and were out of sync with the version of Visual Studio I was using.
If the above tactic didn’t work out for me, which is actually what I was expecting at first, then I was fully prepared to go back into the ASP.NET Core source code that I pulled off of GitHub and start copying in the necessary views and classes manually. As a matter of fact, you should be comfortable doing this yourself, because you’re likely to find yourself in situations in which you need to customize parts of the framework (like what I did with the ApiAuthorizationDbContext toward the beginning of this blog entry) and there may or may not be tools to help you with this. It’s not as hard as you think; just figure out the version numbers of the packages that you’re using in your solution and then look for the git tag corresponding to that version in the code repository, like what I’ve shown here. Check out that commit, find the code you’re looking for, and you’re good to go.
![]() Pro tip: when confronted with a seemingly insurmountable obstacle, a proverbial brick wall, as it were, trying to go over it or through it may not be the best way. Sometimes you need to take a step back from the problem ("sleep on it") and then ask yourself if there isn’t a way around it.
Pro tip: when confronted with a seemingly insurmountable obstacle, a proverbial brick wall, as it were, trying to go over it or through it may not be the best way. Sometimes you need to take a step back from the problem ("sleep on it") and then ask yourself if there isn’t a way around it.
Back on Track. Scaffolding the Registration Page
Now that I’ve talked about what can go wrong, let’s focus on the workflow when everything is running smoothly. While there are a large number of components that you can scaffold into your solution, as you can see from the screenshot below, the only one that we’re concerned with right now is the Registration page. That’s because later on we will modify it in order to make it differentiate between two different types of users: customers (paying users of the system) and ordinary employees.
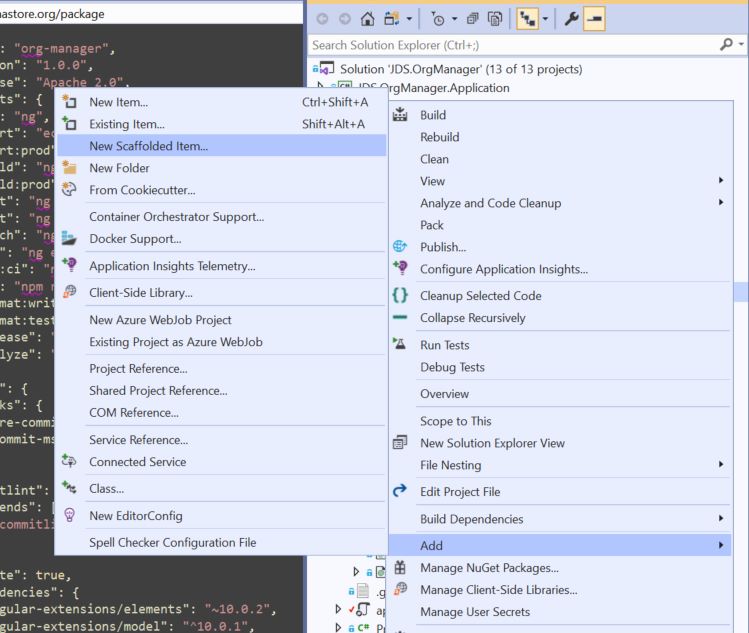
So, the first step is to right click on the Web Api project in the solution, and select "Add->New Scaffolded Item" from the context menu, like this:
From there, we select "Add Layouts for Razor Pages" to add the standard shared partial views to the project. Note that we only need to do this once for our solution, and we won’t be repeating this step when we start scaffolding in additional components.
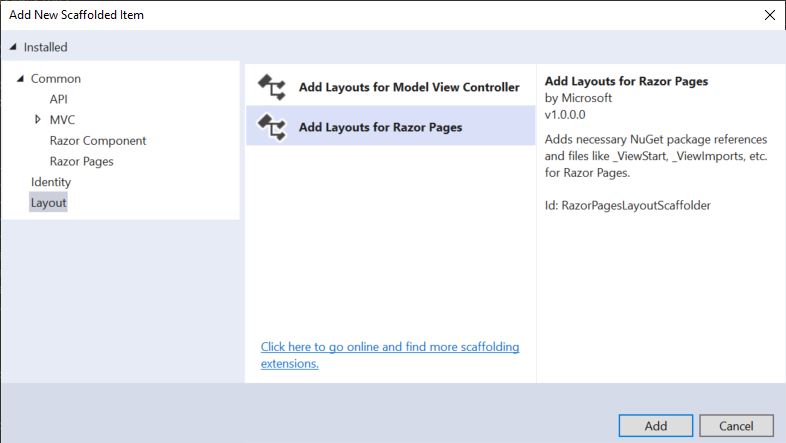
Keep the "Generate layout page" checkbox checked and click "Add."

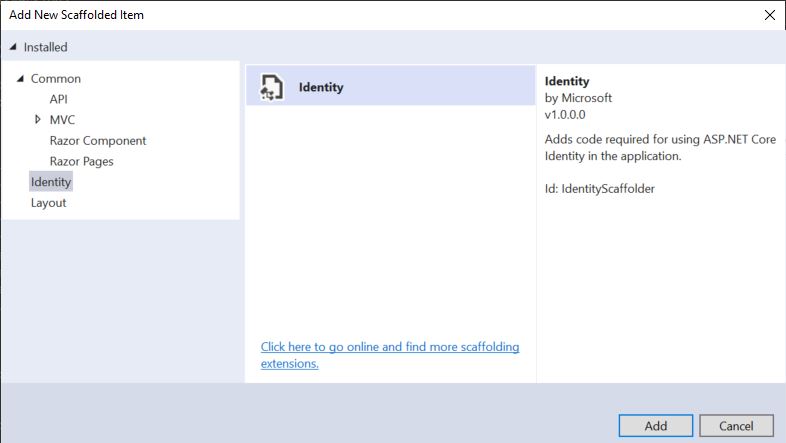
Next, right click on the project again and select "Add->New Scaffolded Item" from the context menu just like before. This time, however, select the Identity tab from the left, select "Identity" from the menu, and click "Add."
Select the proper layout page and EF Core Identity DB Context, as seen below, and click "Add." Just to be clear, I moved around some of the views before doing this just as a matter of personal preference.
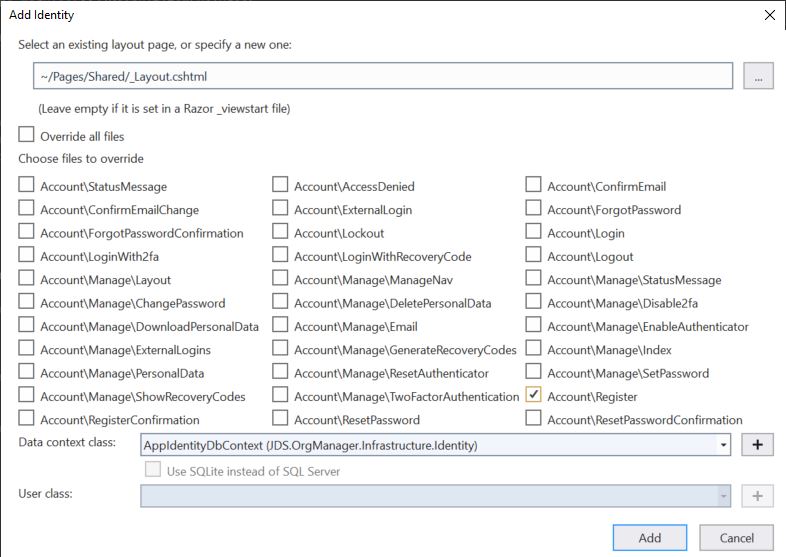
If everything has gone according to plan, then you should now have a new nested folder structure under "Areas" within the Web Api project, along with some Razor import files, partial views, and our now customizable Registration view.

All in a day’s work.
Conclusion
In this blog entry I first showed how to move the auto-generated identity classes and EF Core database context out of the Web Api project, and into the Infrastructure project. I demonstrated how you can customize those pieces for your own solution, such as changing the AspNetUsers primary key type from string (varchar) to int. This is extremely important, because there is never a one-size-fits-all path in software development, and we are trying to prepare our solution for more complex use cases in the future, such as including the user ID as part of a composite primary key.
Next, I showed how to move the auto-generated api-authorization Angular components back into the UI and wire them up to the login/logout/register workflow of the user interface. This is an important step because, again, we don’t want to have to do tedious work that’s been done a million times before in other projects.
After that, I talked about what can go wrong when using automated scaffolding tools and attempted to impart some of my wisdom regarding how to go about solving software problems in general.
Finally, I went through the process of scaffolding the Registration page and associated Razor pages and components using the "Add New Scaffolded" Item wizard.
That’s plenty for now, and hopefully the next few steps for building out our application will go a little more smoothly. Happy coding!
Housekeeping Matters
I’m aware that I use a lot of expressions and mannerisms in my writing that are particular to native speakers of English, and especially Americans. Some of my readers, people from Germany, for example, may come across an expression like "no silver bullet" and immediately understand what I mean since that phrase comes from a common cultural heritage that we share (in this particular example, it refers to stories of mythological creatures called ‘werewolves’ that date as far back as the middle ages, or earlier). However, people from other parts of the world may read that phrase and have no idea what I’m talking about. You may wonder what the heck bullets made of silver have to do with software development. If this is the case, and if there’s any confusion in any section of these blog entries as to what I’m trying to say, please feel free to leave a polite comment in the comment section asking for clarity, or message me directly, and I’ll do my best to explain.
Experts / Authorities / Resources
Microsoft
Other
- Werewolf (Wikipedia)
This is entry #2 in the Scaffold Your Clean DDD Web App Series
If you want to view or submit comments you must accept the cookie consent.