
Scaffold Your Clean DDD Web Application - Part 3: Persistence, Tenancy, and the Data Model
Introduction
In the previous blog entry, we started to add back in our authentication components. We’re going to pick up the pace a little bit and try to knock out more structural/boilerplate code so we can get back to the fun stuff—building out the Application layer workflows and Domain business logic, and playing around in the cloud with Microsoft Azure.
In this blog entry we will evolve our solution and the data model behind it, so that we can begin to see how user requests and interactions operate against a multitenant system. We’ll start by refactoring the persistence interfaces and implementations to make the solution more scalable in a split-stack CQRS architecture. Alongside this change, I’ll show you how you can use both Dapper and Entity Framework Core inside a single transaction/unit of work. Then we’ll add some new EF Core entities corresponding to the tenants and customers of our SaaS product. Finally, we’ll perform some cleanup across the data model classes so that the Persistence layer is more robust.
Caveat emptor: some of the approaches I’ll be using here may deviate from the canonical or "textbook" way of implementing these features that you may see in different tutorials and guides on the Web. In some cases, that’s because we’re just trying to get something working, and we’ll be revisiting that functionality more in-depth in the future. In other cases, the canonical approach may be too tedious or involve a prohibitively frustrating amount of boilerplate code and configuration which is simply not worth it for our demo application. I’ll try to make clear when and why I’m breaking from convention in these situations, though it’s impossible to cover everything.
Related to this point, there may be changes to the demo app that I just don’t have time to go over in exhaustive detail. That’s why I encourage you to take a look at the actual code and also, if you have any helpful suggestions, don’t hesitate to let me know.
First Things First: Understand Our Multitenant Architecture and High-Level Approach
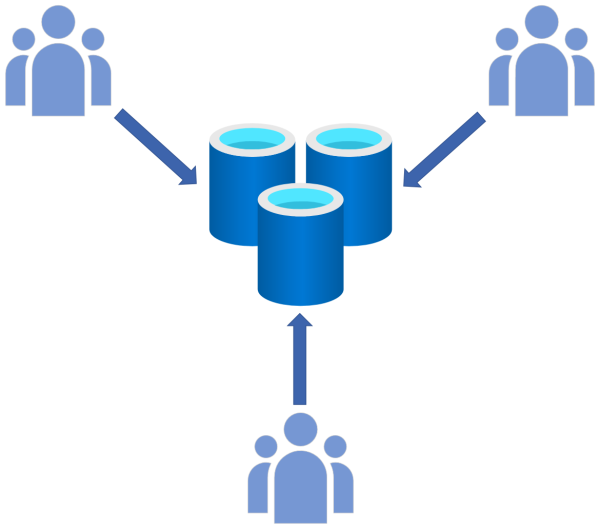
Before reading ahead, it’d be worthwhile for you to revisit some of the concepts I outlined in the blog entry called Monoliths, Microservices, and Multitenancy, as these will certainly apply to what I’m about to lay out. In particular, I’d like to talk about the high-level multitenant architecture of the application. As stated in that blog entry, our end goal with the demo app is to fully implement Template D: Single Application, Multiple Sharded Multitenant Databases.
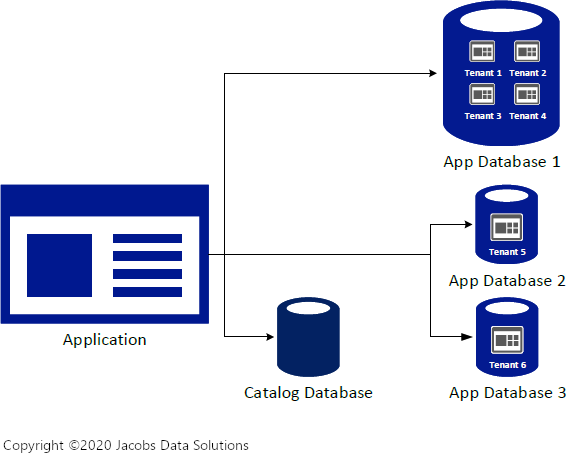
However, rather than going straight for that design, I’m going to punt on this (American football term) and initially implement it as Template B: Single Application, Single Multitenant Database.

This is not to say that we won’t be using the former design in the future—we definitely will, especially as the need to scale starts to become urgent. However, at this point we’ll be starting off more simply, because:
- Our fictional client is yelling at us to get something finished and up in the cloud so that they can see why they’re paying us.
- Having a high-level understanding of where we ultimately want to be, we can consciously and appropriately build out the Application layer in such a way that it WILL scale in the future, once we need to make the shift to multiple application databases. For now, it will remain database agnostic, which is to say, unconcerned and unaware of which application database it is actually talking to.
- As long as we abide by robust patterns and practices, we can manage complexity in the present while preserving the flexibility to break apart our data model and corresponding data persistence abstractions and implementations into separate schemas down the road, which is the plan.
Great, so with that design consideration out of the way, let’s talk about one more concern at a high level before we dig into the code. As stated in that previous blog entry, we decided that tenant ID absolutely should be part of the composite primary key of every single table which contains tenant data—i.e. intra-tenant tables.
However, an extremely impactful design decision must be made early in the development lifecycle regarding whether to have tenant ID come before ID in the composite primary key, or vice versa.
As the database experts in this Stack Exchange question point out, neither approach is perfect, and we must weigh the pros/cons of each before committing to a decision. This is critically important (and weighing this decision now is NOT premature optimization), as we don’t want to be changing the fundamental architecture of our application databases when the system is already in production and then have to deal with customer data migration issues.
As the Stack Exchange answer explains,
- Having the ID first in the index before the tenant ID will cause interleaving of data from separate clients within the same data page, along with data page contention issues, locking issues, etc.
- Conversely, having the tenant ID first can cause parameter sniffing issues, index fragmentation, etc.
The "best practice" for ordering of composite primary key columns is to place the most selective columns first, which would be a vote for option (A). However, to make the best decision for our application, we should ask ourselves what the most common use cases of the application will be. Will it be likely that users of the application will be making queries against the database that cut across tenant boundaries, for example querying ALL employees across ALL tenants? The answer is NO, absolutely not. We anticipate that 95% of the time users of the application will only be making queries against a single tenant. There might be some automated processes or power user functionalities which may cut across tenants, but that is the exception to the rule. We are willing to pay the cost of doing more index maintenance and/or de-parameterizing our queries around the tenant ID if necessary, because we are considering the majority use case. We will go with option (B).
Refactoring the Data Persistence Abstractions and Implementations
Now that we have that decision out of the way, let’s keep pushing ahead and make the necessary updates to our data schema, Application layer abstractions, and Persistence layer implementations based upon our chosen course of action.
We’ll start by refactoring our data persistence classes and interfaces, starting out in the Application layer and then moving into the Persistence layer.
We’ll be renaming our data persistence interfaces, and corresponding implementations, using the convention IApplication[Read|Write]Db[Context|Facade]. So, for example, IApplicationWriteDbContext or IApplicationReadDbFacade. This is much more meaningful than our previous naming convention (i.e. IOrgManagerDbQueryFacade) because it conveys:
- That the implementation is pointing to an application (client) database, and NOT the tenant master database, which we’ll build out later.
- That the implementation is pointing to either a read-only or read/write database. Remember when I introduced Clean DDD and CQRS, and I mentioned splitting the database into one or more read-only databases and one read/write database? We are now making a bold step in that direction. Starting out, we’re still only going to have one database. However, our calling code inside the CQRS workflows won’t know that. Because we are programming to abstractions, not concretes, whatever is behind those interfaces doesn’t matter and our solution will still scale. The only caveat is that a single CQRS command or query may never talk to both the read database and the read/write database inside a single workflow/unit of work (see diagrams below). If a CQRS command needs to hydrate domain entities from an application database to do its work (which very obviously will be the case), then it needs to read that data from the read/write database. Think back to Ghostbusters: Don’t cross the streams.
- That the implementation is either using Entity Framework Core ("Context") or Dapper ("Facade"). This is also visible just by examining the properties and methods of each respective interface. Unfortunately, it is difficult to prevent those abstractions from leaking, as the underlying persistence technologies are so radically different. However, it’s still imperative that we keep them behind interfaces so that we have flexibility in switching out the databases behind them, or even having no database behind them at all, which will be the case in unit test scenarios.
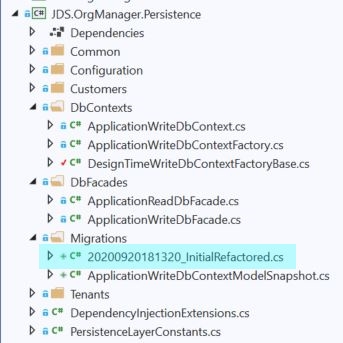
Our persistence interfaces now reside here in the Application layer project:
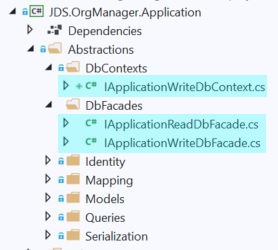
And the source code for each of them is as follows.
IApplicationWriteDbContext:
public interface IApplicationWriteDbContext
{
    IDbConnection Connection { get; }
    DbSet<CurrencyEntity> Currencies { get; }
    DatabaseFacade Database { get; }
    DbSet<EmployeeManagerEntity> EmployeeManagers { get; }
    DbSet<EmployeeEntity> Employees { get; }
    bool HasChanges { get; }
    DbSet<PaidTimeOffPolicyEntity> PaidTimeOffPolicies { get; }
    EntityEntry Entry(object entity);
    EntityEntry<TEntity> Entry<TEntity>(TEntity entity) where TEntity : class;
    Task<int> SaveChangesAsync(CancellationToken cancellationToken);
}
IApplicationReadDbFacade:
public interface IApplicationReadDbFacade
{
    Task<IReadOnlyList<T>> QueryAsync<T>(string sql, object param = null, IDbTransaction transaction = null, CancellationToken cancellationToken = default);
    Task<T> QueryFirstOrDefaultAsync<T>(string sql, object param = null, IDbTransaction transaction = null, CancellationToken cancellationToken = default);
    Task<T> QuerySingleAsync<T>(string sql, object param = null, IDbTransaction transaction = null, CancellationToken cancellationToken = default);
}
IApplicationWriteDbFacade:
public interface IApplicationWriteDbFacade : IApplicationReadDbFacade
{
    Task<int> ExecuteAsync(string sql, object param = null, IDbTransaction transaction = null, CancellationToken cancellationToken = default);
}
Right off the bat, there are some obvious changes that you might notice from the previous code implementation. For one, we have split the Dapper DB facade into two interfaces, as described above. The write DB facade derives directly from the read DB facade, which means that it can do everything that the read DB facade can, except it’s connecting to the read/write database instead of the read database. This is important, as we want to have the flexibility to perform queries against the read/write database.
Also, you’ll notice that the methods exposed on both of the DB facades now accept an IDbTransaction as an optional parameter. In CQRS commands and other units of work against the read/write database, we would like to be able to use both Entity Framework Core AND Dapper inside the same database transaction. This is a sophisticated design pattern. However, we want our system to be great, right? We want to have the flexibility to easily query the read/write database or perform sweeping updates such as complex delete operations. Dapper provides this. At the same time, we want the convenience of being able to update the database using aggregate objects, without worrying so much about the relationships between the underlying tables. Entity Framework Core provides this.
A picture (or four) is worth a thousand words, so here are a couple of diagrams showing what our new persistence interfaces and implementations look like, and how they communicate with the databases.
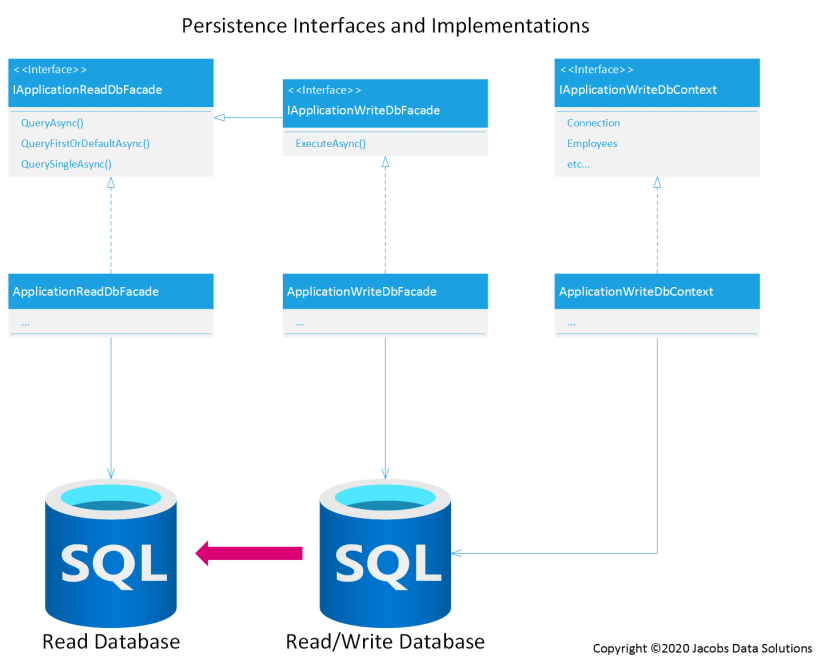
It’s a no-brainer to just have IApplicationWriteDbFacade inherit from IApplicationReadDbFacade, since it will share the same query methods. However, the implementation of that interface will be connected to the read/write database, NOT the read database.
Next, you can see that all CQRS queries will use IApplicationReadDbFacade to query data from the read database.
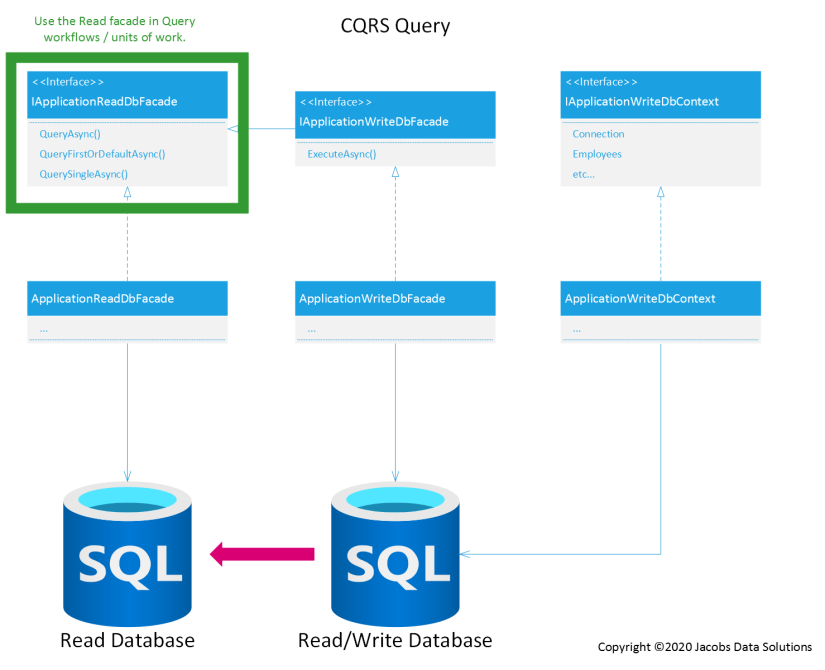
There are a couple of points to make here:
- There is no
IApplicationReadDbContext. Why? This is a design decision on my part to only use Dapper to read data from the read database, and not use EF Core at all for query operations. There’s nothing to stop us from changing course and writing LINQ queries against such a context at some later point, but for now let’s keep it simple and use Dapper to get the job done. IApplicationReadDbFacadealways connects to the read database, never the read/write database. The read database is assumed to be a faithful snapshot of the read/write database, which happens through eventual consistency. Now, as stated earlier, at this point in time the read database and the read/write database are one and the same. However, we don’t want to paint ourselves into a corner as the solution scales, so we enforce a division between the two early on by intentionally separating our persistence components in this way.
On to the CQRS commands…
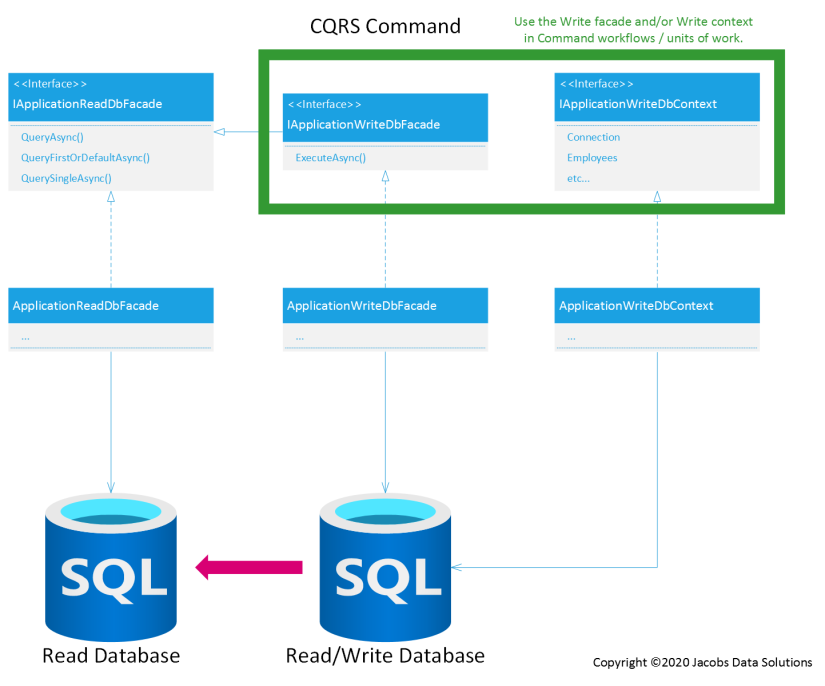
You’ll notice a little more flexibility on the write side of the stack. It’s a design decision particular to each individual CQRS command workflow whether to inject IApplicationWriteDbFacade, IApplicationWriteDbContext, or both. Either the DB facade or the DB context can be used to read data from the read/write database in addition to updating the database. This works great and provides the ultimate in versatility, as long as both are connected to the same database.
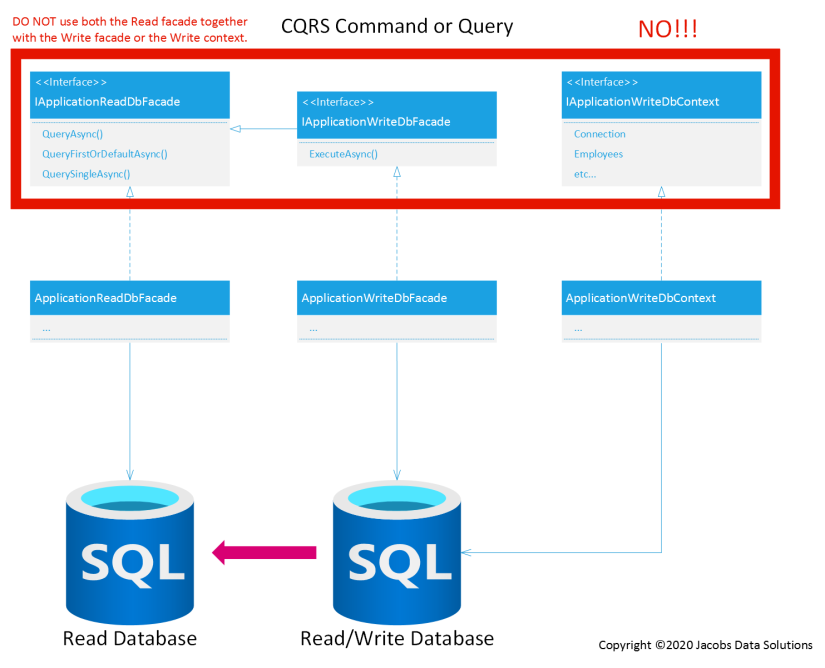
DO NOT DO THIS:
Egon: Don’t cross the streams.
Peter: Why?
Egon: It would be bad.
Peter: I’m fuzzy on the whole good/bad thing. What do you mean "bad"?
Egon: Try to imagine all life as you know it stopping instantaneously and every molecule in your body exploding at the speed of light.
Raymond: Total protonic reversal.
Peter: That’s bad. Okay. Alright, important safety tip, thanks Egon.
- Ghostbusters
I know it sounds like I’m beating a dead horse here, but I want to drive home the point that it’s a really bad idea to rely upon persistence components which could conceivably be connected to entirely separate data stores within the same transaction. I’ve actually witnessed errors in corporate systems that were caused by this exact anti-pattern—a lag of just a few milliseconds, even between databases in the same SQL Server availability group, could be enough to cause data inconsistency and hose the logic in your CQRS command. Don’t do it. Furthermore, as the application scales, how will we even know that whatever implementation is behind IApplicationReadDbFacade is even connected to a database? There could be some other kind of storage technology, like a caching layer, sitting behind it. If that’s the case, then there would be a huge disparity between what you’re reading from and writing to the data store.
This is all well and good on paper, but there’s a small catch—EF Core and Dapper don’t necessarily play nice together, or at the very least they weren’t designed with this use case in mind. That’s why we’ve decided to expose more EF Core details in IApplicationWriteDbContext, such as the Database property, and unfortunately it will take a small amount of trickery to make them work together since EF Core uses a different transaction class. Without getting too far ahead of ourselves, here’s what such an implementation might look like in practice:
public MyCommandHandler(
    IApplicationWriteDbContext context,
    IApplicationWriteDbFacade facade
{
    this.context = context ?? throw new ArgumentNullException(nameof(context));
    this.facade = facade ?? throw new ArgumentNullException(nameof(facade));
}

public async Task<MyViewModel> Handle(MyCommand request, CancellationToken cancellationToken)
{
    ...
    using (var transaction = await context.Database.BeginTransactionAsync())
    {
        var sqlTransaction = transaction.GetDbTransaction();
        await facade.ExecuteAsync(
            @"DELETE FROM Tenants WHERE …", null, sqlTransaction);
        await context.Tenants.AddAsync(tenantEntity);
        await context.SaveChangesAsync();
        await transaction.CommitAsync();
    }
    return ...
}
Once again, the above is a contrived example, but it shows how this can be accomplished in practice. Using Dapper and Entity Framework Core together in the same transaction is an incredibly powerful technique and provides a great deal of flexibility. We can have our cake and eat it too.
Cleaning Up and Enhancing the Data Model
As it stands, we have a TenantId column on various application database tables, and it is part of the clustered primary index, which is great (once again, this enforces a hard division between tenants and helps prevent leakage of tenant-specific data across tenant boundaries). What’s missing, though, is the ability to manage tenants themselves. We’re going to remedy that deficiency of the data model with the addition of three new EF Core entities/database tables:
Customers– Maintains information about the paying customers of our SaaS product.Tenants– Maintains information about each tenant itself, including an "assignment key" (basically a GUID which will be used to aid in adding employees to the system), a slug (URL fragment which we will be using to route users to the proper tenant in Angular), and a reference to the customer who owns the tenant.TenantAspNetUsers– A join table which specifies which users of the system have access to each tenant. The many-to-many relationship represented by this table is necessary because we don’t want to assume that each user will only have access to a single tenant. For example, what if a certain user is an employee of multiple companies? Or an employee of one but an administrator of several of them? These are possible real-life scenarios that we want to be prepared for.
Here’s what our new EF Core entities look like for those tables.
public class CustomerEntity : AuditableDbEntity, IAddressEntity
{
    public string Address1 { get; set; }
    public string Address2 { get; set; }
    public int AspNetUsersId { get; set; }
    public string City { get; set; }
    public int? CompanyId { get; set; }
    public CurrencyEntity Currency { get; set; }
    public string CurrencyCode { get; set; }
    public string FirstName { get; set; }
    public int Id { get; set; }
    public string LastName { get; set; }
    public string MiddleName { get; set; }
    public string State { get; set; }
    public ICollection<TenantEntity> Tenants { get; set; }
    public Title? Title { get; set; }
    public string Zip { get; set; }
    public CustomerEntity()
    {
        Tenants = new HashSet<TenantEntity>();
    }
}

public class TenantEntity : AuditableDbEntity
{
    public ICollection<TenantAspNetUserEntity> AspNetUsers { get; set; }
    public Guid AssignmentKey { get; set; }
    public CustomerEntity Customer { get; set; }
    public int CustomerId { get; set; }
    public ICollection<EmployeeEntity> Employees { get; set; }
    public int Id { get; set; }
    public string Name { get; set; }
    public string Slug { get; set; }
    public TenantEntity()
    {
        Employees = new HashSet<EmployeeEntity>();
        AspNetUsers = new HashSet<TenantAspNetUserEntity>();
    }
}

public class TenantAspNetUserEntity : IDbEntity
{
    public int AspNetUsersId { get; set; }
    public TenantEntity Tenant { get; set; }
    public int TenantId { get; set; }
}
We’ll also need to update the DB context and add EF configuration classes for these entities. While we’re at it, we’ll clean up the other configuration classes as well. What we implemented before was fine for a first pass, yet we can do better. Before looking at the new code and my explanation of changes, take a look at the EmployeeEntityConfiguration class as we had initially implemented it, and see if you can make a list of code smells or areas of improvement that are present.
public class EmployeeEntityConfiguration : ConfigurationBase<EmployeeEntity>
{
    public override void Configure(EntityTypeBuilder<EmployeeEntity> builder)
    {
        base.Configure(builder);
        builder.HasKey(e => new { e.TenantId, e.Id });
        builder.Property(e => e.Id).UseIdentityColumn();
        builder.Property(e => e.Address1).HasMaxLength(50);
        builder.Property(e => e.Address2).HasMaxLength(15).IsRequired(false);
        builder.Property(e => e.City).HasMaxLength(30);
        builder.Property(e => e.CurrencyCode).HasMaxLength(3);
        builder.Property(e => e.FirstName).HasMaxLength(25);
        builder.Property(e => e.LastName).HasMaxLength(25);
        builder.Property(e => e.MiddleName).HasMaxLength(25).IsRequired(false);
        builder.Property(e => e.PtoHoursRemaining).HasColumnType("decimal(18,4)");
        builder.Property(e => e.Salary).HasColumnType("decimal(18,4)");
        builder.Property(e => e.SocialSecurityNumber).HasMaxLength(11);
        builder.Property(e => e.State).HasMaxLength(2);
        builder.Property(e => e.Zip).HasMaxLength(10);

        builder.HasOne(e => e.Currency).WithMany();
        builder.HasOne(e => e.PaidTimeOffPolicy).WithMany().HasForeignKey(e => new { e.TenantId, e.PaidTimeOffPolicyId });
    }
}
Do you have your list? OK, let’s see how we can improve this. See if your list is similar to mine.
- What stands out the most? The most glaring issue, in my opinion, is the numbers. Magic numbers, that is. This is a code smell as old as high-level programming languages. Each of the string properties which are calling the
HasMaxLength()fluent configuration method has a hard-coded numerical length. We should be using constants here. In the new implementation, as you’ll see, we’ve created aLengthsstatic class, and we will be using the constant field lengths across both EF Core entities and Application layer validation classes. This lends a robustness to our code and consistency across the data model. For example, you may be looking at an address column in a particular table and you will be assured that it is the same length as any other address column in any other table. - There’s a similar problem with the decimal type properties, such as
PtoHoursRemaining. Hard coding the column type asdecimal(18,4)is not robust. These magic values must also be replaced with constants. - Properties which don’t require a time component should have their column type explicitly specified also, so we’ll create a constant for SQL date and set that as the SQL type for properties like
DateHired, etc. Note that properties which require a time component (such as theCreatedUtcproperty) will get implemented asDateTime2in the database by default, so there’s nothing we need to change there. - The properties corresponding to primary key columns—
TenantIdandId—should be clearer about how their values are generated. More specifically, theIdcolumn should be an identity column, which means that SQL Server will generate those values incrementally for us. On the other hand, theTenantIdcolumn should not be an identity column—we must always provide that value. We’ll add fluent method calls to the configuration class to make this explicit to EF Core.
Here’s a better implementation of the EmployeeEntityConfiguration class.
public class EmployeeEntityConfiguration : ConfigurationBase<EmployeeEntity>
{
    public override void Configure(EntityTypeBuilder<EmployeeEntity> builder)
    {
        base.Configure(builder);
        builder.HasKey(e => new { e.TenantId, e.Id });
        builder.Property(e => e.TenantId).ValueGeneratedNever();
        builder.Property(e => e.Id).UseIdentityColumn().ValueGeneratedOnAdd();
        builder.Property(e => e.Address1).HasMaxLength(Lengths.Address1).IsRequired();
        builder.Property(e => e.Address2).HasMaxLength(Lengths.Address2);
        builder.Property(e => e.City).HasMaxLength(Lengths.City).IsRequired();
        builder.Property(e => e.CurrencyCode).HasMaxLength(Lengths.CurrencyCode).IsRequired();
        builder.Property(e => e.FirstName).HasMaxLength(Lengths.FirstName).IsRequired();
        builder.Property(e => e.LastName).HasMaxLength(Lengths.LastName).IsRequired();
        builder.Property(e => e.MiddleName).HasMaxLength(Lengths.MiddleName);
        builder.Property(e => e.PtoHoursRemaining).HasColumnType(PersistenceLayerConstants.SqlDecimalType);
        builder.Property(e => e.Salary).HasColumnType(PersistenceLayerConstants.SqlDecimalType);
        builder.Property(e => e.SocialSecurityNumber).HasMaxLength(Lengths.SocialSecurityNumber);
        builder.Property(e => e.State).HasMaxLength(Lengths.State).IsRequired();
        builder.Property(e => e.Zip).HasMaxLength(Lengths.Zip).IsRequired();

        builder.Property(e => e.DateOfBirth).HasColumnType(PersistenceLayerConstants.SqlDateType);
        builder.Property(e => e.DateHired).HasColumnType(PersistenceLayerConstants.SqlDateType);
        builder.Property(e => e.DateTerminated).HasColumnType(PersistenceLayerConstants.SqlDateType);

        builder.HasOne(e => e.Currency).WithMany().OnDelete(DeleteBehavior.NoAction).HasForeignKey(e => e.CurrencyCode);
        builder.HasOne(e => e.Tenant).WithMany(e => e.Employees).HasForeignKey(e => e.TenantId);
        builder.HasOne(e => e.PaidTimeOffPolicy).WithMany().OnDelete(DeleteBehavior.NoAction).HasForeignKey(e => new { e.TenantId, e.PaidTimeOffPolicyId });
    }
}
Applying the Data Model Changes
OK, great. The data model is looking much better, however we have one more task to complete before we wrap up, which is to add the new Entity Framework Core code migration so that our changes are reflected in the database schema. We could apply the changes as a new migration on top of the previous migration. However, these are sweeping enhancements to the data model, and since our system isn’t yet in production, we’ll blow away the previous migration and create these as an entirely new primary code migration.
From a Developer Command Prompt, inside the JDS.OrgManager.Persistence folder, we execute the following commands:
dotnet ef database update 0
dotnet ef migrations remove
dotnet ef migrations add InitialRefactored
If all goes well, then the new migration will be added.
We’re not done yet though. I’ll now show you how to manually add foreign key relationships to our freshly-scaffolded migration, so that we have relationality between the ASP.NET Core identity tables, namely AspNetUsers, and our application tables, such as Customers and TenantAspNetUsers. The approach I’ll demonstrate is the only viable way to accomplish this, unfortunately, because we really don’t want to mess around with having the same tables inside both the identity DB context and the application DB context, and as far as I know, there is no way for EF Core to create relationships between tables in separate contexts via configuration.
You may be a little skeptical and say that we have violated the separation of Persistence and Infrastructure concerns by doing this, and you would be right. However, the intent is that this is a non-permanent design decision which can stay in place until we are ready to break apart the database into separate application databases, tenant master databases, identity, etc.
Developer commentary: I’ve actually fought religious wars over whether to use foreign keys at all, or to exclude them entirely. While there may be some perceived merits to not having them, my perspective is this: consciously choosing to NOT use foreign keys in an application database, especially when you’ve also committed to using an ORM like EF Core, is an incredibly myopic and bone-headed decision, for which you will pay dearly in both time and money as your solution scales. Foreign keys are guard rails which preserve the integrity of your customers’ data, and that data is the single most important asset of any information organization. I’d go so far as to say that it’s even debatable what kind of a performance boost, if any, you would hypothetically gain from leaving out foreign keys since now there’s no index on those columns that you’re joining against. For more information on this, I suggest you read SQL Antipatterns, by Bill Karwin, specifically the chapter entitled "Keyless Entry."
OK, getting back on track. We’re going to manually add foreign key relationships between the AspNetUsers table and our application tables, knowing full well that they will probably go away at some point when we split the database into separate schemas. That’s perfectly fine. The idea is that they will support us during this phase of development.
Under the "migrations" folder in the JDS.OrgManager.Persistence project, there should be a file there called 20200920182315_InitialRefactored.cs or something like that. This is the migration added by EF Core. Unlike the auto-generated files that get created by typical scaffolding tools in the Microsoft stack, these are meant to be modified by you, the developer. Partial classes aren’t necessary, just go in and start modifying the code.
First, we’ll modify the Up() method. This gets called when applying the migration to the database. At this point in time, one of the major shortcomings of EF Core is that there is no good way to declaratively specify the ordering of columns in the tables that get created for each entity. It seems to default to putting the key columns first, which is fine, but then it orders the other columns alphabetically, with inherited properties appearing first. By convention, I like to have the audit columns—CreatedBy, LastUpdatedBy, etc.—last in the table. So, for each of the tables that have them, unfortunately we need to manually reorder them in each call to the CreateTable() method. Do you remember my discussion of productivity features of Visual Studio way back when? Hotkeys come in handy for this. We’ll highlight the four rows in the method call corresponding to the audit columns and move them down to the bottom using ALT + Down Arrow.
Now we’ll manually create the foreign key relationship to AspNetUsers, which we accomplish inside the constraints lambda expression with another call to table.ForeignKey().
When we’re done, it should look like this:
migrationBuilder.CreateTable(
    name: "Customers",
    columns: table => new
    {
        Id = table.Column<int>(nullable: false)
            .Annotation("SqlServer:Identity", "1, 1"),
        Address1 = table.Column<string>(maxLength: 50, nullable: false),
        Address2 = table.Column<string>(maxLength: 15, nullable: true),
        AspNetUsersId = table.Column<int>(nullable: false),
        City = table.Column<string>(maxLength: 30, nullable: false),
        CompanyId = table.Column<int>(nullable: true),
        CurrencyCode = table.Column<string>(maxLength: 3, nullable: false),
        FirstName = table.Column<string>(maxLength: 25, nullable: false),
        LastName = table.Column<string>(maxLength: 35, nullable: false),
        MiddleName = table.Column<string>(maxLength: 25, nullable: true),
        State = table.Column<string>(maxLength: 2, nullable: false),
        Title = table.Column<int>(nullable: true),
        Zip = table.Column<string>(maxLength: 10, nullable: false),
        CreatedBy = table.Column<string>(maxLength: 10, nullable: false),
        CreatedUtc = table.Column<DateTime>(nullable: false),
        LastModifiedBy = table.Column<string>(maxLength: 10, nullable: true),
        LastModifiedUtc = table.Column<DateTime>(nullable: true),
    },
    constraints: table =>
    {
        table.PrimaryKey("PK_Customers", x => x.Id);
        table.ForeignKey(
            name: "FK_Customers_Currencies_CurrencyCode",
            column: x => x.CurrencyCode,
            principalTable: "Currencies",
            principalColumn: "Code");
        // JDS
        table.ForeignKey(
            name: "FK_Customers_AspNetUsers_AspNetUsersId",
            column: x => x.AspNetUsersId,
            principalTable: "AspNetUsers",
            principalColumn: "Id");
    });
Near the end of the Up() method, we must also add an index as well.
// JDS
migrationBuilder.CreateIndex(
    name: "IX_Customers_AspNetUsersId",
    table: "Customers",
    column: "AspNetUsersId");
We’ll have to repeat this process for a few other tables, like Employees and TenantAspNetUsers. Once we’re done, we can apply our modified schema to the database.
Hit CTRL + B to see if the solution builds, and then at the command line type:
dotnet ef database update
If we look at the schema in SQL Server Management Studio, we can see that our updates to the database have been applied.
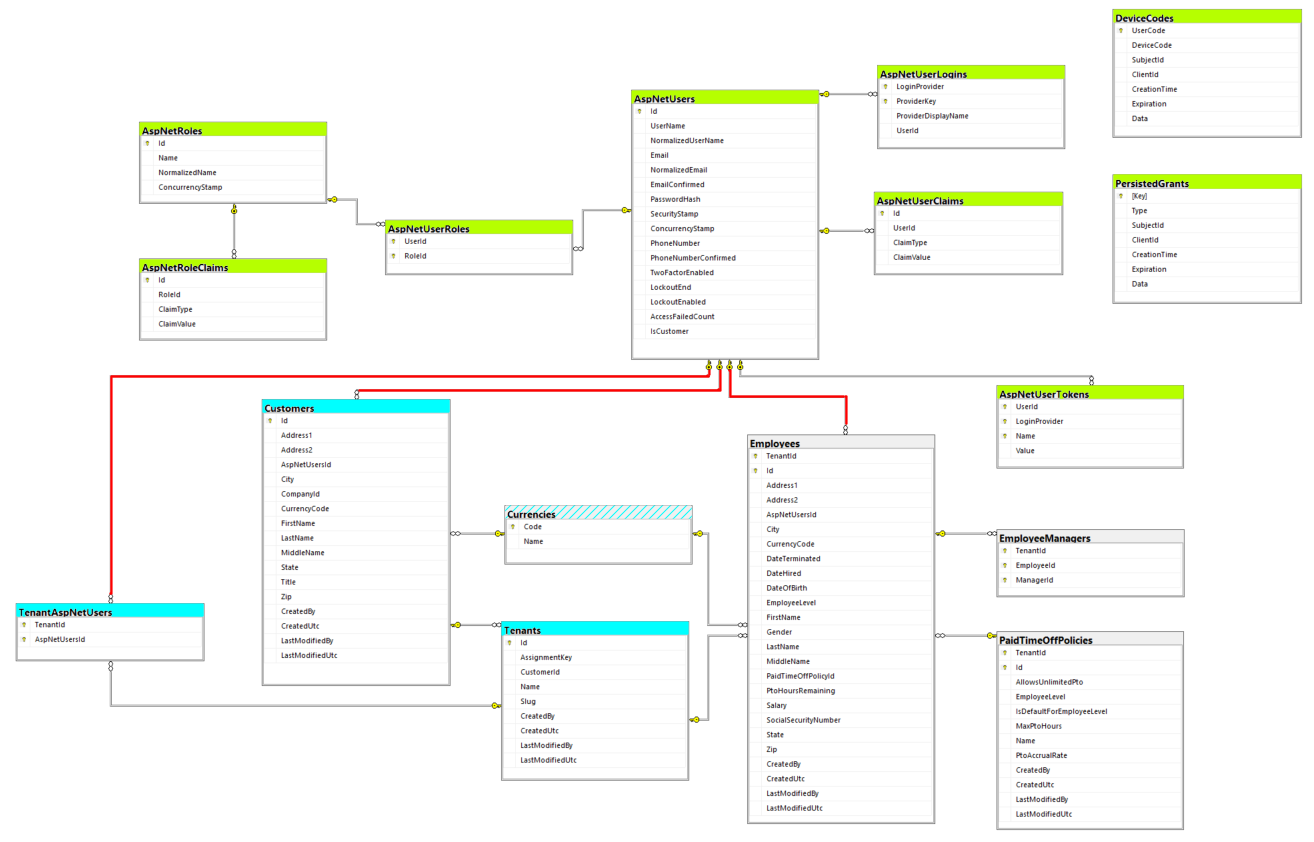
I’ll make a few comments about the schema, and then we’ll wrap up. I added color highlighting to the tables to help clarify.
- The ASP.NET Core Identity tables are highlighted in green. These are associated with
AppIdentityDbContextand the migrations in the Infrastructure project. - The new tables that we added to the application DB context are highlighted in light blue. As the solution evolves, we’ll see that these belong to their own special bounded context, which we can just refer to as Customers/Billing for the time being. What’s interesting to note is that these all operate outside the bounds of any individual tenant. They represent a supra-tenant area of our data model, and at this point in time it doesn’t make sense to add domain entities corresponding to these tables to the Domain layer since we’re only going to perform CRUD operations against them (though that will probably change down the road, depending on how complex the billing logic needs to be).
- The original application tables—
Employees,EmployeeManagers,PaidTimeOffPolicies—have been left in gray. If you’ve been following along from previous blog entries, you’ll recall that these correspond to the Human Resources bounded context. These represent the intra-tenant area of our data model that I mentioned earlier, and you should notice thatTenantId: -
- is a member of every one of those tables.
- is part of the corresponding composite primary key for each of those tables.
- is also a member of every single foreign key relationship between intra-tenant tables.
- Read that last sentence again and make sure you fully understand what I’m trying to get across. The point is that the business logic which will ultimately be dependent upon those tables will have no idea that it’s operating inside of a tenant. In other words, that business logic will be tenant agnostic. Toward that end, we’re enforcing those tenant boundaries all the way down to the core of our data model, in both primary and foreign keys. This will make for a more robust solution and preserve data integrity going forward.
- The foreign key relationships that we manually added are highlighted in red. We’ll keep these in mind as the solution grows just so that we’re aware that they’re provisional and may go away at some point.
The data model is starting to look like something, and we’re ready to move on.
Conclusion
We started out by revisiting the different multitenant architectural templates and declaring which ones we were going to implement, namely Template D: Single Application, Multiple Sharded Multitenant Databases via Template B: Single Application, Single Multitenant Database. Then we again discussed the topic of the ordering of columns in the clustered primary index, specifically, whether TenantId should come first in intra-tenant tables. We decided that it should, even though there could some performance issues down the road—the benefit is worth the cost. Next, we refactored the database interfaces and abstractions, breaking them up into read/write varieties and further dividing them into "facades" (Dapper) and "contexts" (Entity Framework Core). I talked about why it’s a really bad idea to use read facades in a CQRS command/write unit of work ("crossing the streams"). I mentioned how we can use Dapper and EF Core together in the same transaction, and why it’s beneficial to do so even though they are technologies which might seem to be orthogonal at first blush. We cleaned up the EF Core entity configuration files, making the relationships and constraints clearer and also removing magic values, which increases the maintainability of the code. Finally, we modified the EF Core code migration that we previously added by hand in order to create foreign key relationships between application and identity tables in the database, as well as reorder the columns of our tables. It was a lot of work, but our application is starting to shape up.
Experts / Authorities / Resources
Stack Exchange
Tools
Bill Karwin
- SQL Antipatterns (Book)
This is entry #3 in the Scaffold Your Clean DDD Web App Series
If you want to view or submit comments you must accept the cookie consent.