
Supercharge Your Software Engineering Laptop
Introduction
In this blog entry, I'm going to take a break from talking about software engineering topics and instead discuss computer hardware. Specifically, I'm going to provide a detailed walkthrough of how I upgraded the RAM and Solid State Drive on my LG Gram ultrabook. As I stated at the very beginning, the computer that you use for your software development work matters. I chose to purchase the LG Gram 17" 2019 model [no affiliate relationship with LG at this time] because it's a rockin' laptop for software engineers. The original laptop came with 16GB of RAM and a 256GB SSD, which I thought was upgradable to 20GB and 512GB, respectively. Little did I know, the laptop supports much more, and there is a popular modification out on the Internet to upgrade the RAM to 40GB and SSD to 1TB using high-quality Samsung components! For a few hundred bucks more and a moderate time investment, it was a deal I couldn't refuse!
In what follows, I'll provide the steps I took to perform this mod on my laptop. Even if you don't have this same laptop, or are running on a desktop, you may still benefit from learning about the process I underwent to do the upgrade, the preparations I took, and potential pitfalls to avoid. Hopefully, this guide will help you develop a solid process for your computer hardware projects.
Disclaimer
I'm a software engineer by profession. I don't claim to be the foremost expert on computer hardware. I'm just a humble nerd and, like you, I do a lot of research and reading of blogs. In that vein, let me state vociferously that I will not be held liable for any damages or losses, financial or otherwise, that you incur as a result of following the guidance provided in this blog entry. I've done my best to identify best practices but at the end of the day, YOU are responsible for your own equipment.
Words of Wisdom
"Words of wisdom: Drop that zero and get with the hero." -Vanilla Ice
What follows are some pieces of sage advice that you may or not may find on other blogs or YouTube videos regarding this modification. I've saved you the effort of having to dig through the comment sections.
- What I describe here applies to the LG Gram 17" 2019 model. You can similarly modify the LG Gram 17" 2020 model, however, the specs are newer so you'll need to use different hardware. Specifically, the 2020 model supports 3200Mhz RAM, whereas the 2019 model supports slower 2666Mhz RAM.
- The RAM and SSD inside the 2021 model of the Gram are soldered onto the mainboard, so that model is NOT upgradeable. As far as I know, more than a few people have complained to LG about this.
- As soon as you pull the backplate off of your laptop, you've voided the warranty. Just something to be aware of. Since I have the 2019 model, I don't care because my laptop is already two years old.
- Changing out the components in your laptop WILL affect the heat profile of your computer and the battery life as well. This is a given because laptops have a small form factor, and the trade-off for that small size, especially in a thin laptop like the LG Gram, is that it's extremely difficult to manage the heat generated by various components such as the SSD. Laptops don't have the luxury of extra space to mount heat sinks, etc. Everything is compact and every square centimeter has to count.
- Building off of point #4, depending on the particular RAM and SSD that you decide to put in you may experience unexpected performance, as components will down-throttle to prevent hardware damage if they get too hot. In extreme cases, components may simply cook outright, though IMHO that's more likely to happen with older hardware. After modding your laptop, you may need to take additional measures like purchasing a laptop cooling pad to help manage the additional heat generated.
- Benchmarking certain hardware components such as your SSD will decrease the life of those components. Just so you're aware. CrystalDiskMark, for example, gives you this warning.
- The RAM chip you purchase must be laptop RAM (DDR4 SODIMM). Regular form RAM chips for desktop computers won't work.
- The SSD should be NVMe M.2 2280, PCIe generation 3.0. My research indicates that PCIe 4.0 will NOT work, as laptops don't currently support this and an additional heat sink would be required anyway, which wouldn't fit inside a laptop.
Credit Where Credit Is Due
In performing this upgrade of my laptop, I primarily followed the instructions from a blog entry by technologist Jay Chen, however, there are several other great resources out there such as PC World, Tom's Hardware, r/laptops, r/techsupport, or r/buildapc. There are also some great YouTube videos out there, such as this one by TinkerForward.
The Parts
I purchased the parts from Jay Chen's blog post, which seems to be what most people use for this mod. These are:
- Samsung 970 EVO Plus 1TB Solid State Drive (SSD)
- Samsung 32GB DDR4 2666MHz RAM Memory Module for Laptop Computers
- iFixit Essentials Toolkit (optional)
[At the time of this writing, I don't have any affiliate relationships with the products or vendors mentioned.]
Pre-preparation
Do not pass GO. Do not collect $200. Before doing anything to your computer, here are a few essential steps that most hardware tutorials overlook. However, you'll be really glad you did them.
Preliminary Step 1: Back Your S*** Up
It should go without saying: back your stuff up. Your important data. Your pictures. Your
Preliminary Step 2: Create Emergency Rescue/Repair Media
If you are on Windows 10, follow these instructions, to create an ISO bootable USB thumb drive. You must have a USB thumb drive with a minimum of 8GB (16 is better). There are alternative guides you can follow here or here, as well as any number of third-party tools to create bootable rescue media. The point is to have an emergency reinstallation/repair method available in case something goes wrong.
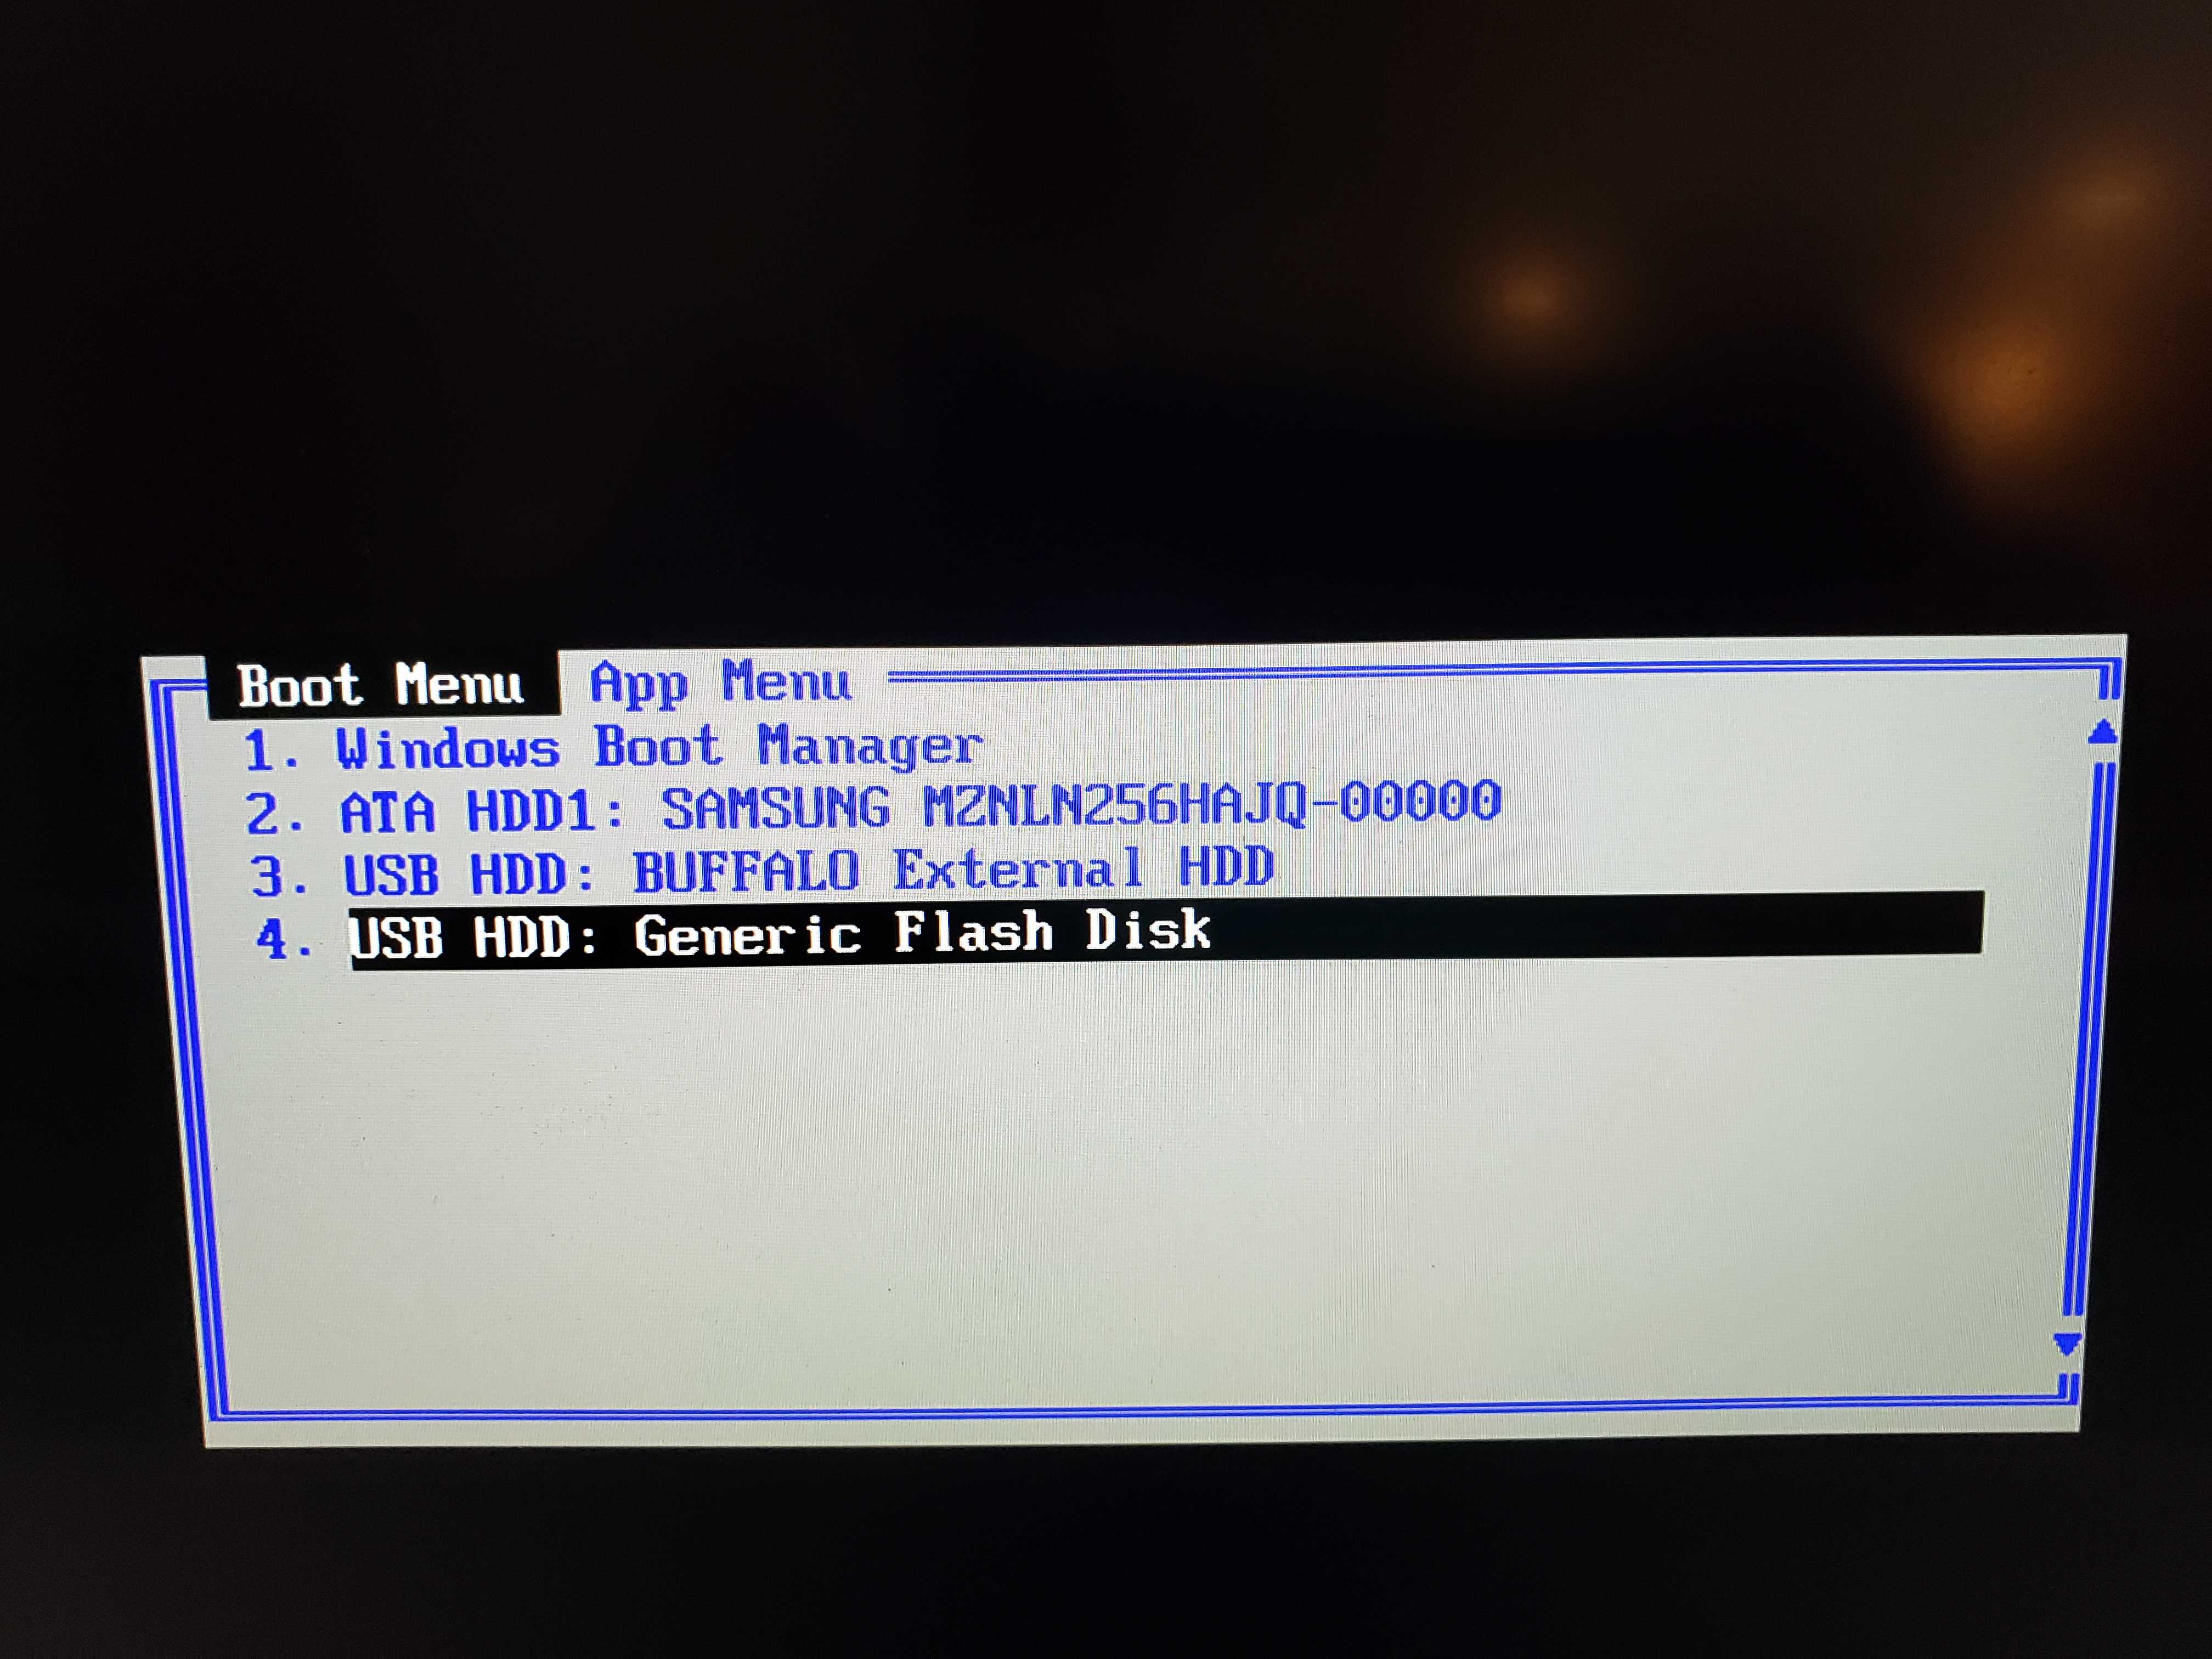
After you have created your emergency restore USB, leave it plugged in and reboot your computer to test it to make sure it works. Hold F10 during the boot sequence to get to the Windows 10 boot menu. It should look like what you see below.
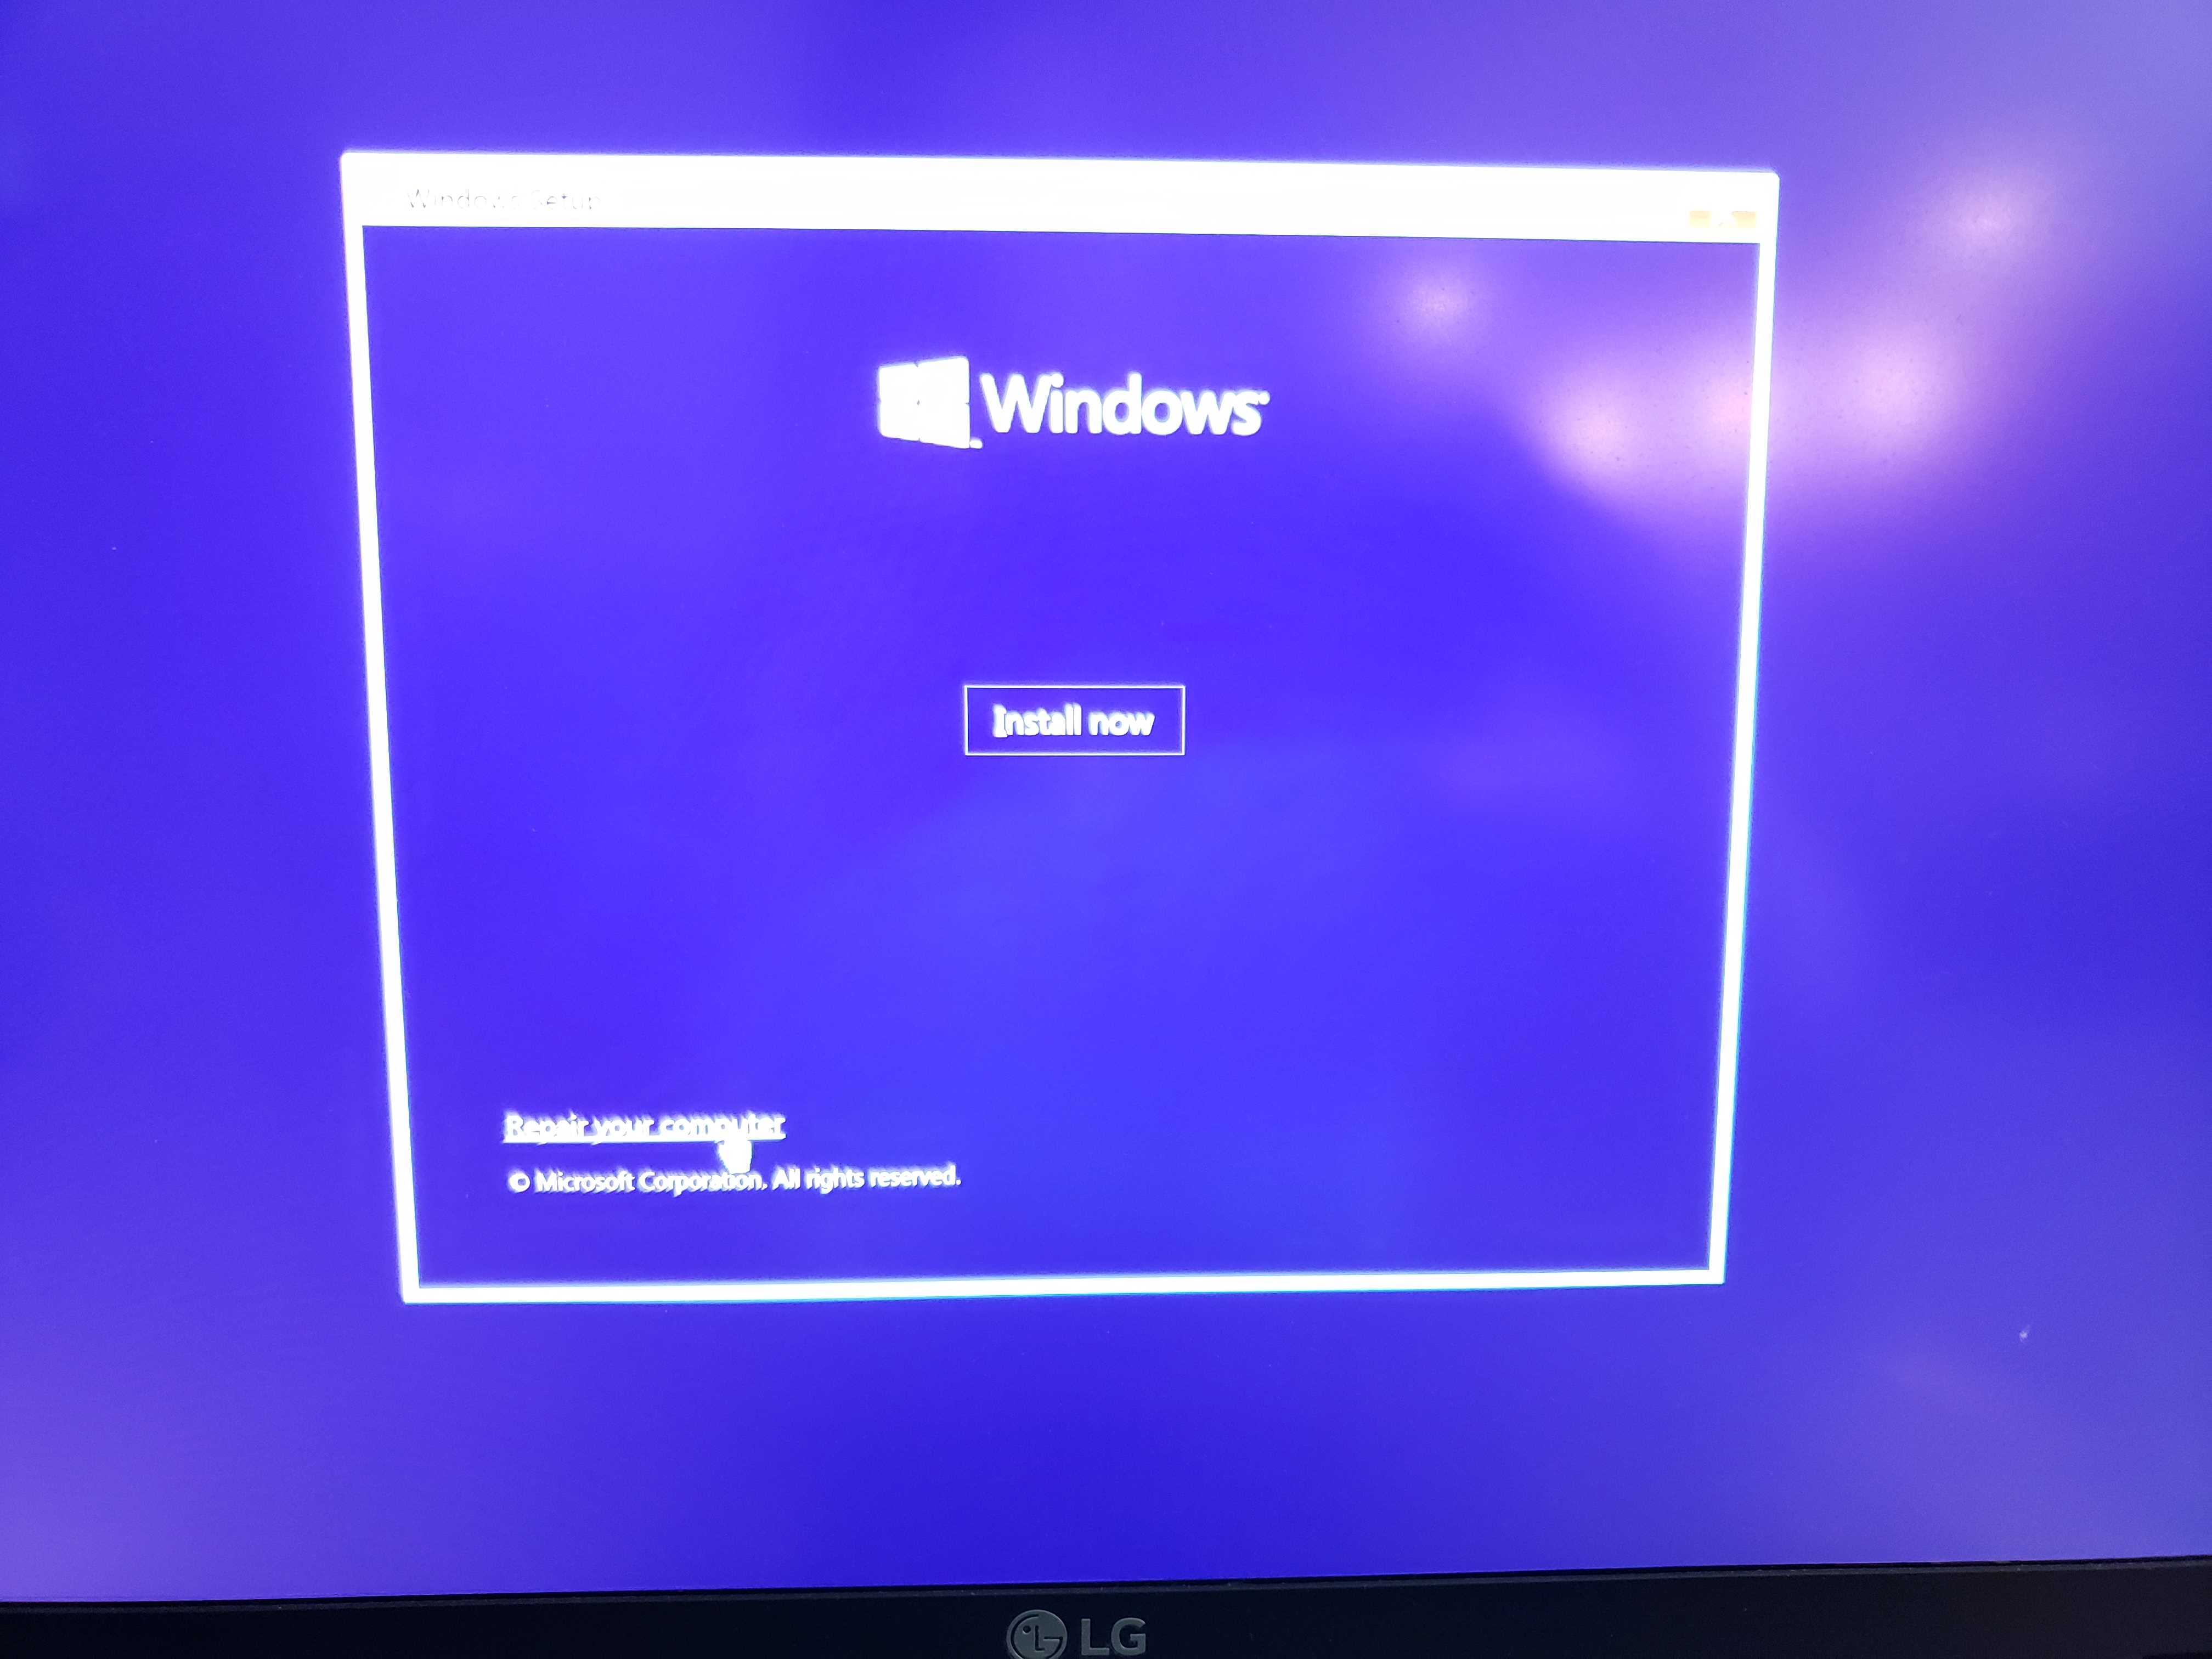
When you get to the Windows Setup screen, click on "Next".

Click the "Repair your computer" link.
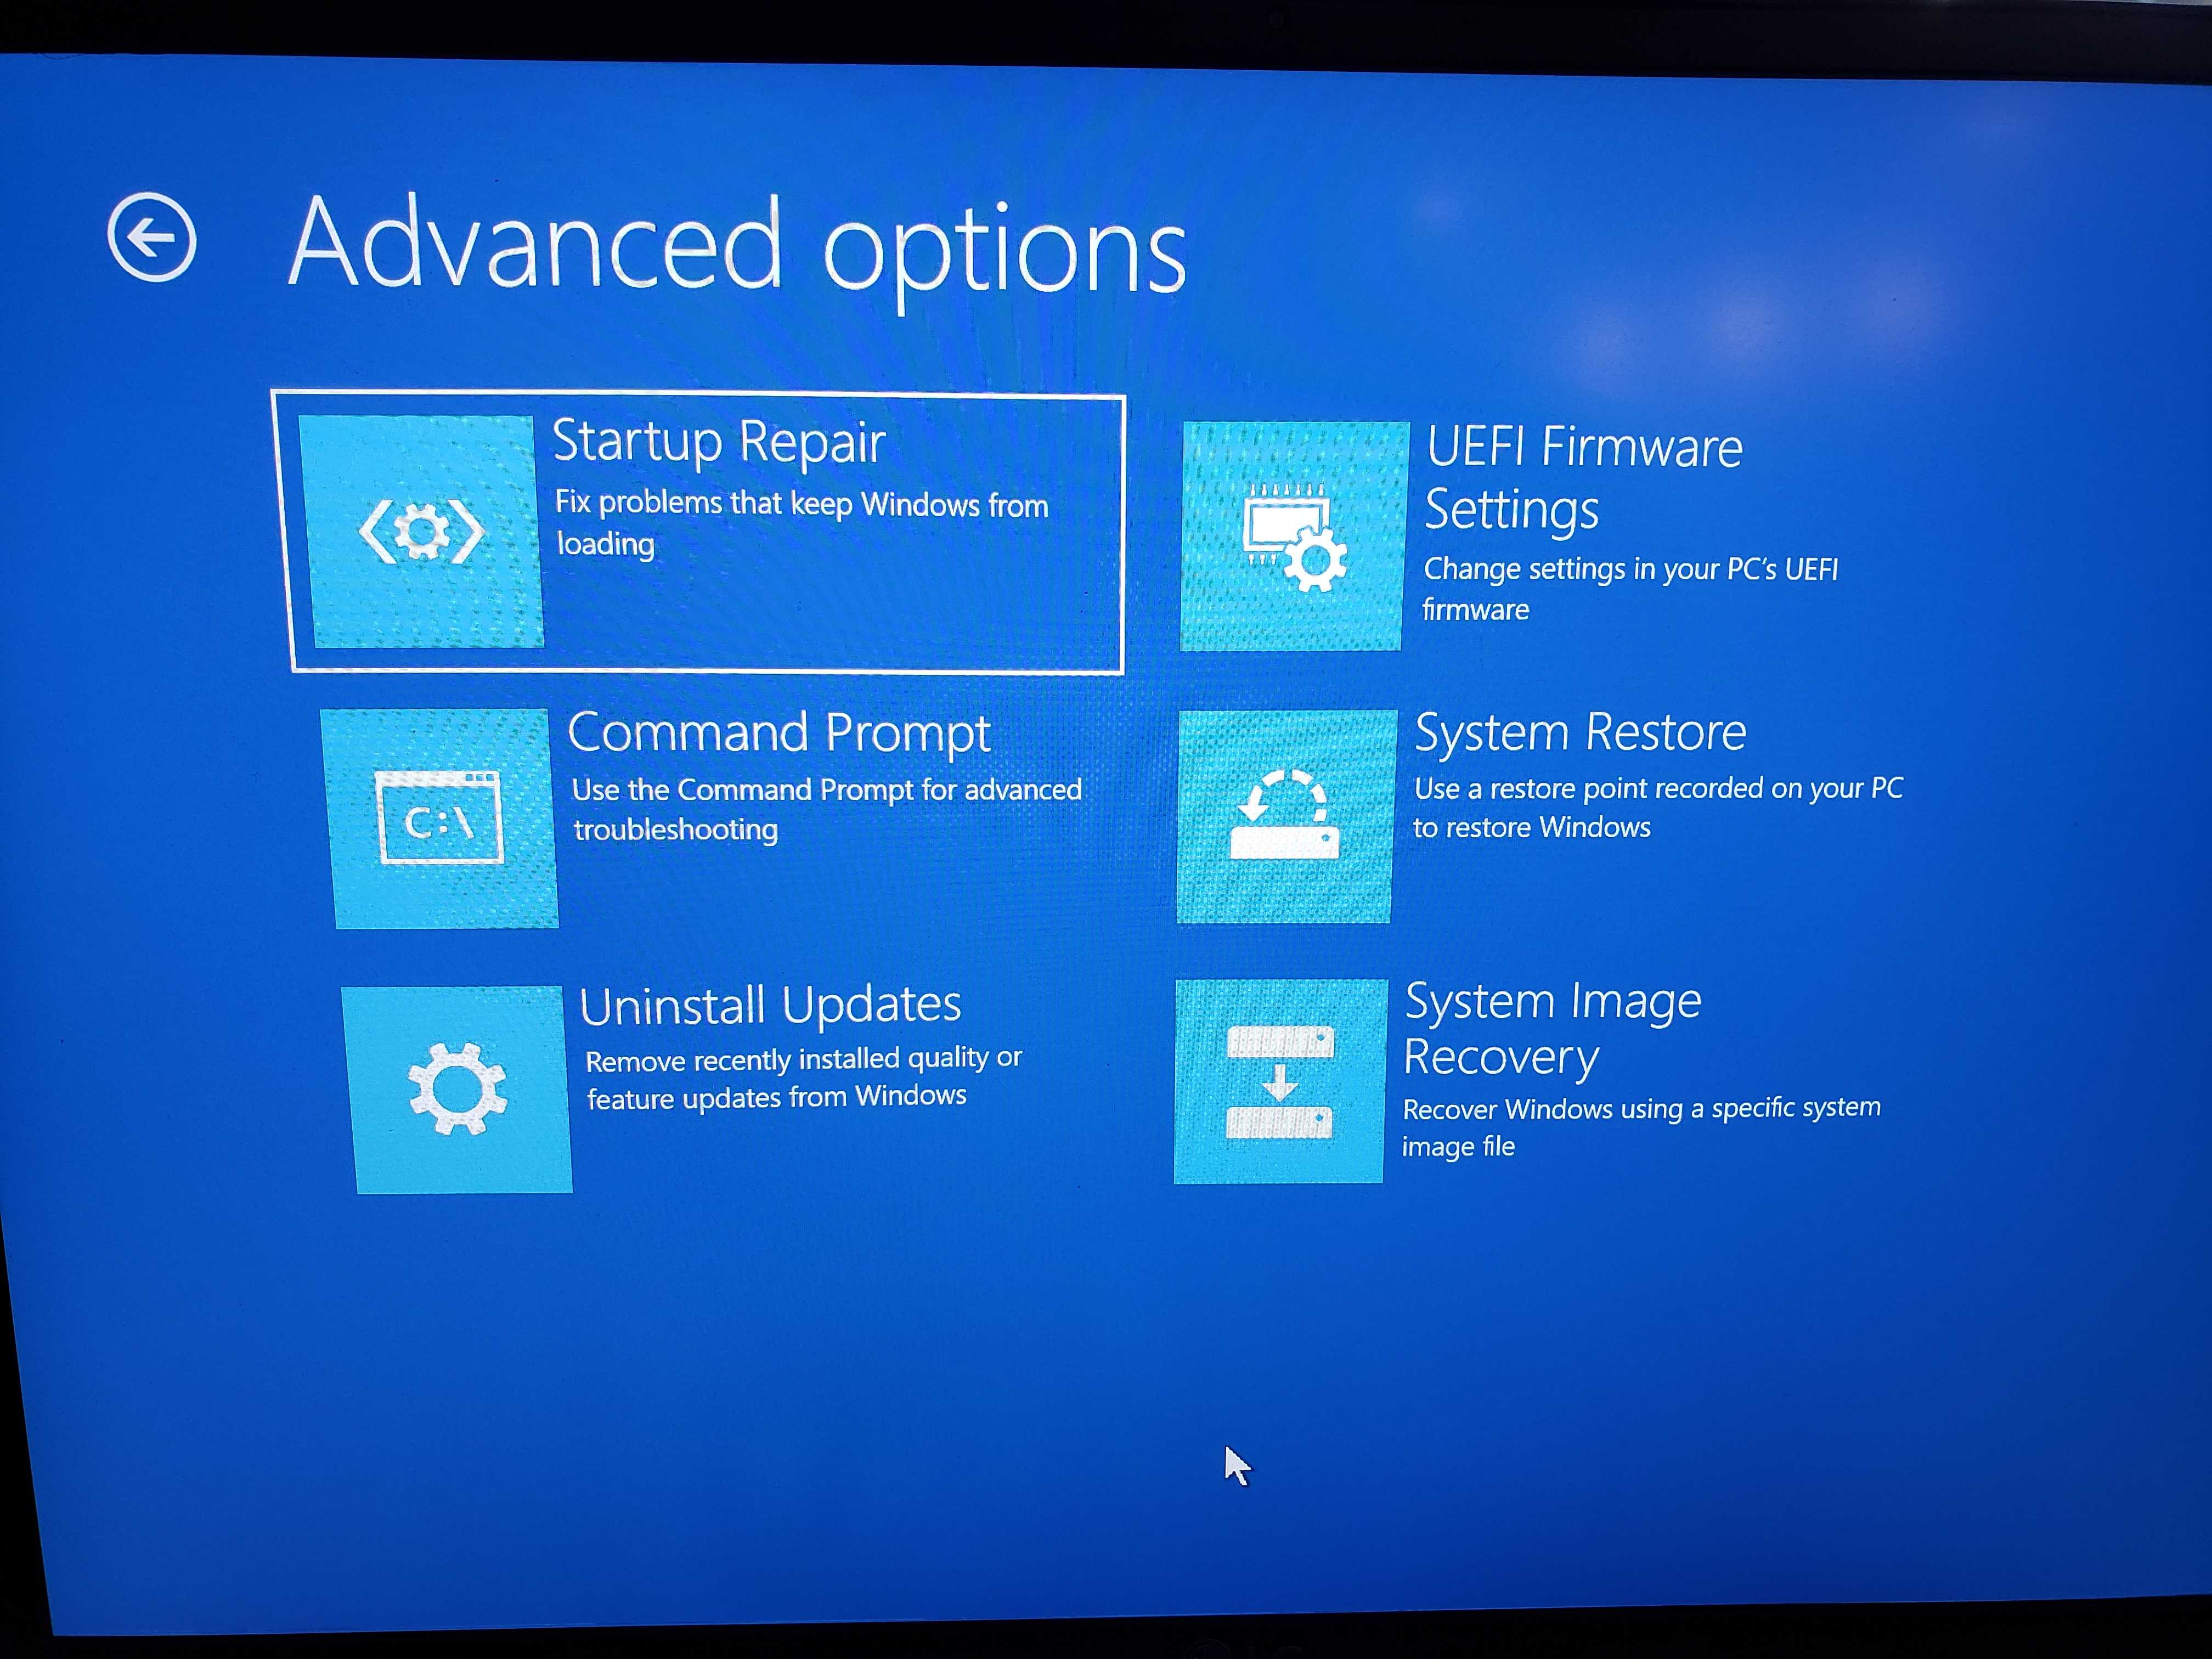
Choose the "Troubleshoot" option.
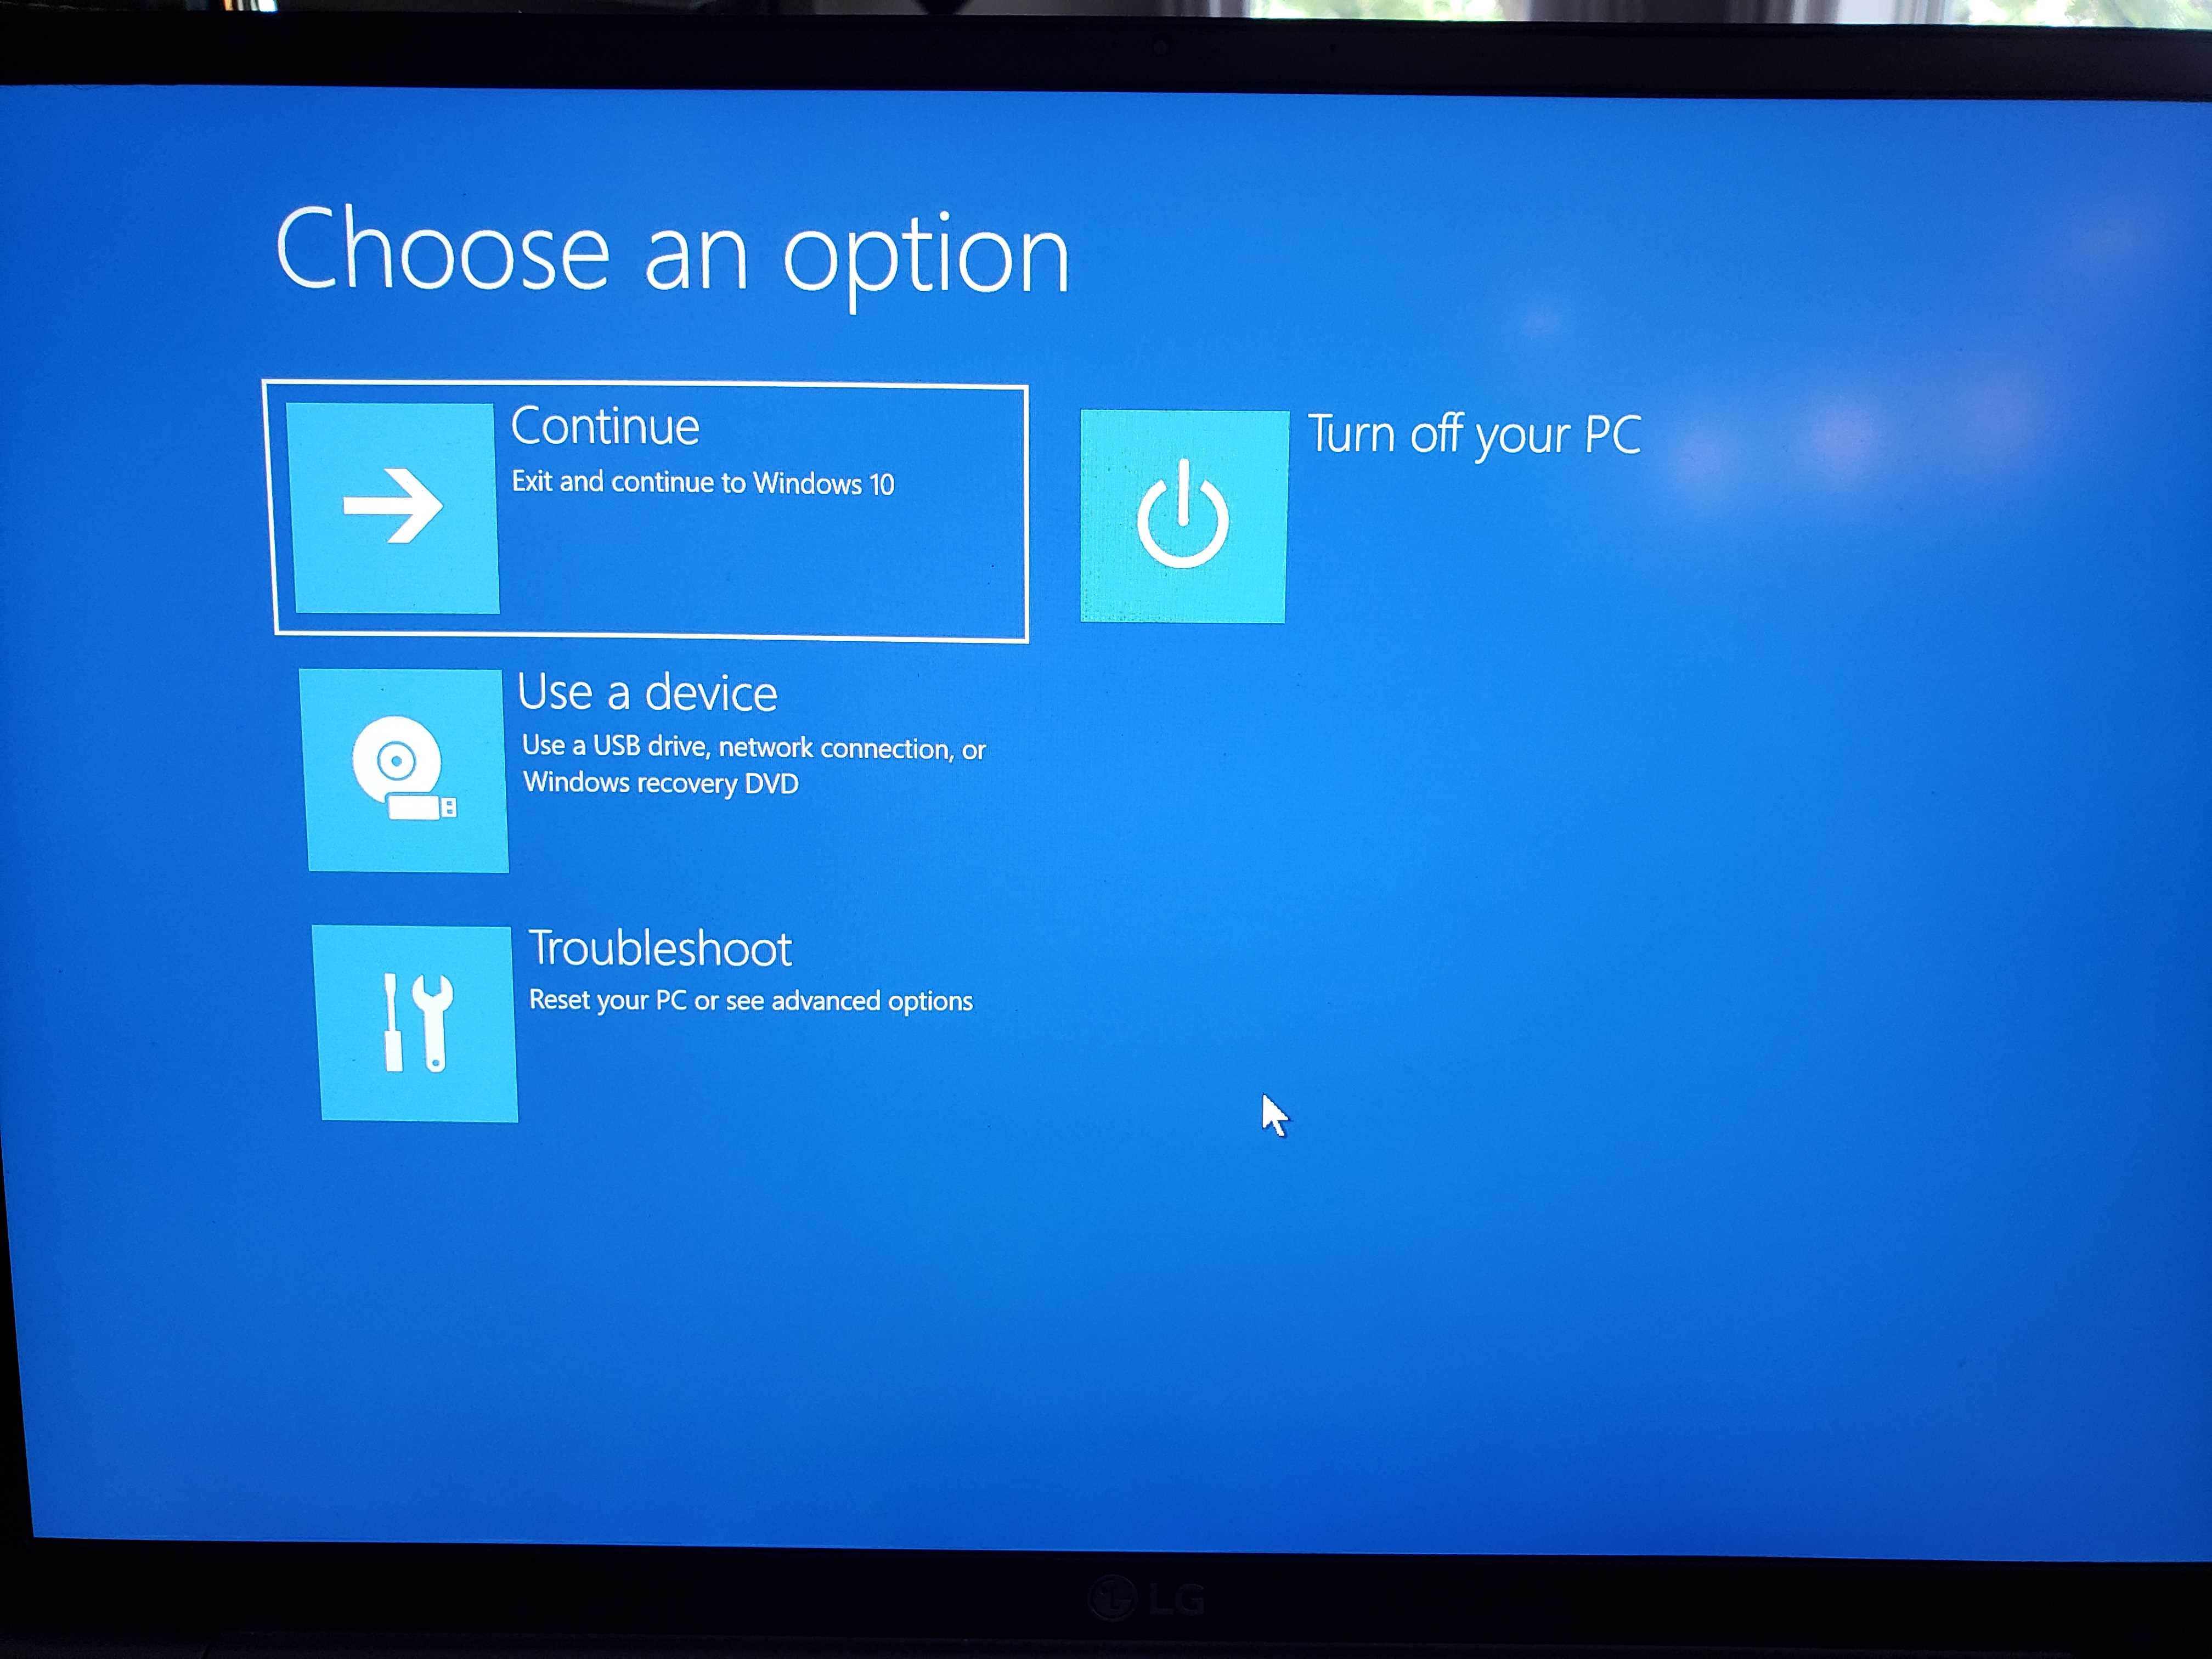
You now have advanced options at your disposal, including a command prompt that gives you access to important tools like DISKPART and the like.
When you are satisfied that your emergency repair media is working, proceed to the next step.
Preliminary Step 3: Baseline Your System
Before performing this or any other upgrade, it's a good idea to baseline your system. This is another step that seems to get neglected in a lot of

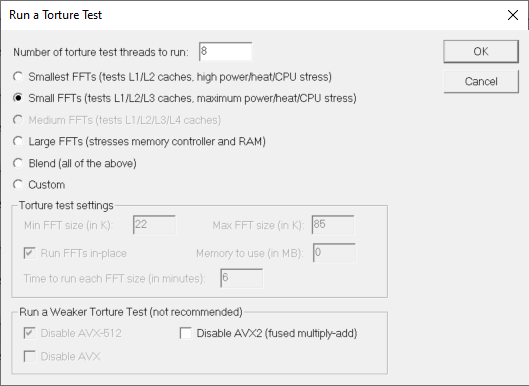
Now, download a tool like Prime95 so that you can push your processor to its limit and get a good benchmark. Note: some hardware buffs on the Net may claim that using a tool like Prime95 on a laptop isn't a good idea. My stance is that the likelihood of causing hardware damage is low, especially if you're only running it for less than a minute. Again, see my disclaimer above.
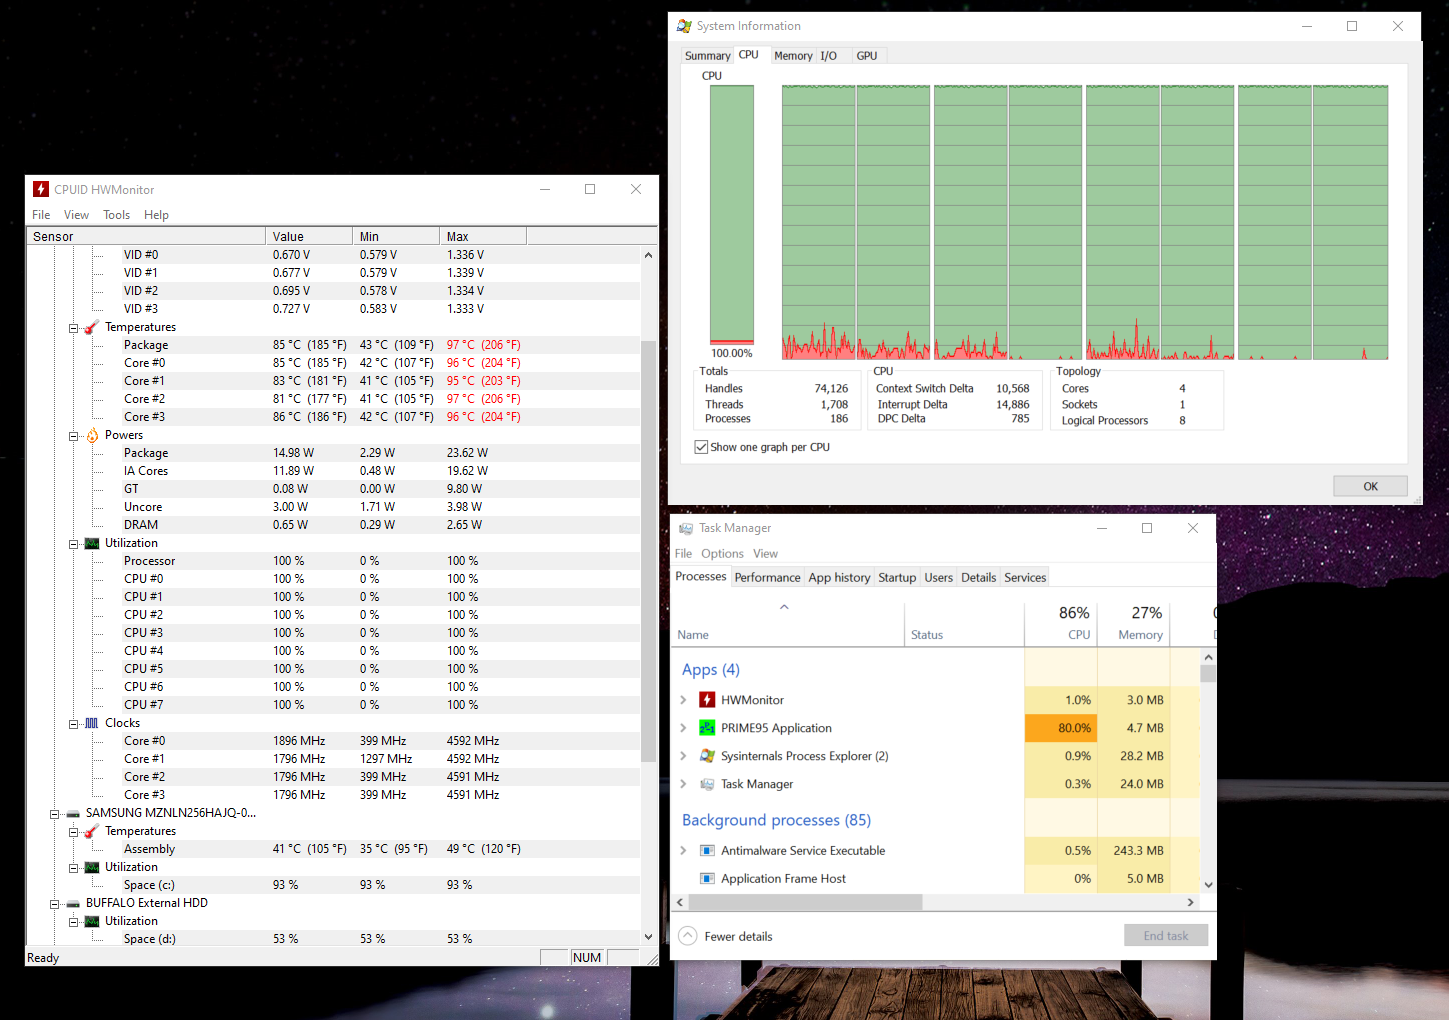
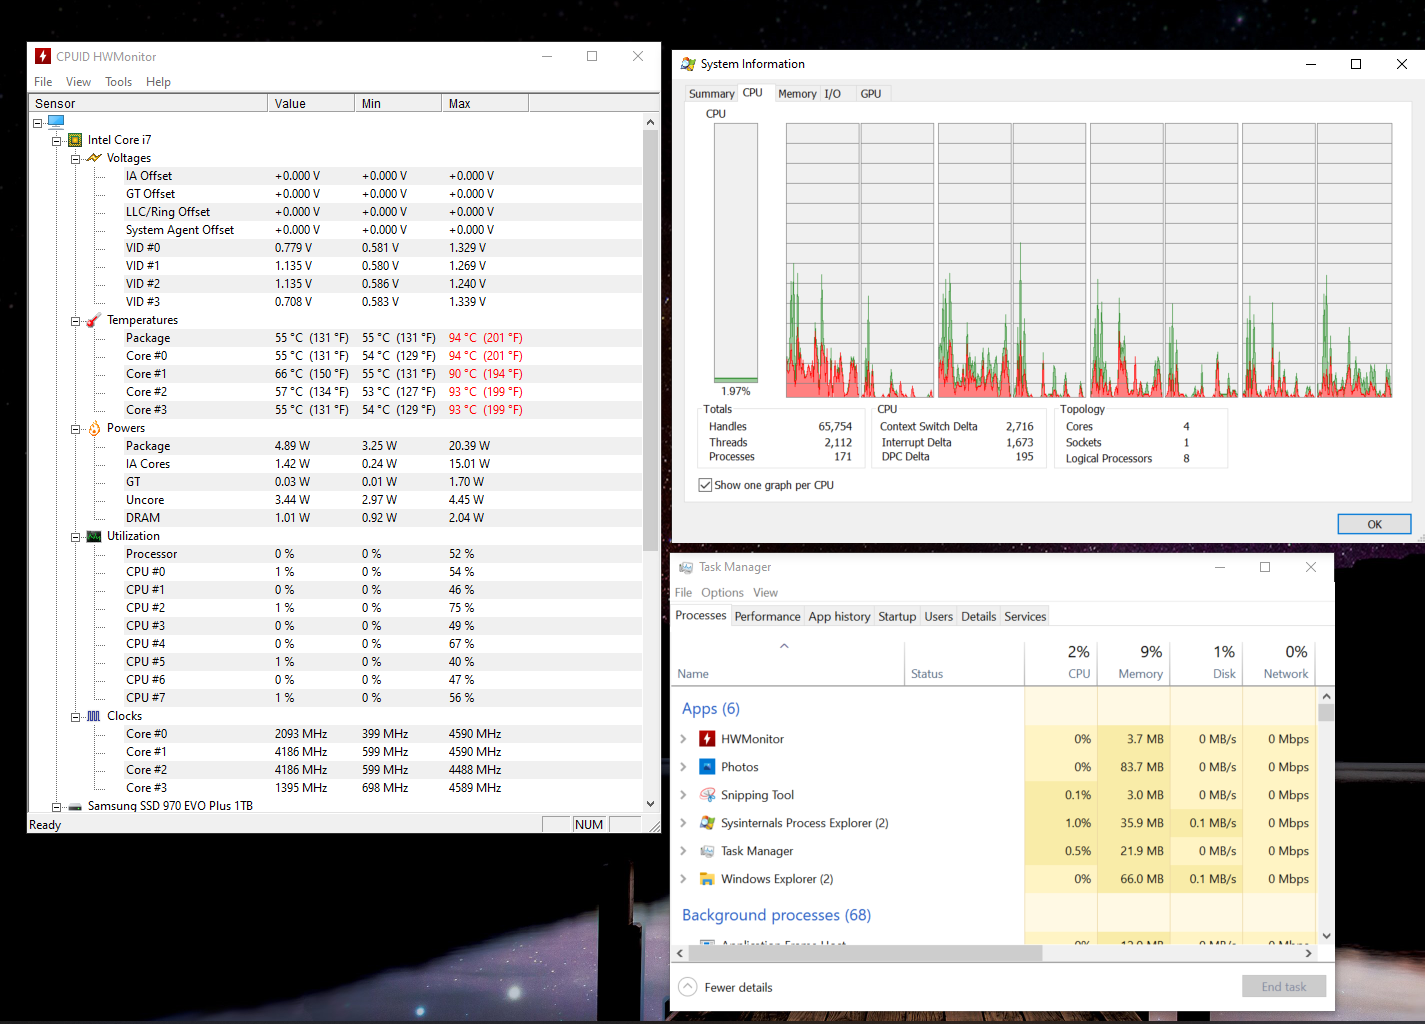
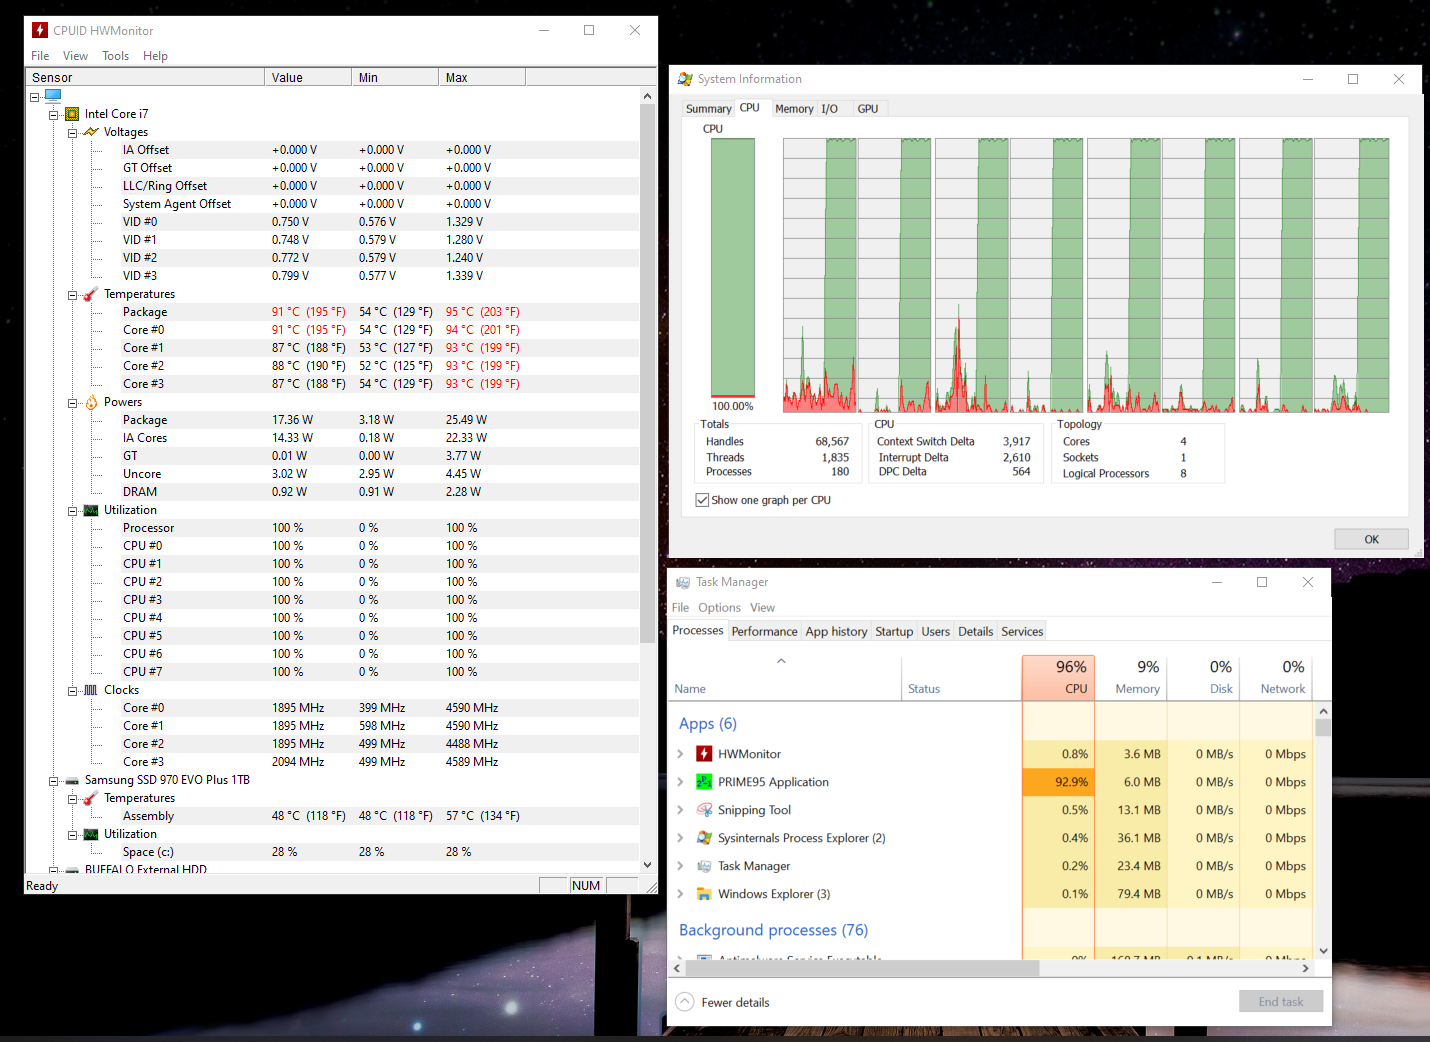
Here's what it looked like on my machine when I ran the various Prime95 tests against the original LG Gram hardware.
Test 1

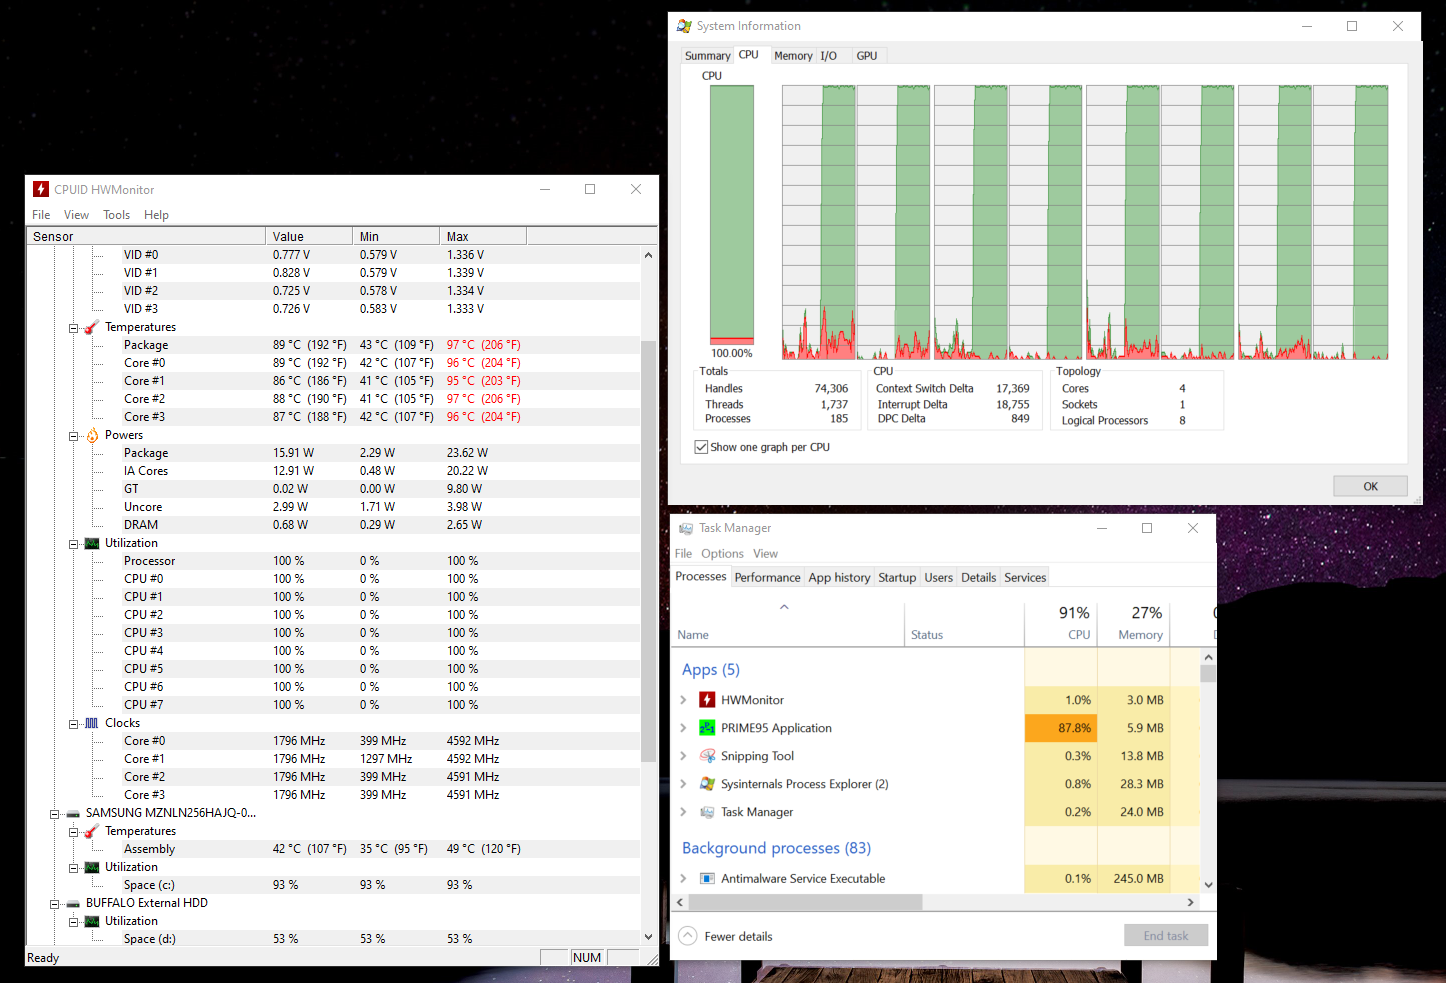
Test 2
Test 3

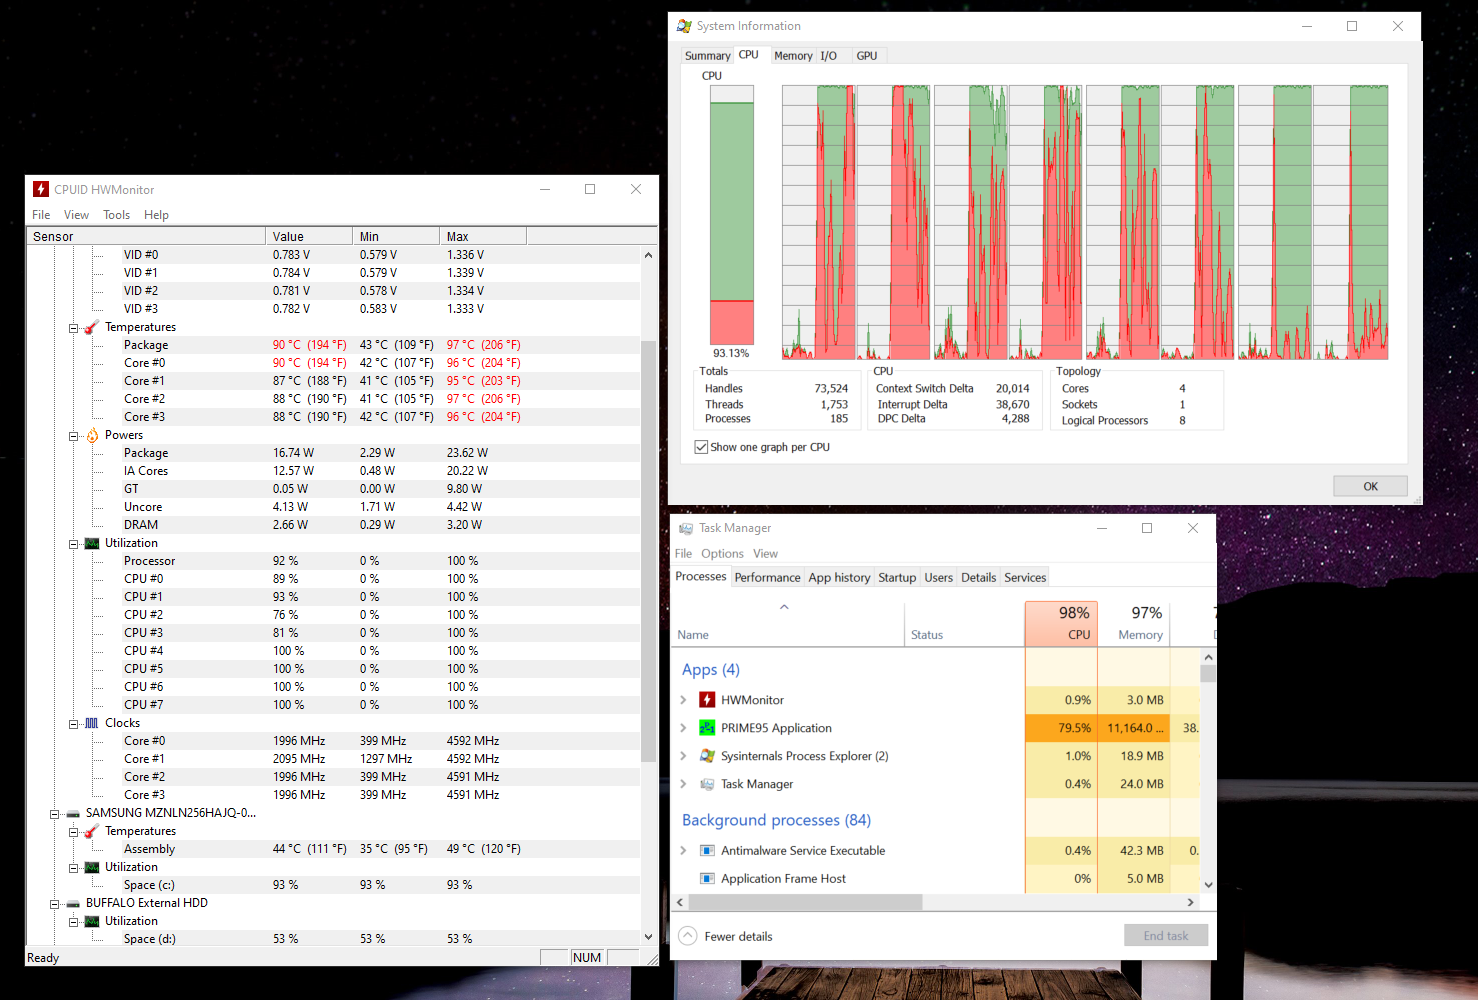
As you can see from the various screenshots, the CPU tends to idle around 55°C (130°F) with little to no load. Pushing it a little bit, it goes up to around 85°C (185°F) to 90°C (194°F). Above 90°C, and you start to have a problem. At such higher temperatures, the CPU should begin to down throttle to prevent hardware damage and if it can't cool down quickly enough (airflow is blocked, the heat sink isn't properly seated or thermal paste was applied improperly) then you risk cooking your CPU.
Just as an aside, laptop components such as CPUs are made to run hotter than desktop ones. This makes sense, taking into consideration what I said earlier
about heat management being an issue inside the smaller form factor of a laptop. For example, I have a micro-ATX Xeon server that I built a few years ago
sitting in a spare room in my home. At this point, I just use it to donate processing power to scientific projects, like discovering new medical treatments
for Covid at IBM's World Community Grid. The server's cores are all pegged at 100%, non-stop 24/7, and they still rarely go above
Assuming that you purchased the Samsung SSD, then you should also download Samsung Magician so you can benchmark
your SSD. It's interesting to note that the 256GB SATA stays around
So why does all this matter? We're not upgrading the CPU, correct? A few reasons:
- The Gram doesn't seem to have many heat sensors inside it, aside from those on the CPU. We must use what we have.
- Changing around the other hardware may affect how the CPU runs.
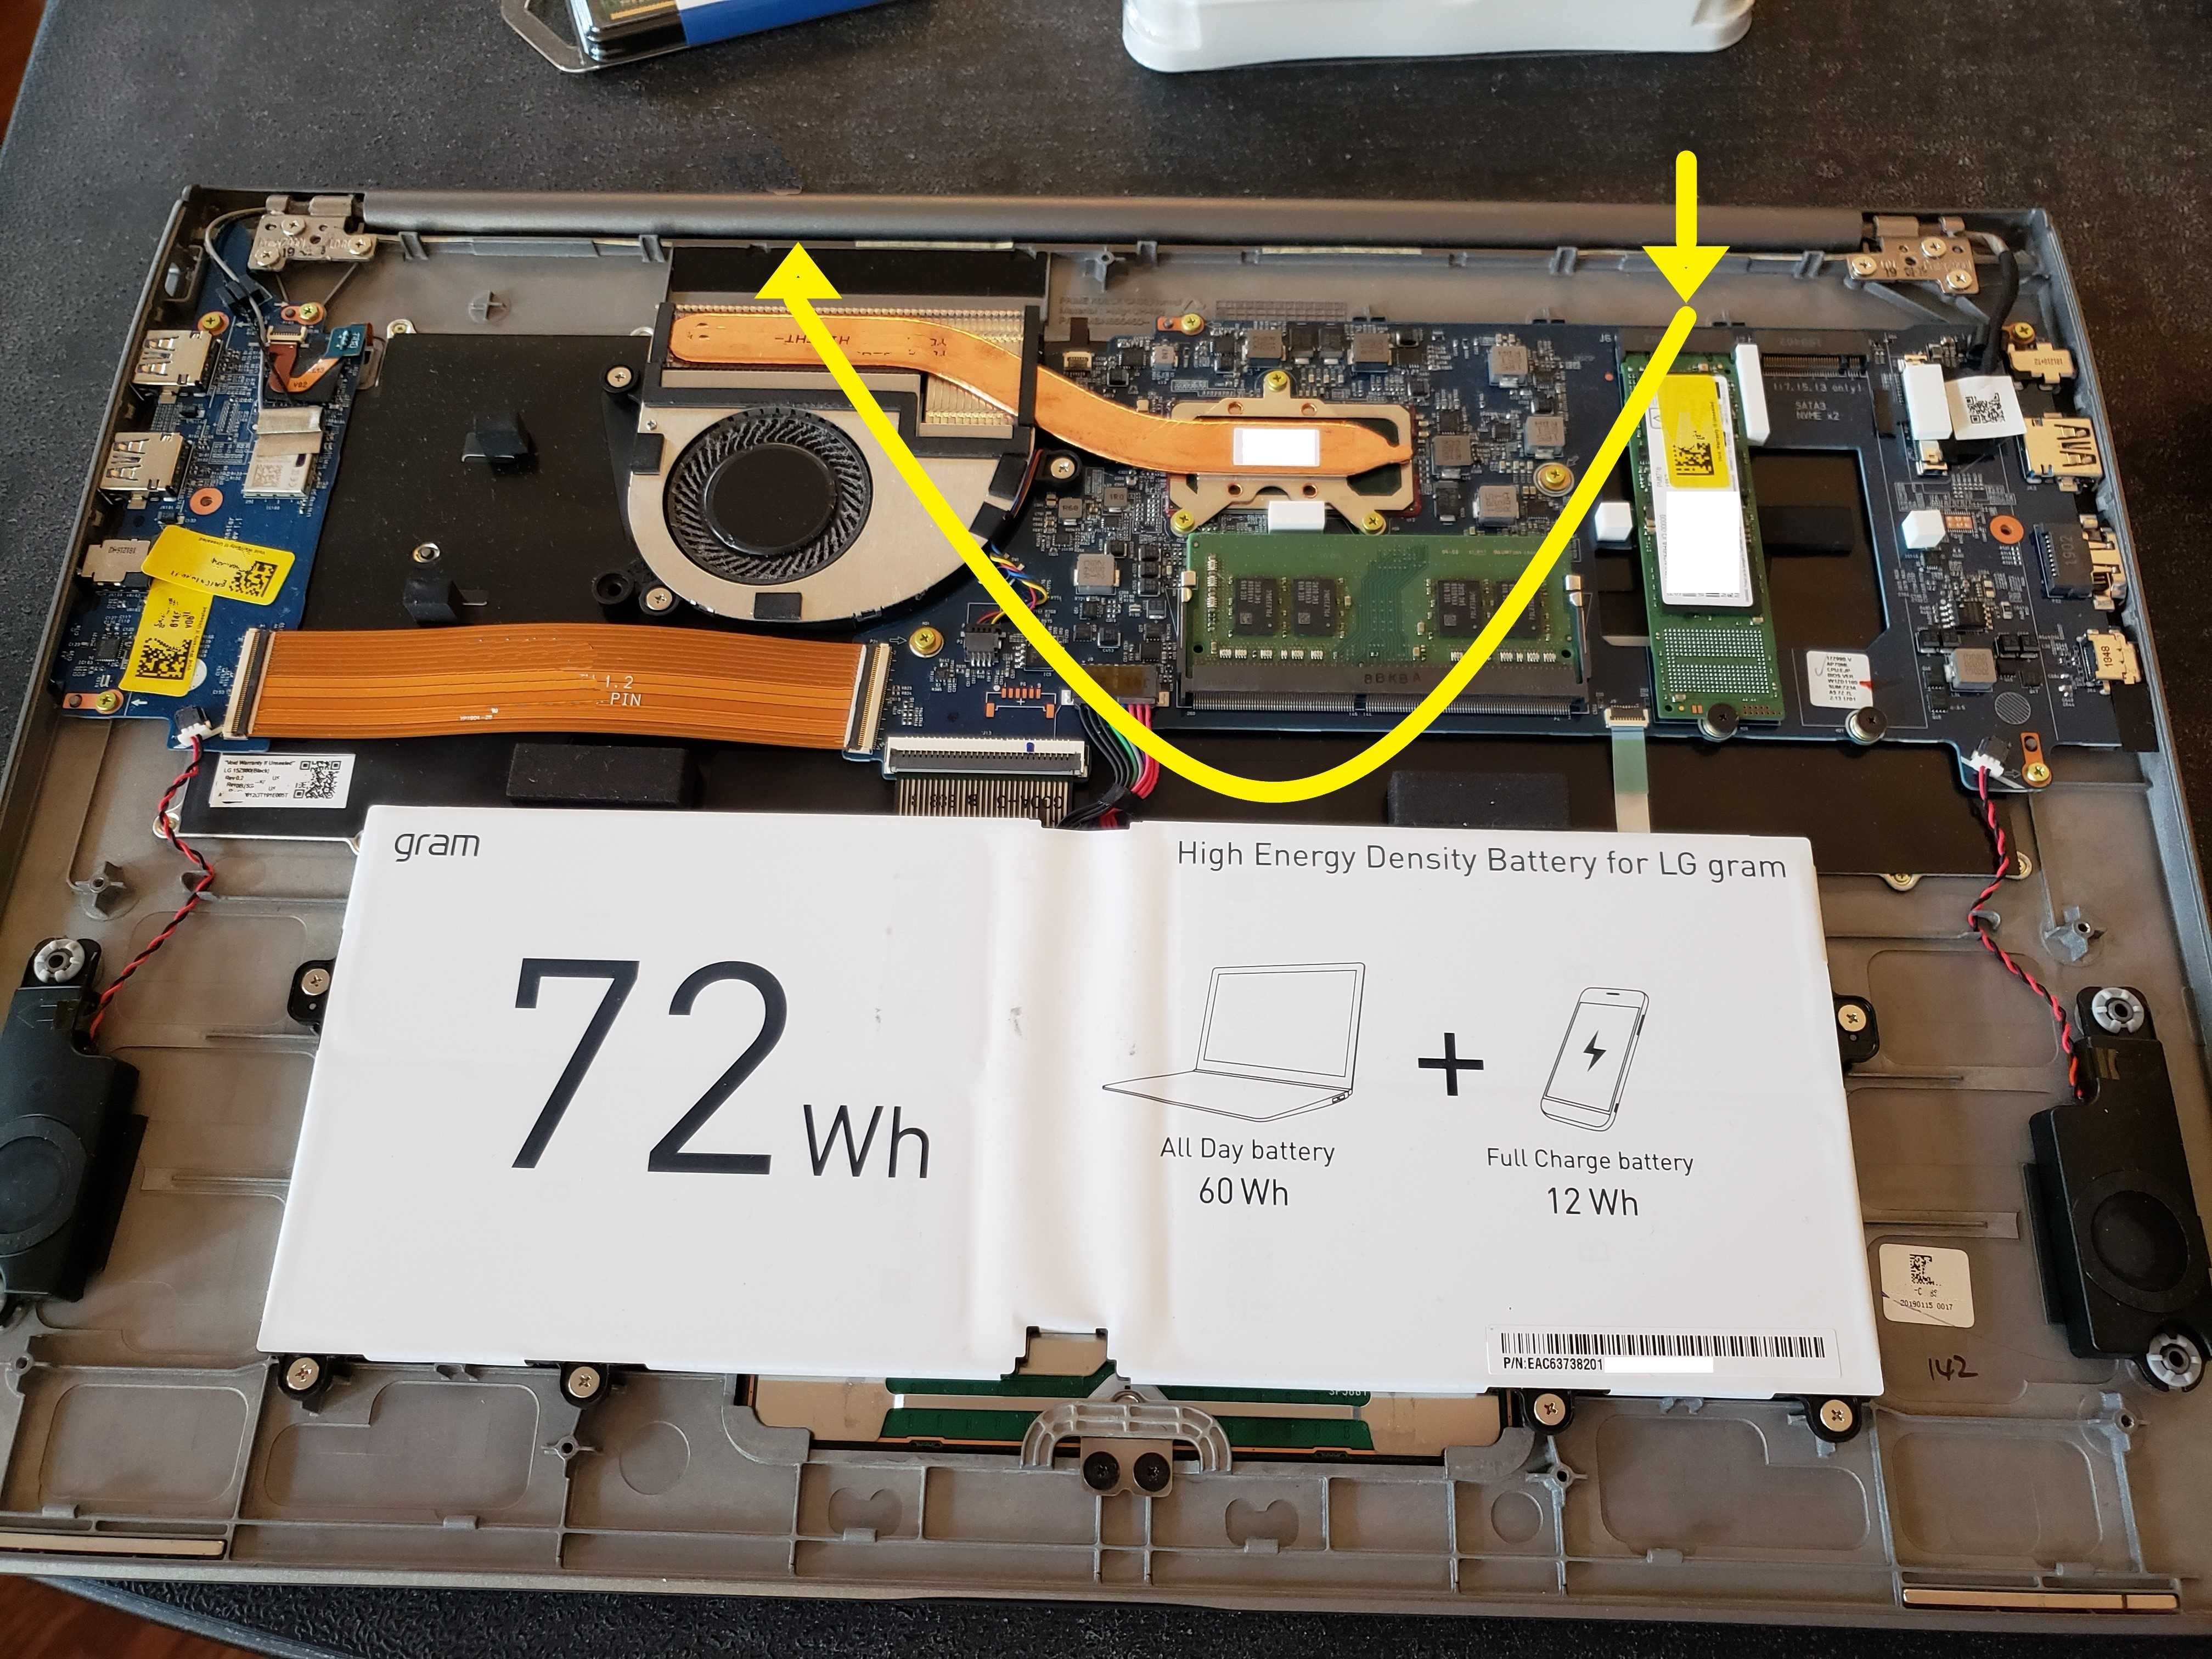
- The heat generated by the new RAM chip and SSD is likely to flow across the CPU, as you can see in the picture below.
Apples to Apples
Another point to take into consideration is the ambient temperature of your physical space when performing these tests and the power plan of your laptop,
typically determined by whether or not your laptop is plugged in and how much battery is left. If you're going to go through the effort of doing this
prep work, why not be as scientific as possible, right? Try to keep all other variables constant when doing before/after comparisons. In my case, I had the air conditioning going so that the temperature of the room was about 20.
Upgrade Preparation
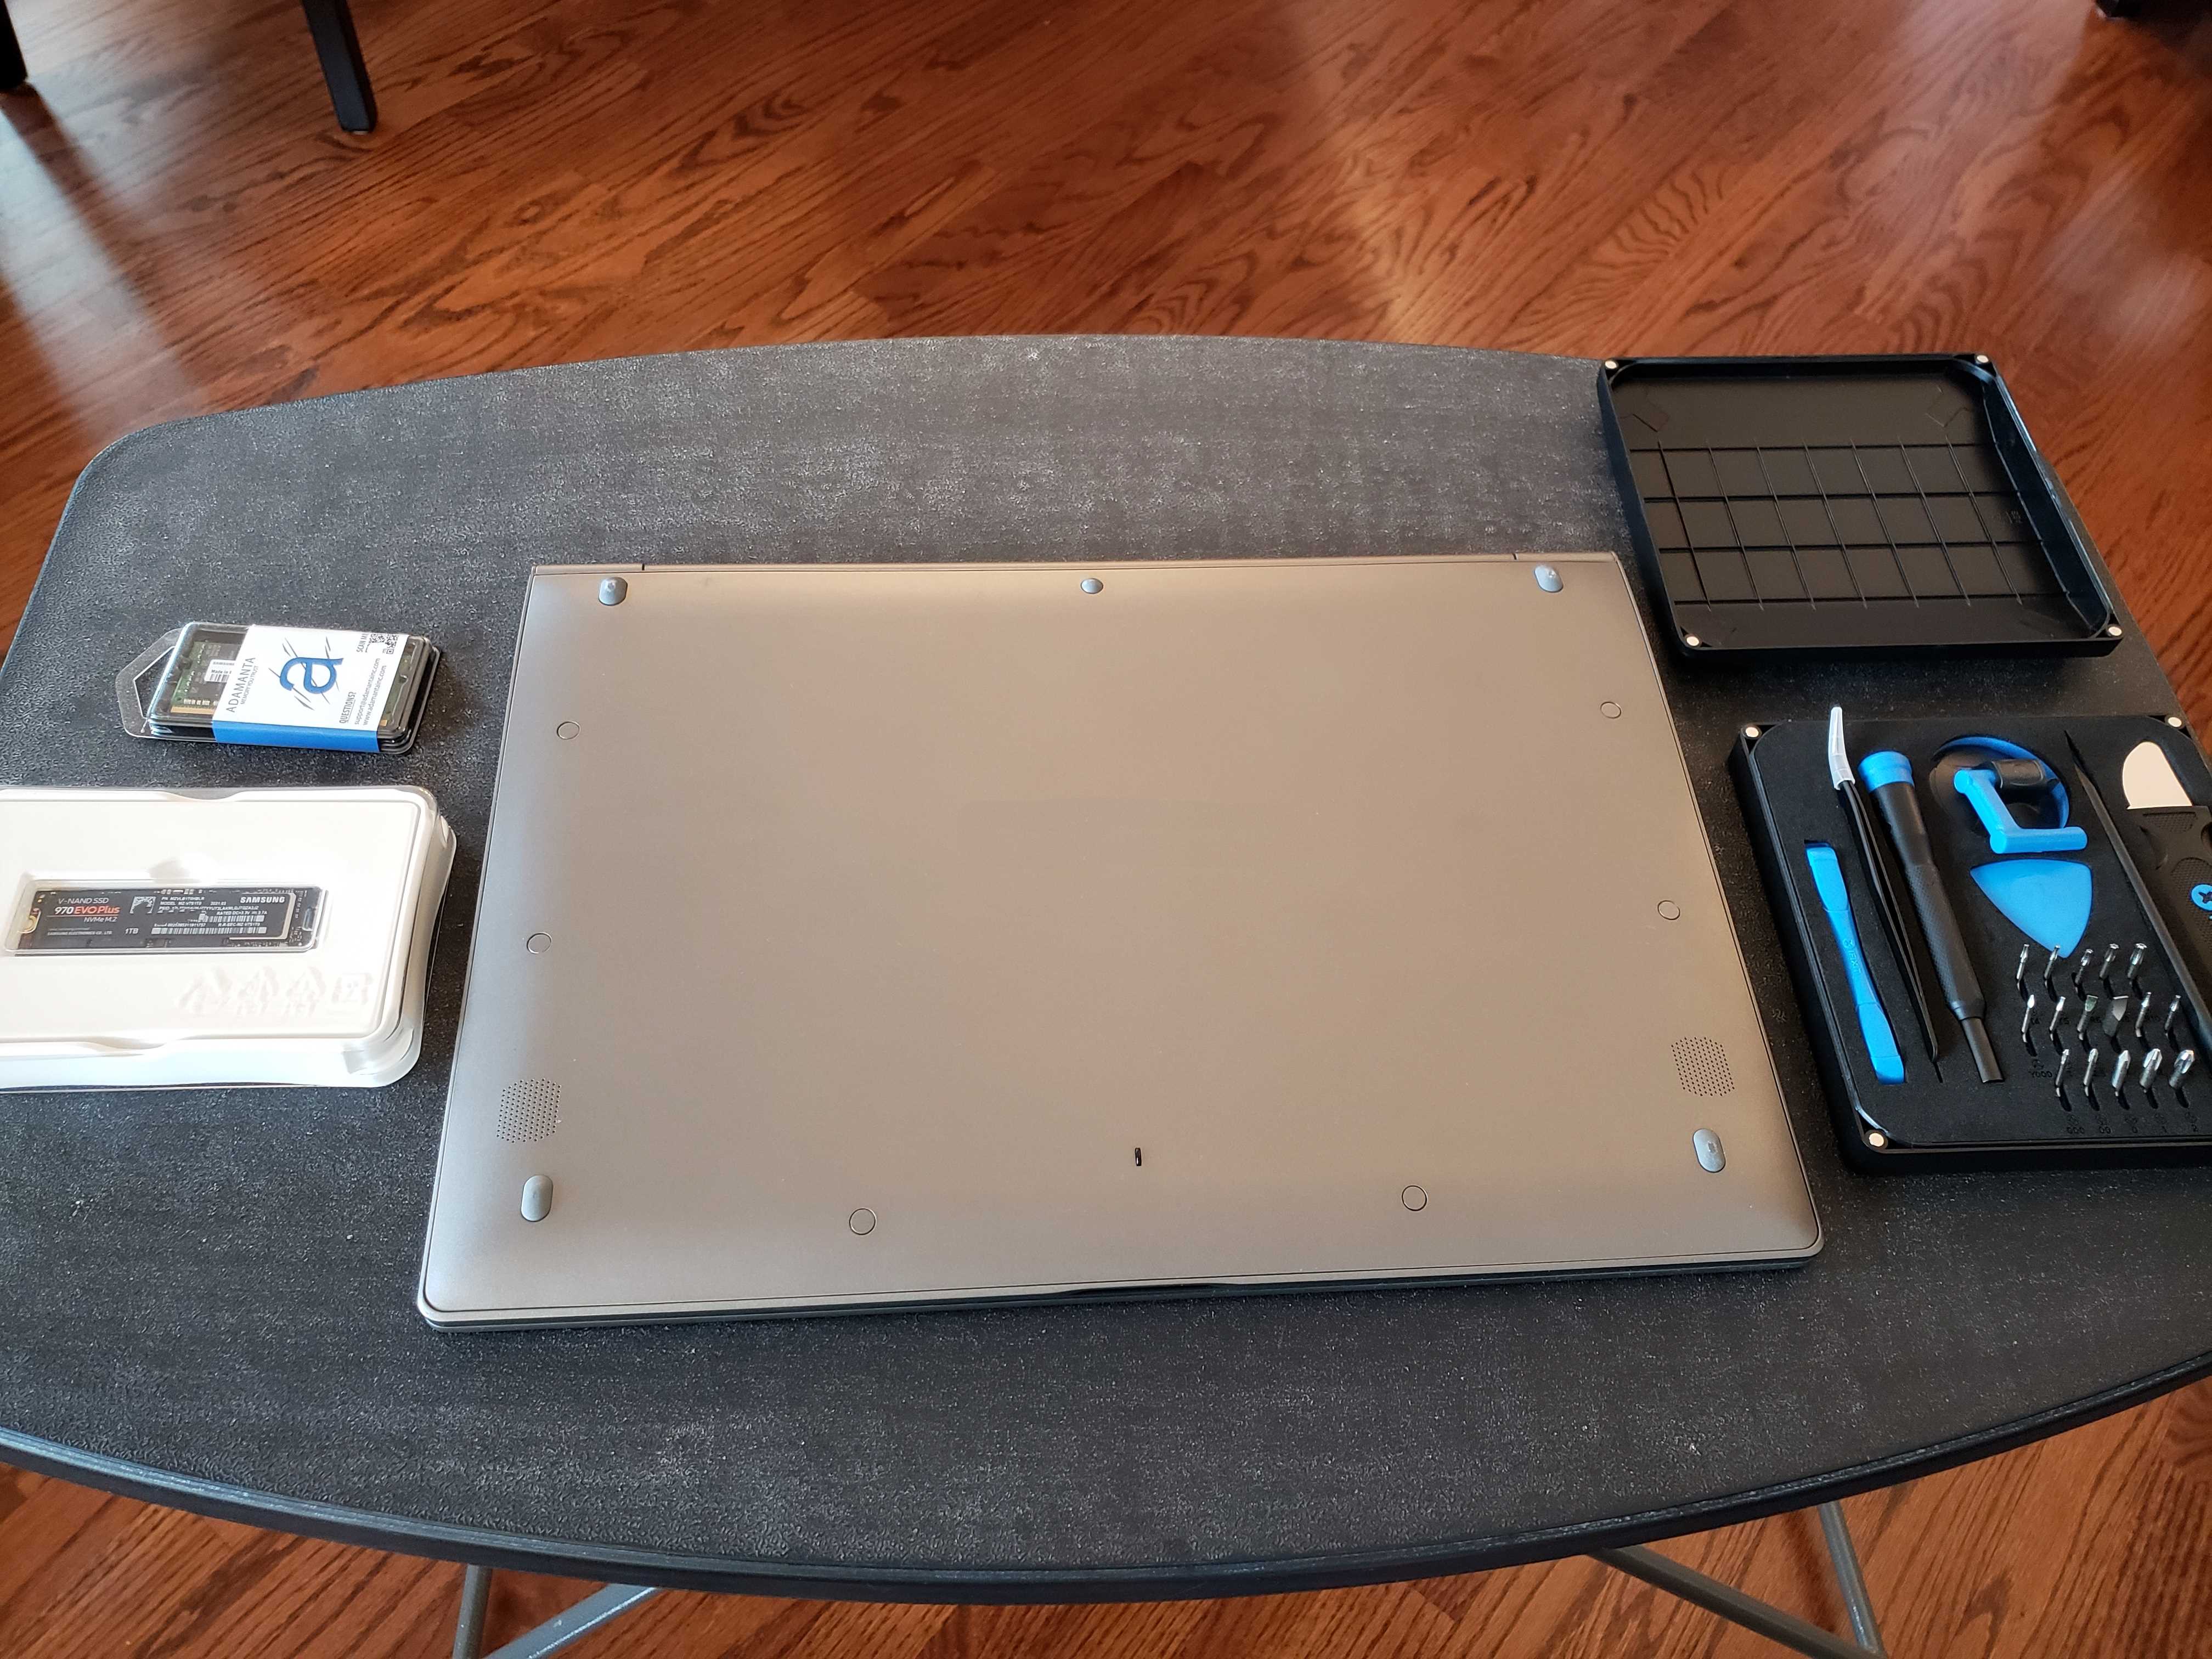
Arrange your laptop and parts for the upgrade on a clean, non-conductive surface. I recommend wearing an anti-static band while you work, latex gloves if you're super paranoid about static electricity zapping your components and/or laptop. Don't do something boneheaded like perform the upgrade on a wool rug while wearing flannel pants, etc. Make sure the laptop is unplugged. When everything is ready, we can start the upgrade.
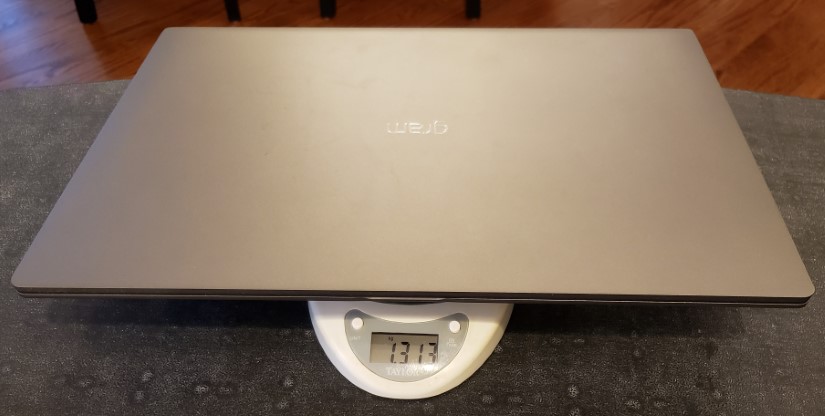
Here you see everything laid out in my workspace, ready to go.
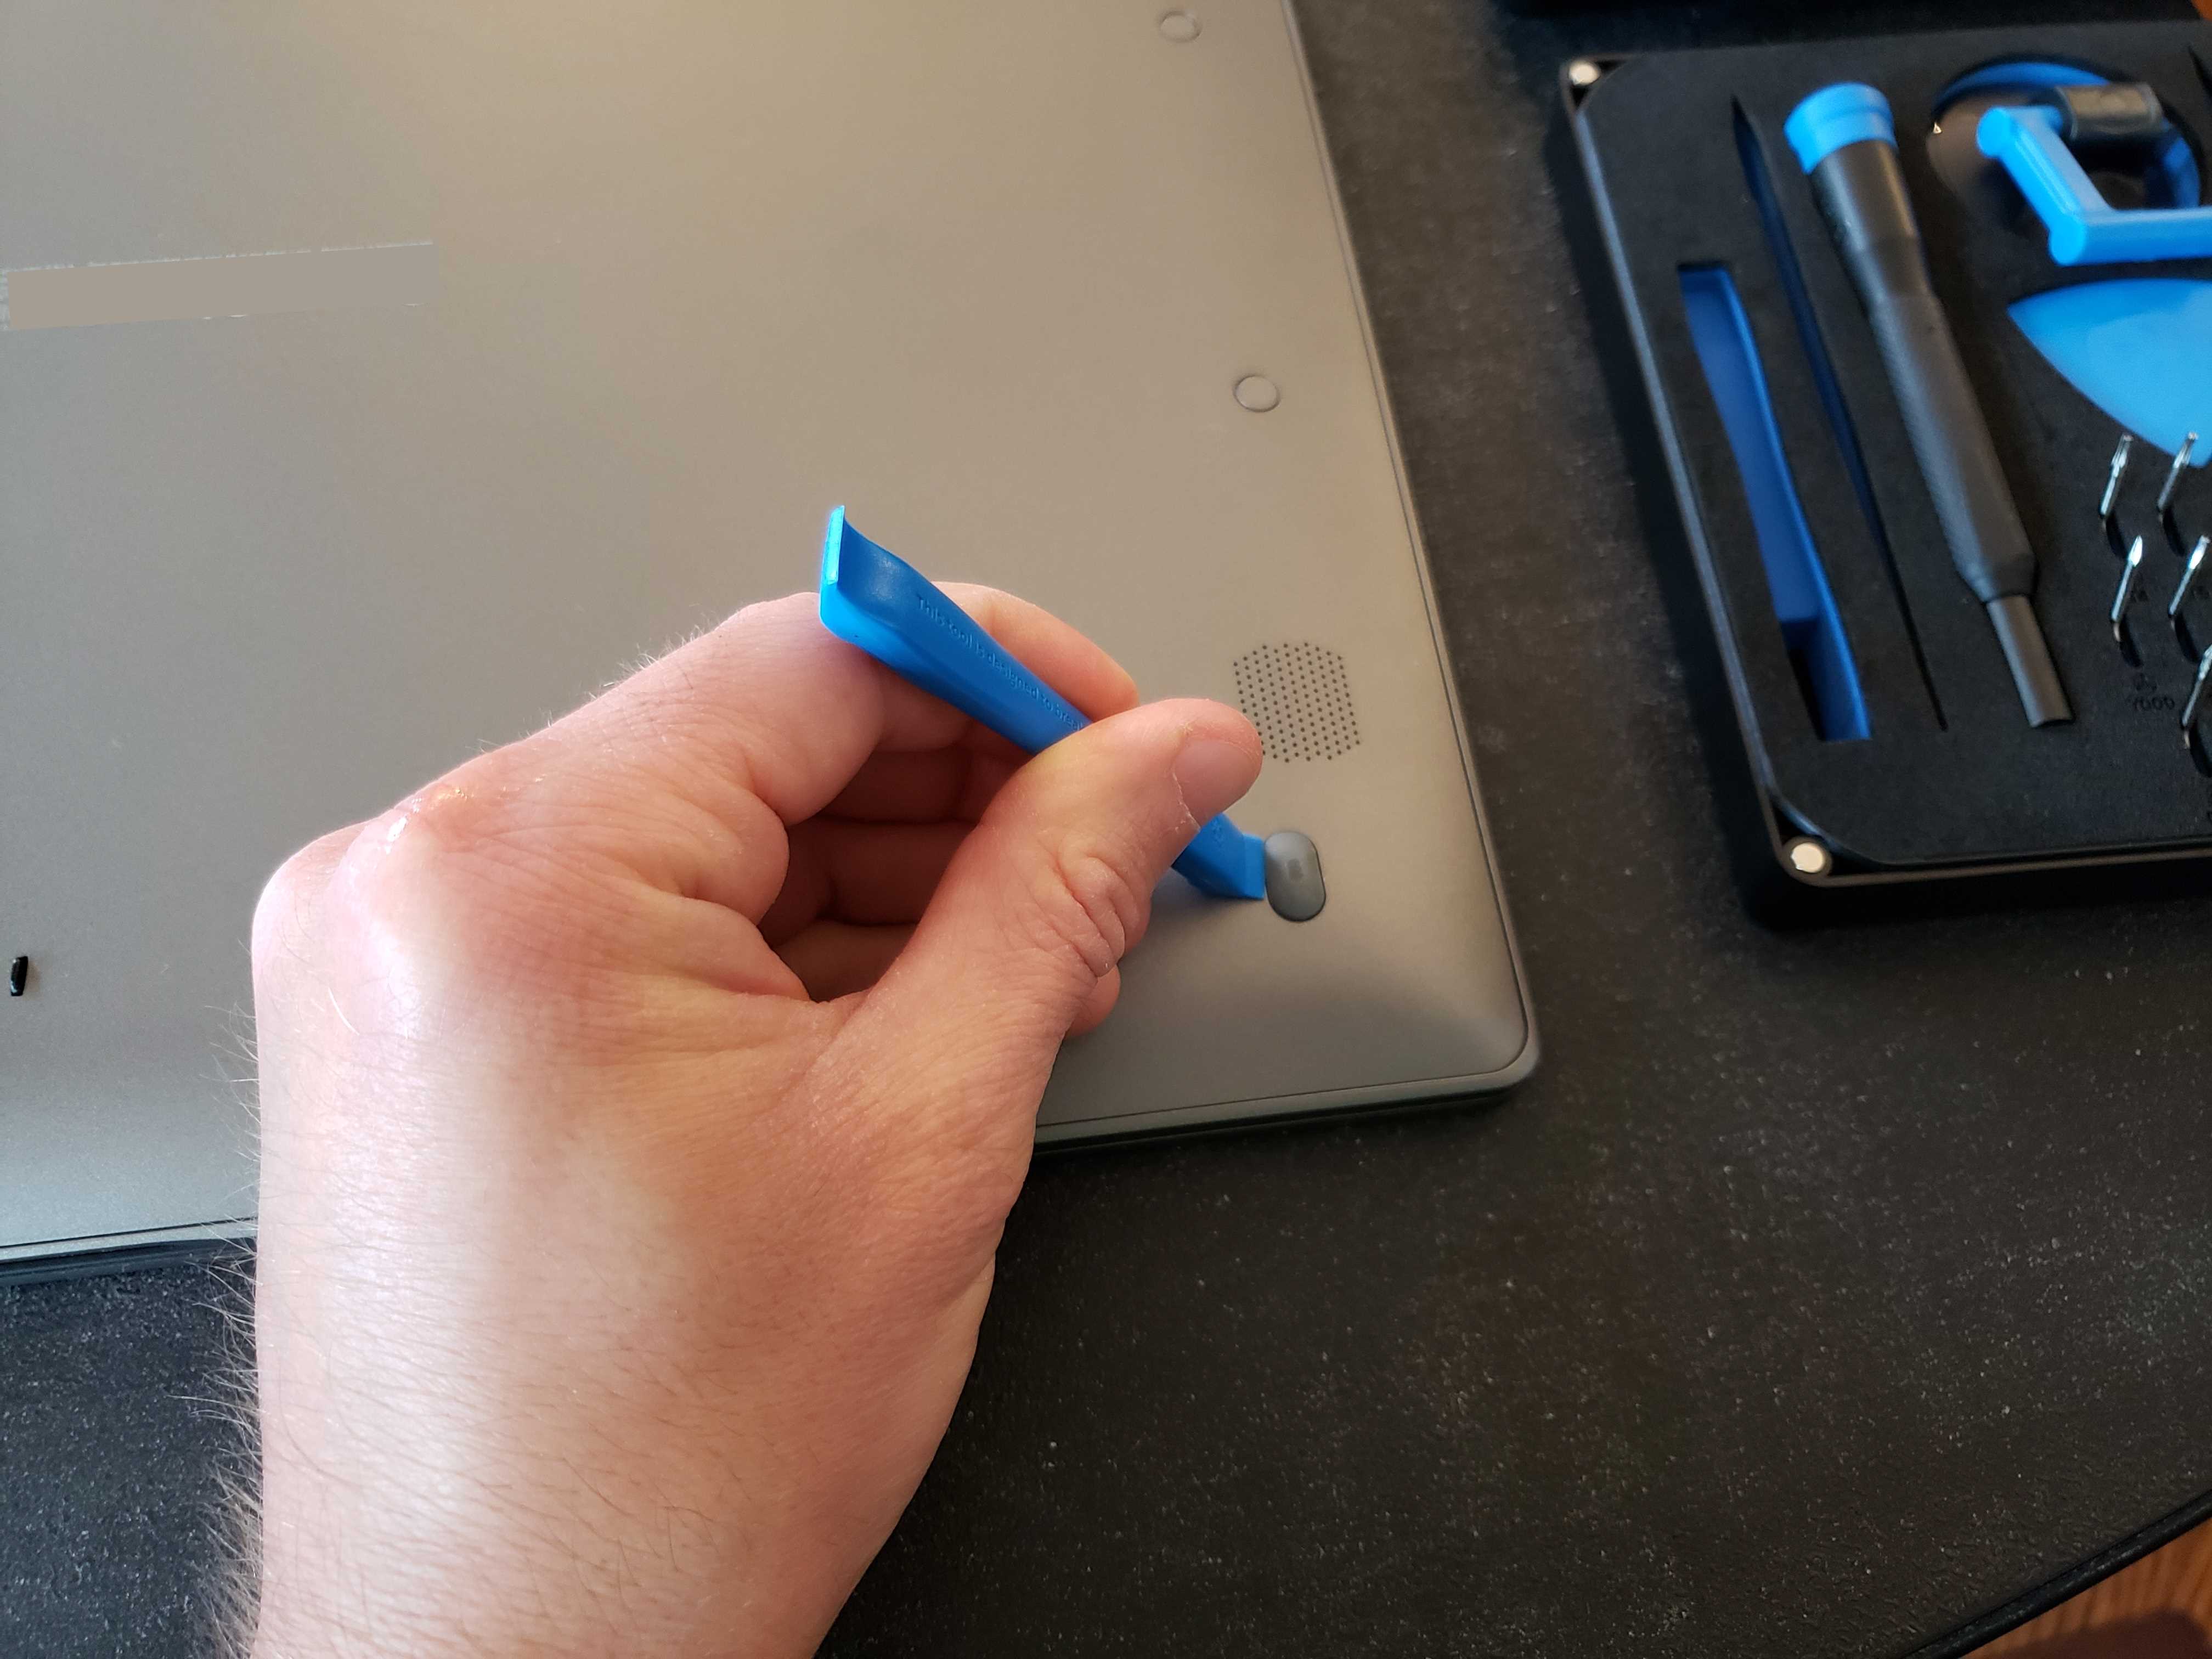
Step 1: Pry Out the Rubber Footings and Remove the Screws From the Laptop Backplate
This is all pretty much the same as what Jay Chen did in his blog entry that I used as a guide. Removing the rubber footings and screw covers is fairly straightforward. There is adhesive binding the rubber footings to the backplate, so it will take some effort to pry them out.


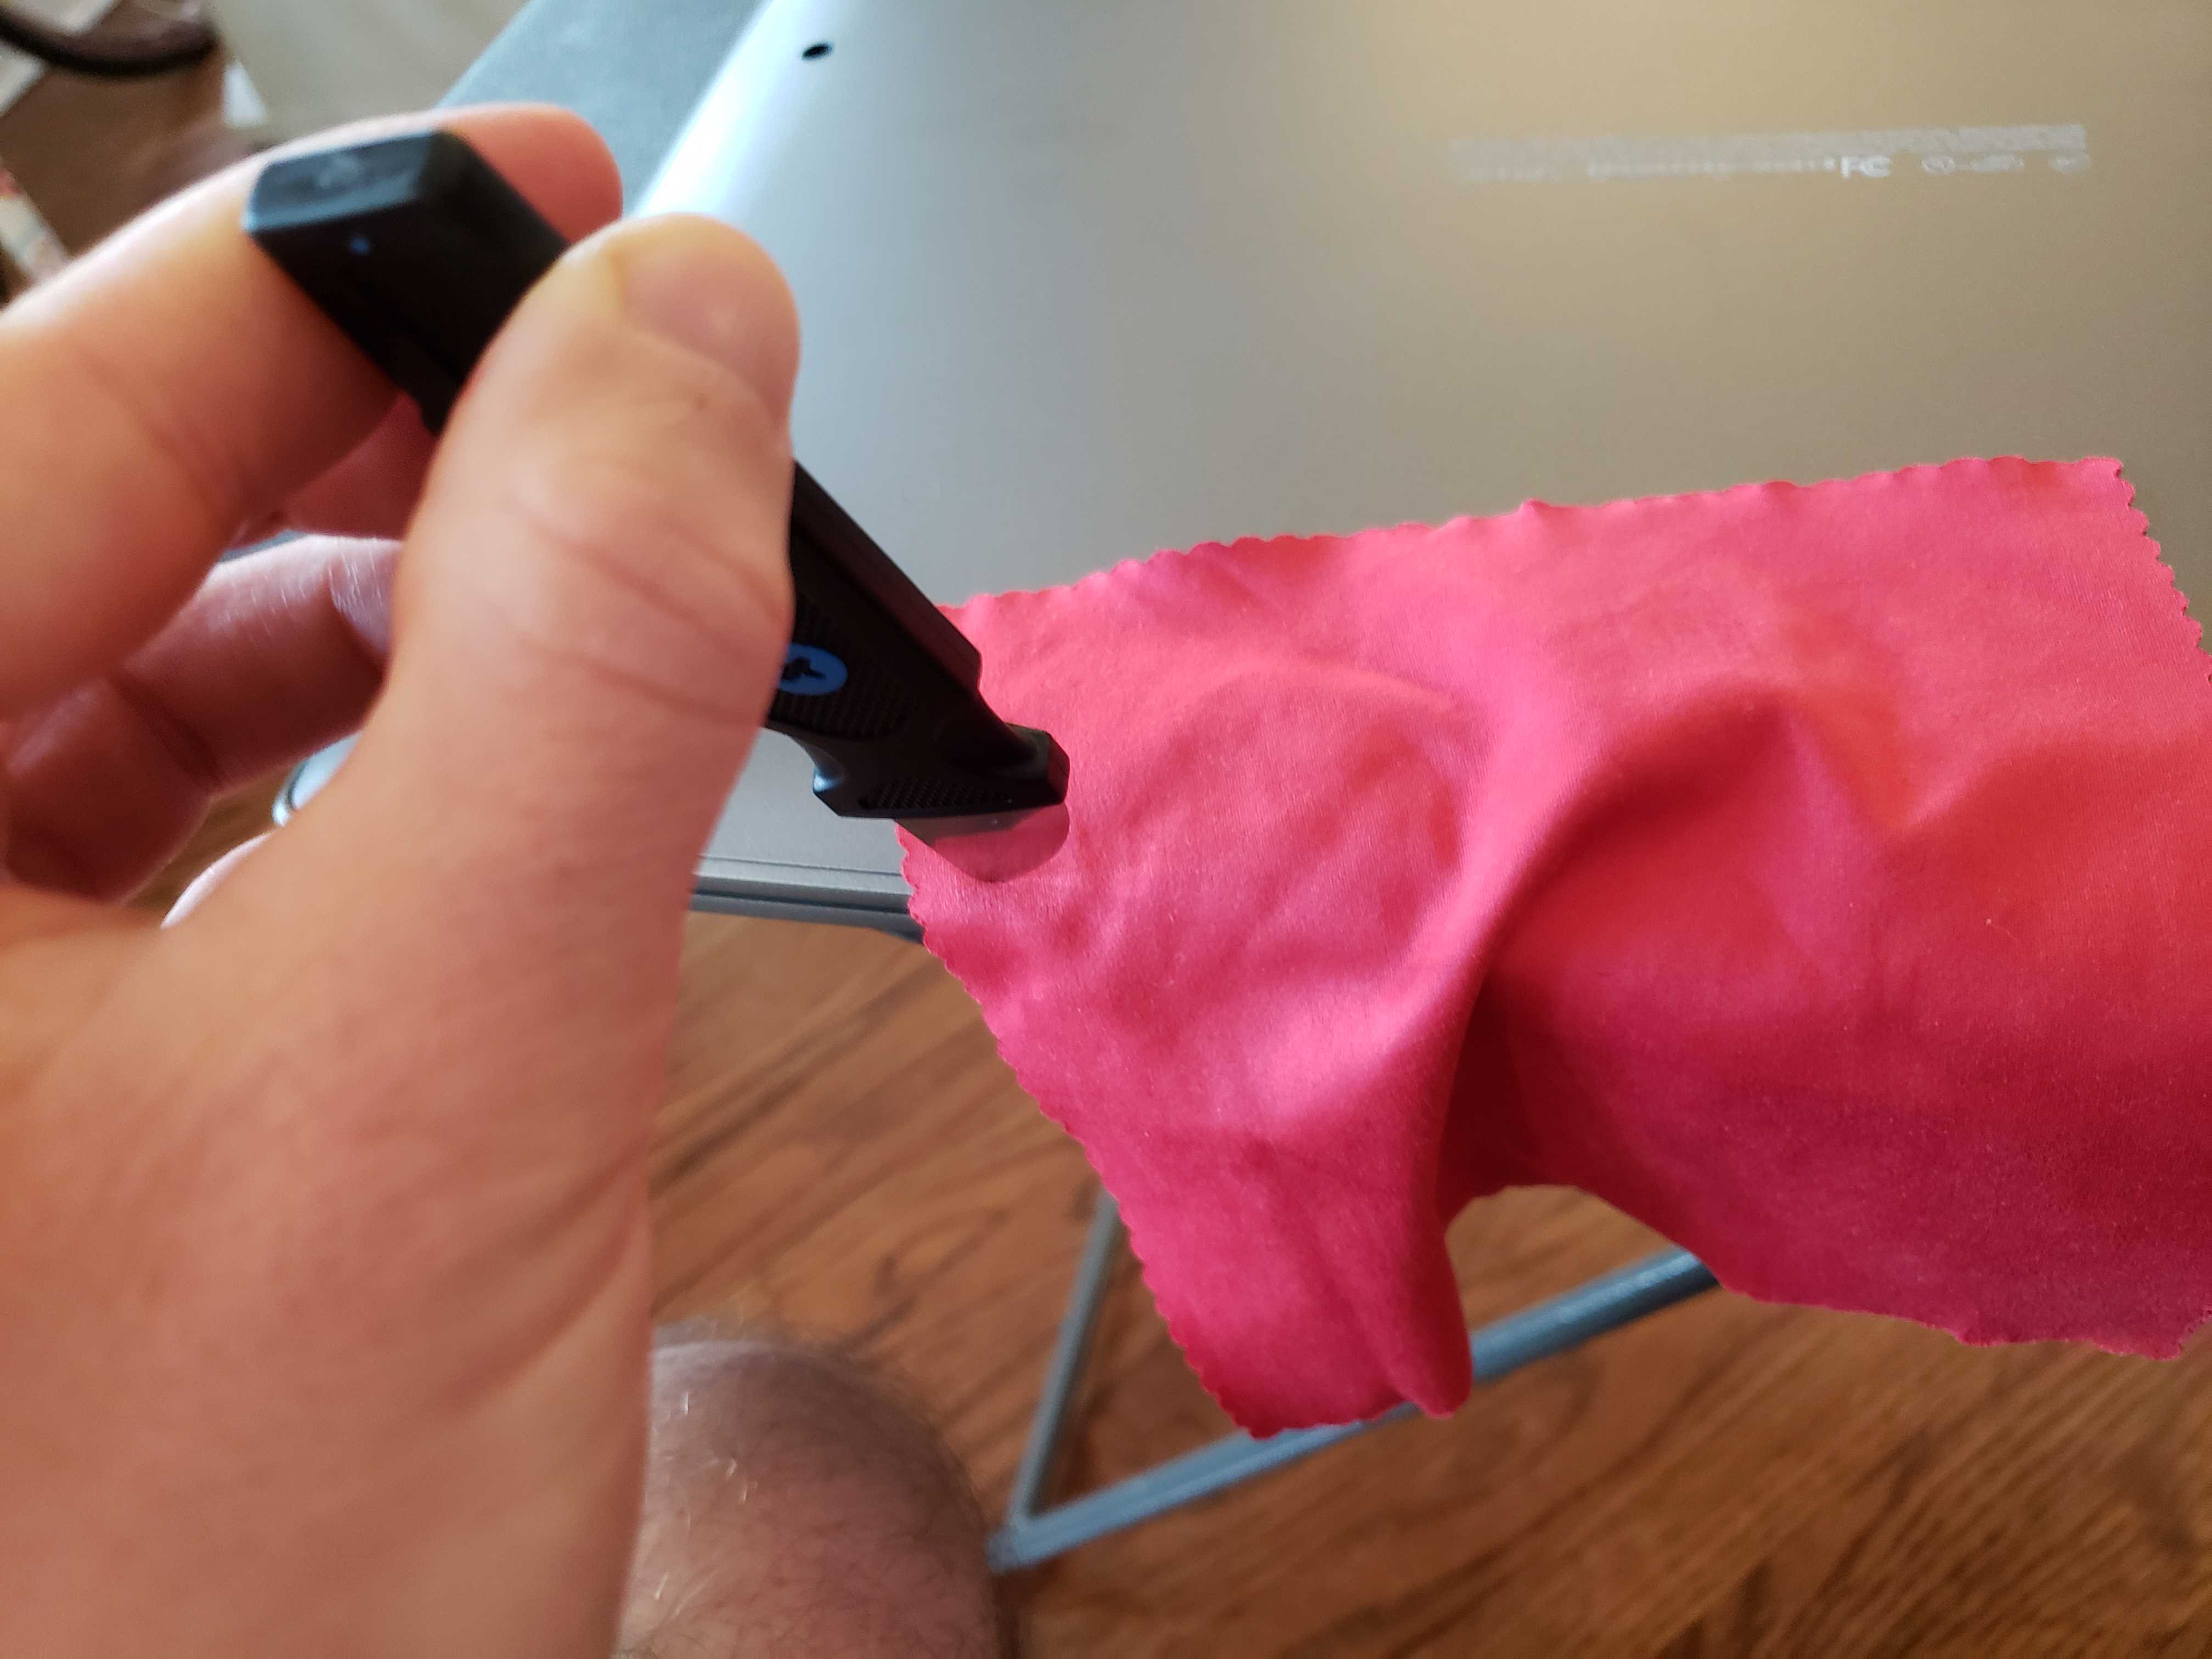
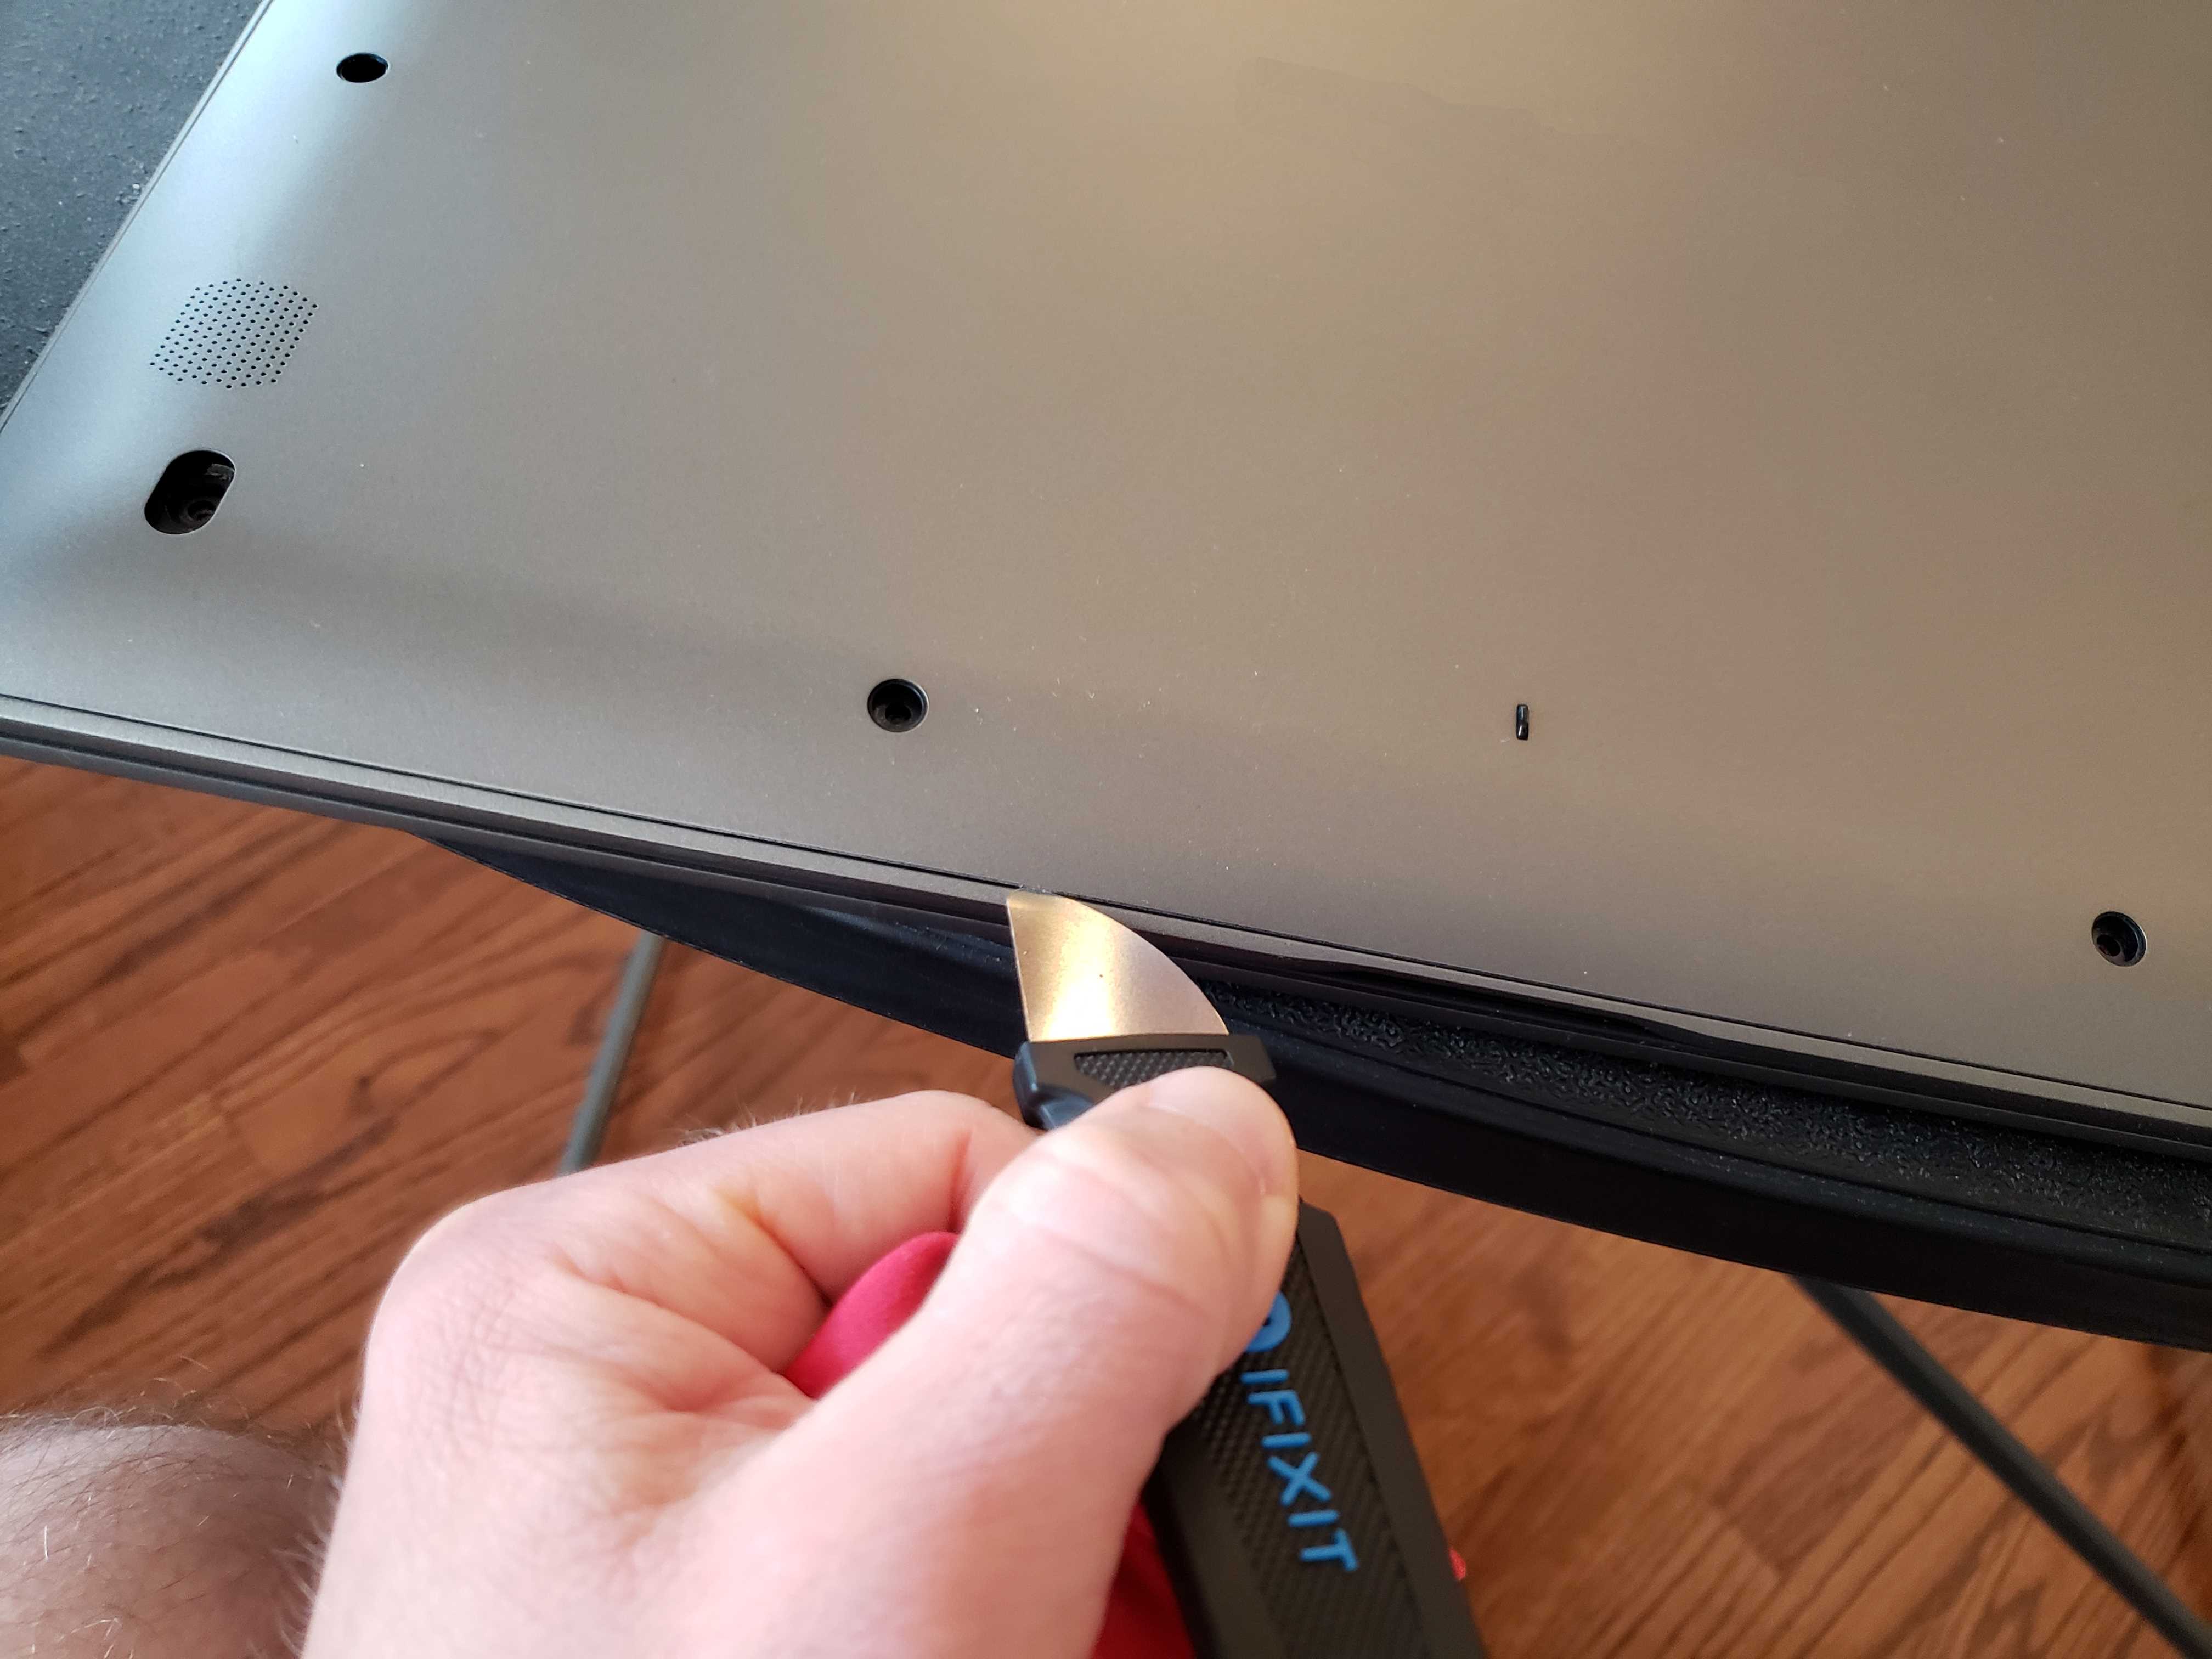
Step 2: Remove the Backplate
I found this step to be surprisingly difficult. Use the knife to pry around the edges and ideally do it with an old microfiber cloth around it so you don't damage the paint. Don't use too much force or you could bend or break the backplate.
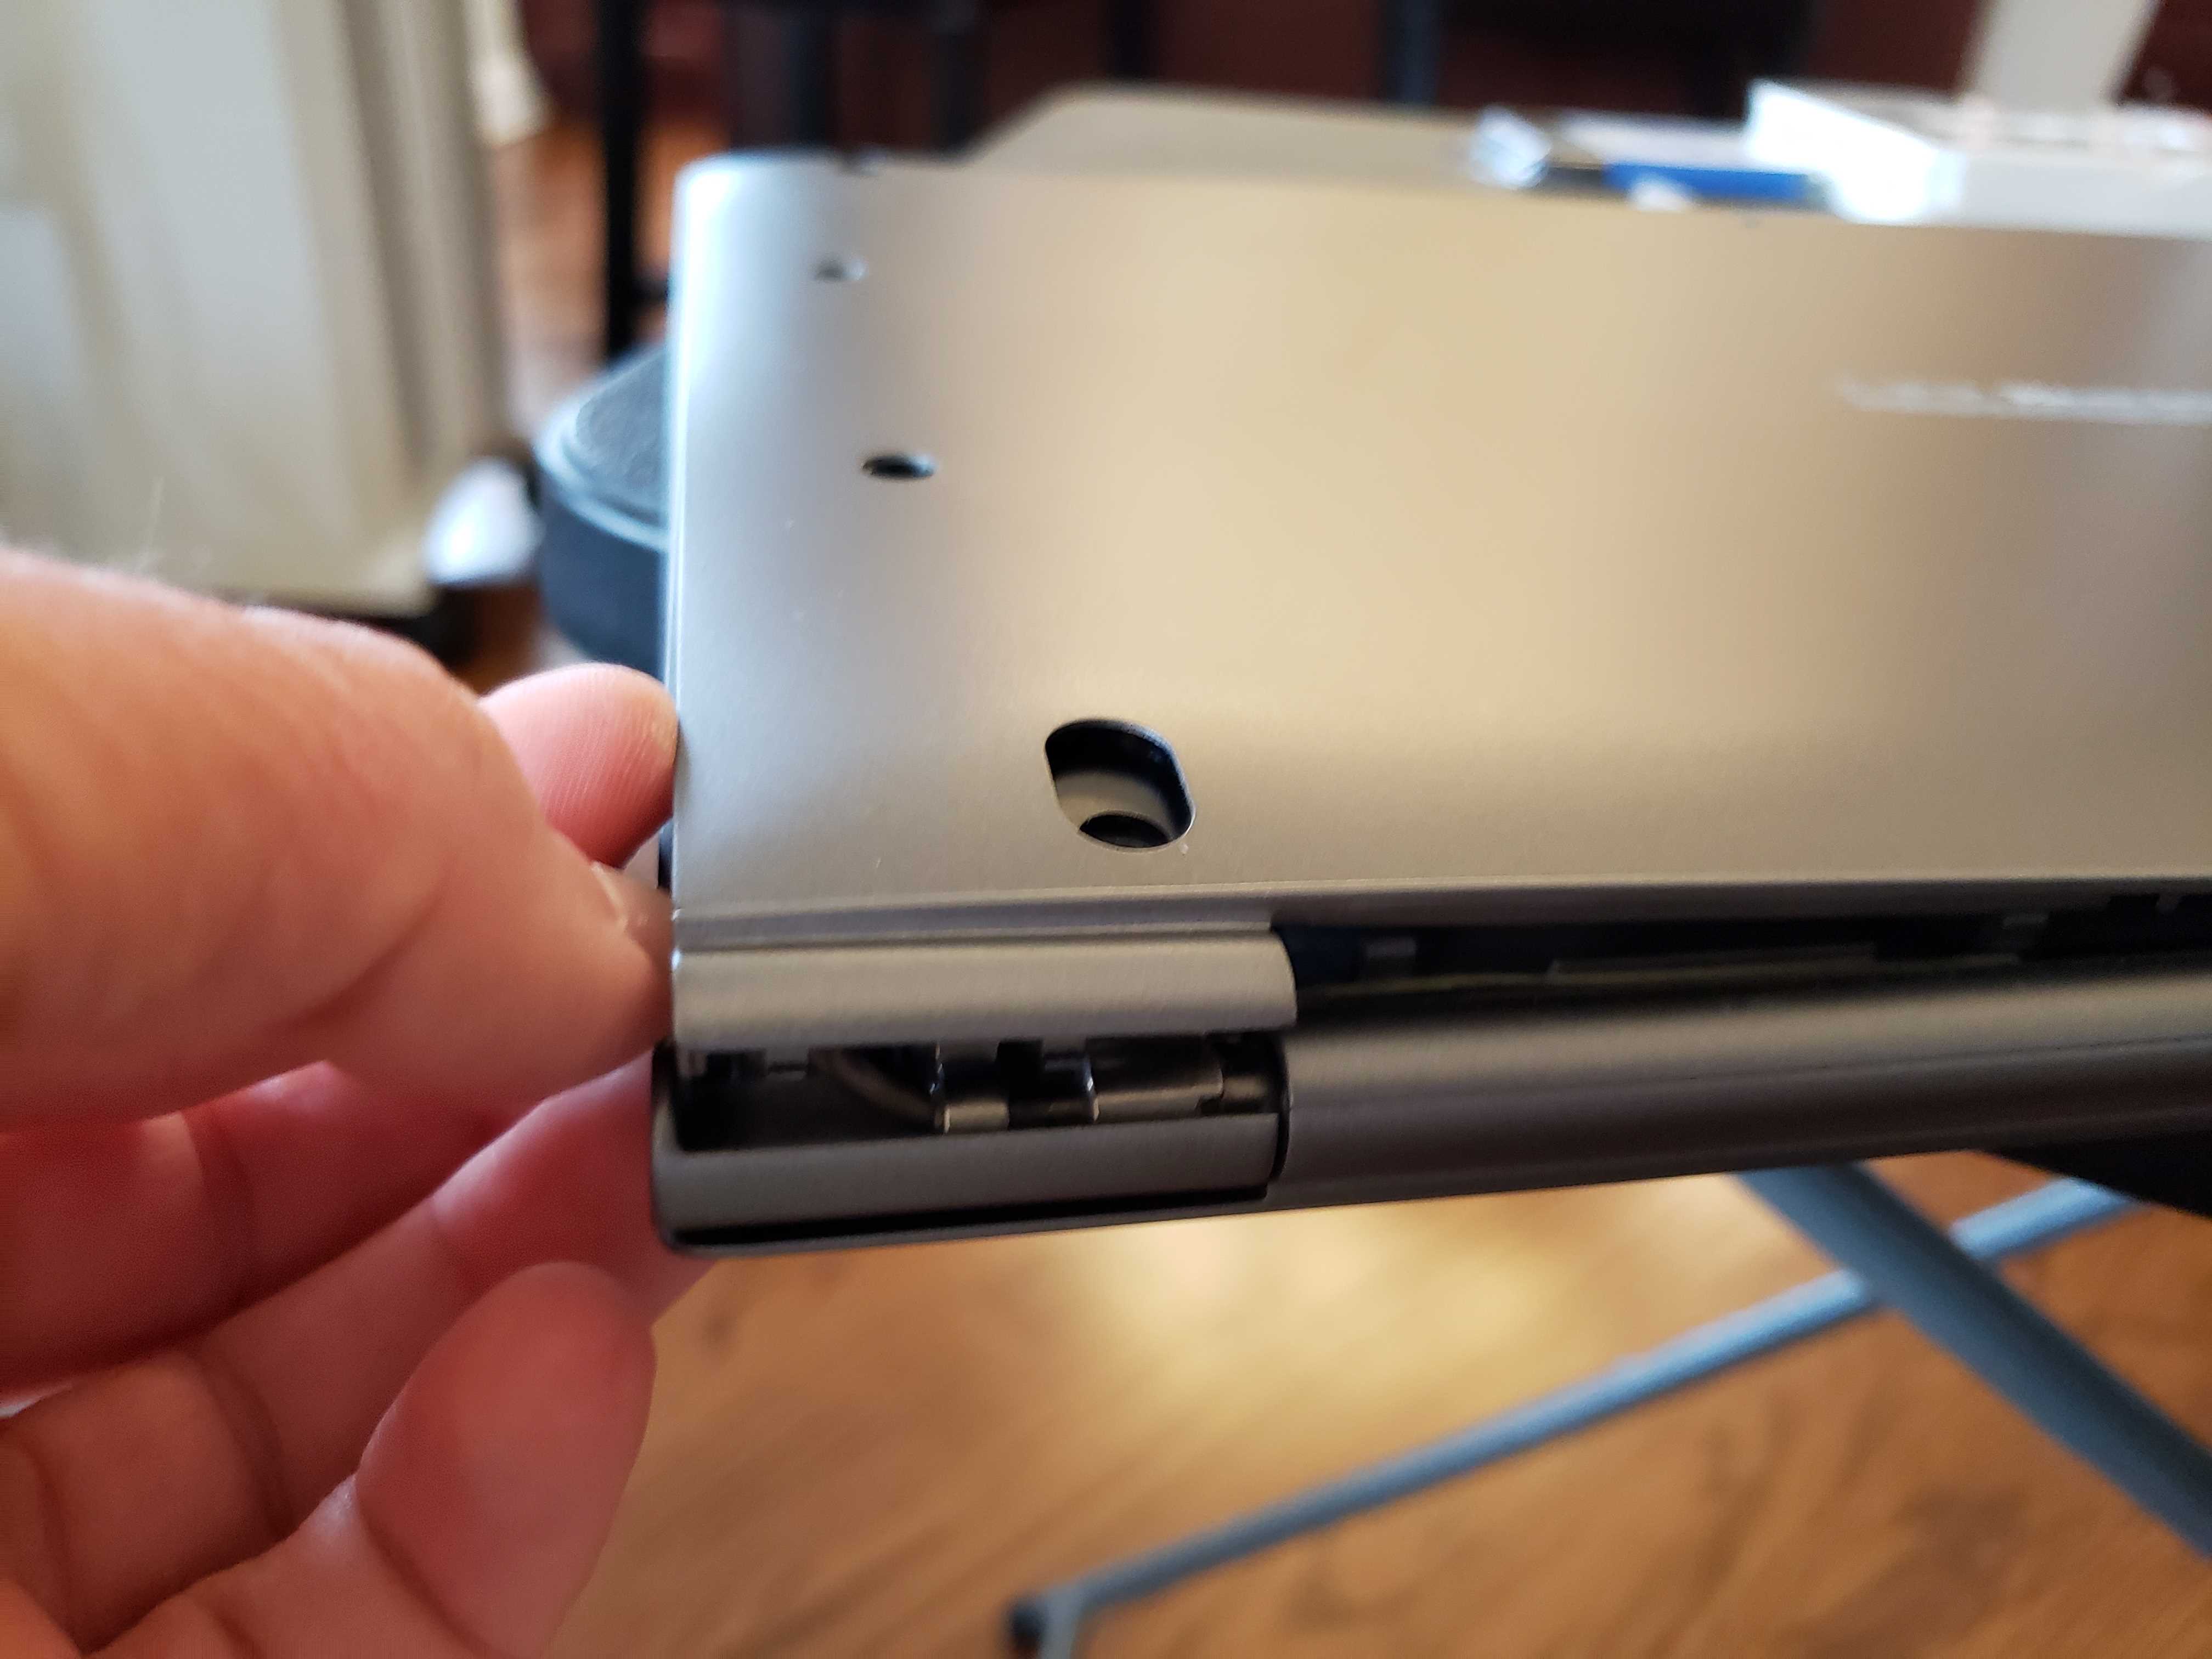
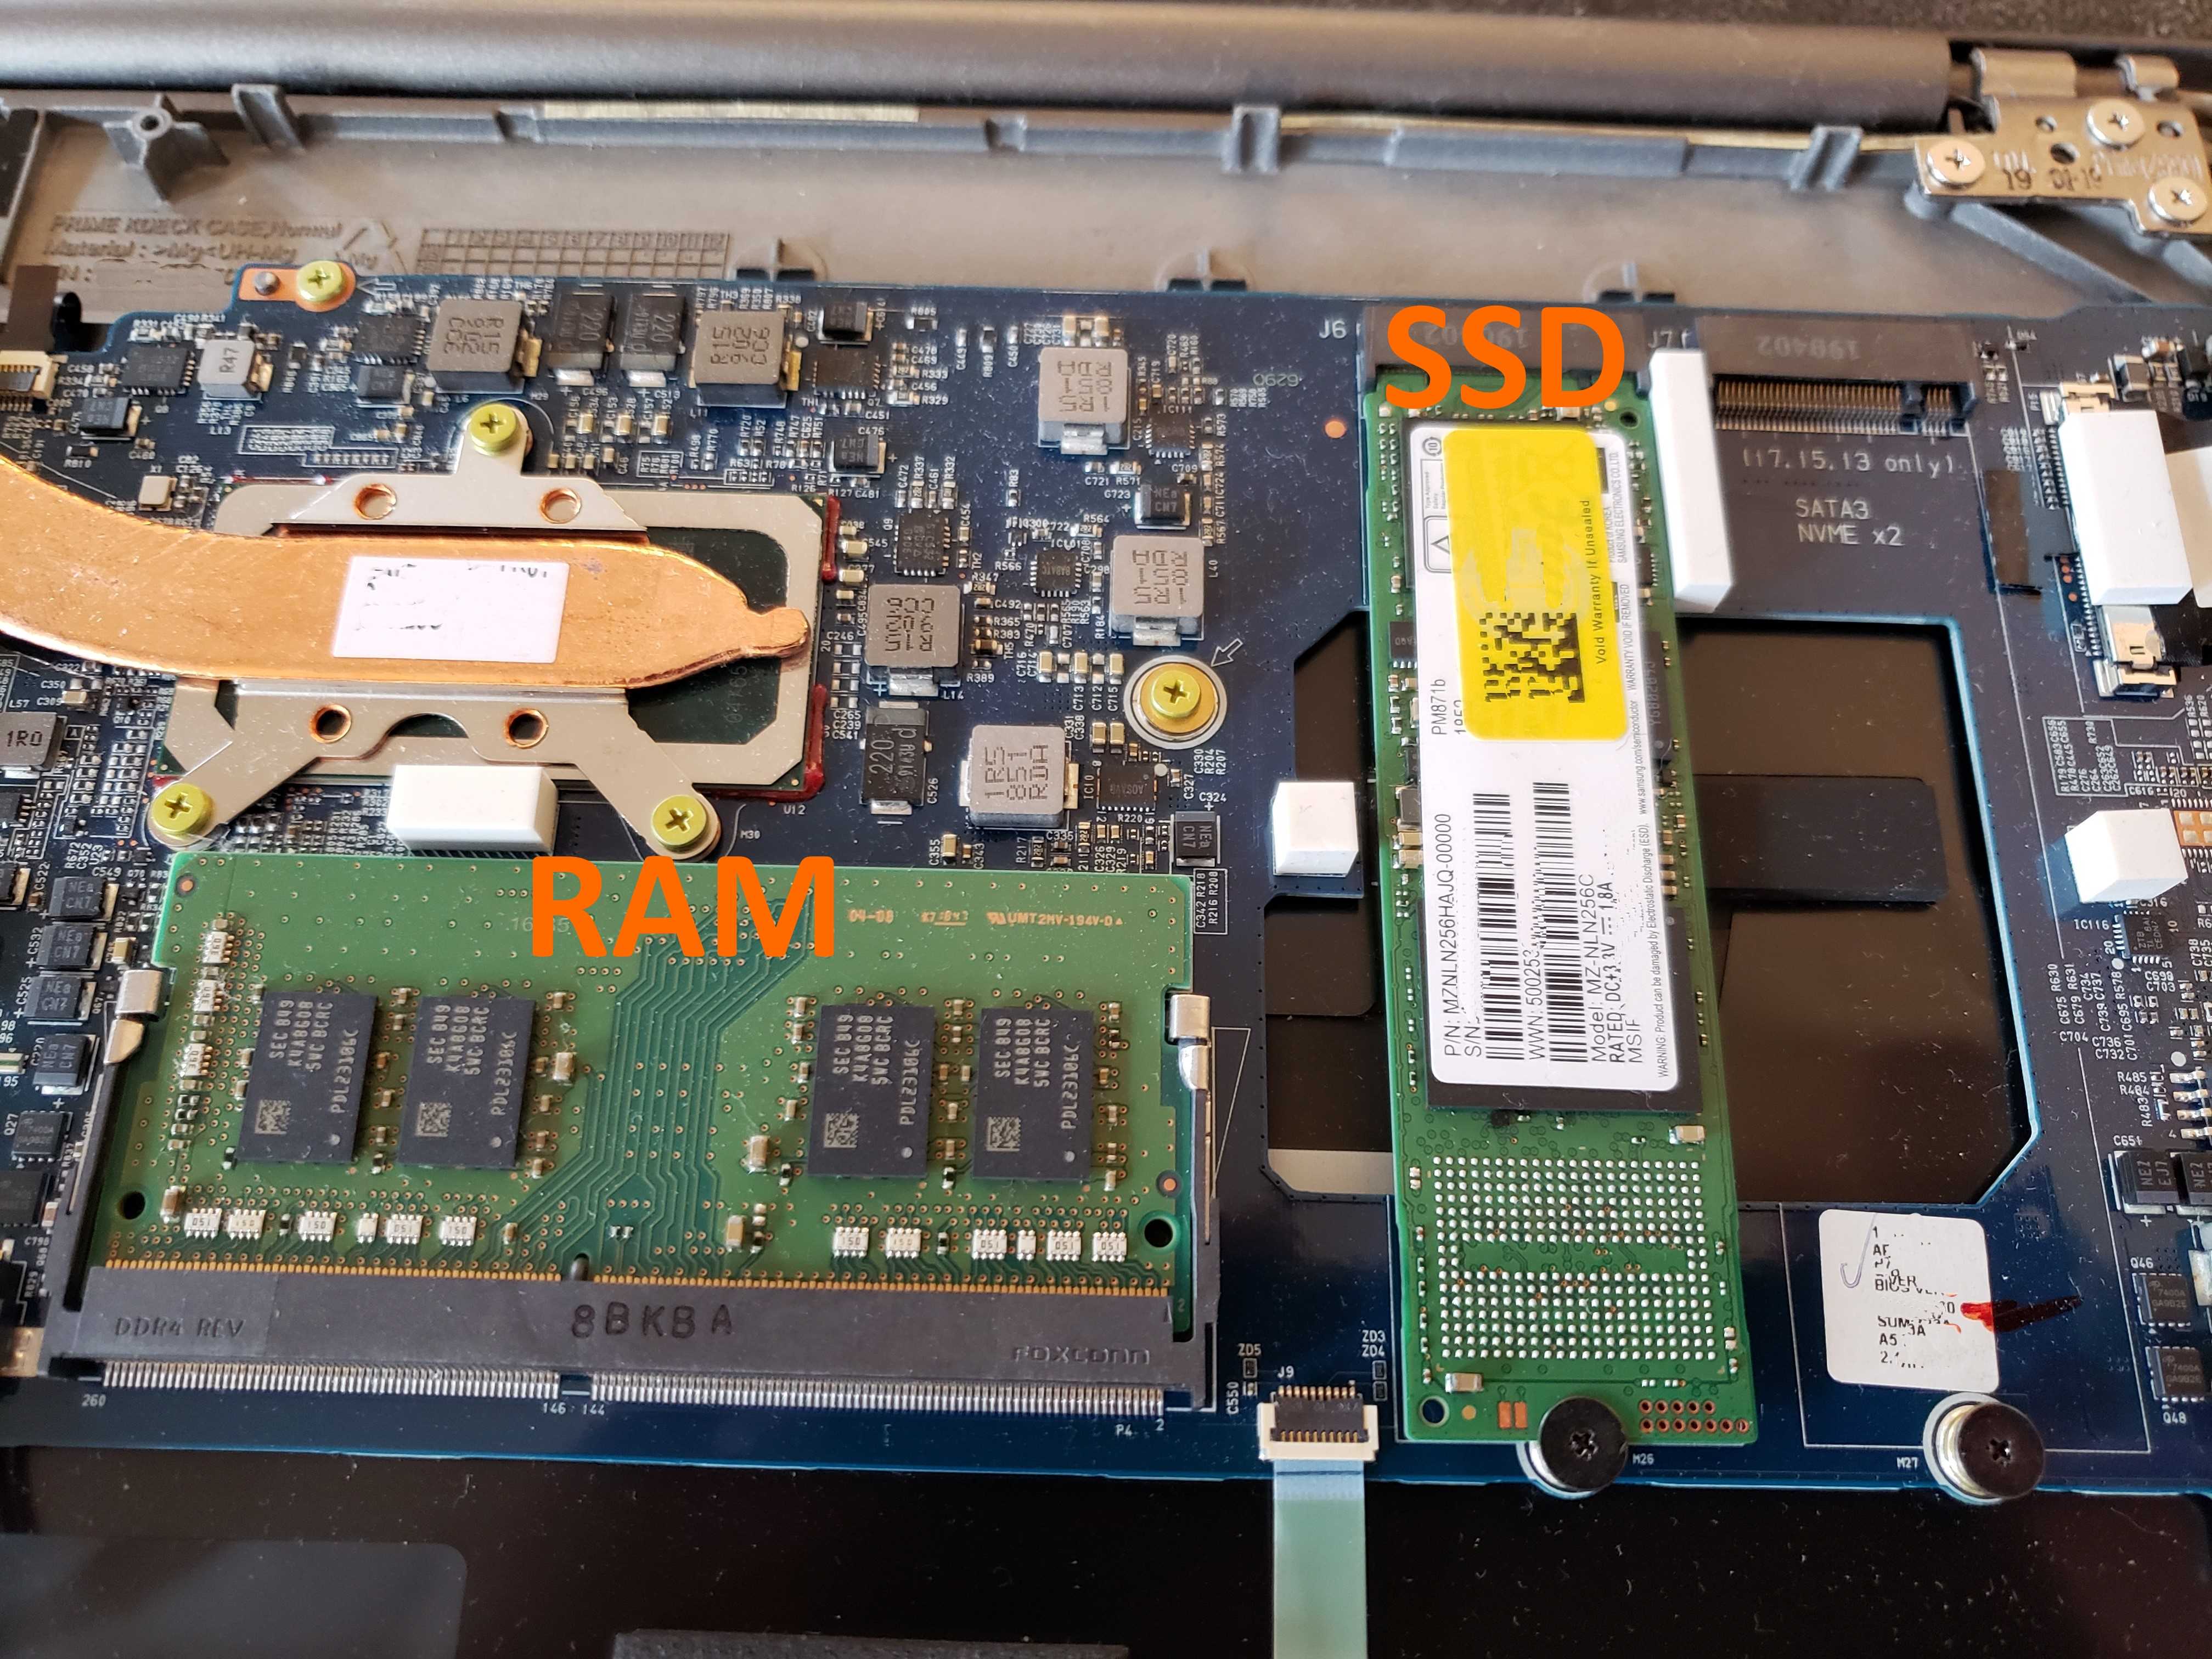
If you were successful in removing the backplate, then you should have access to the RAM and SSD, like so:
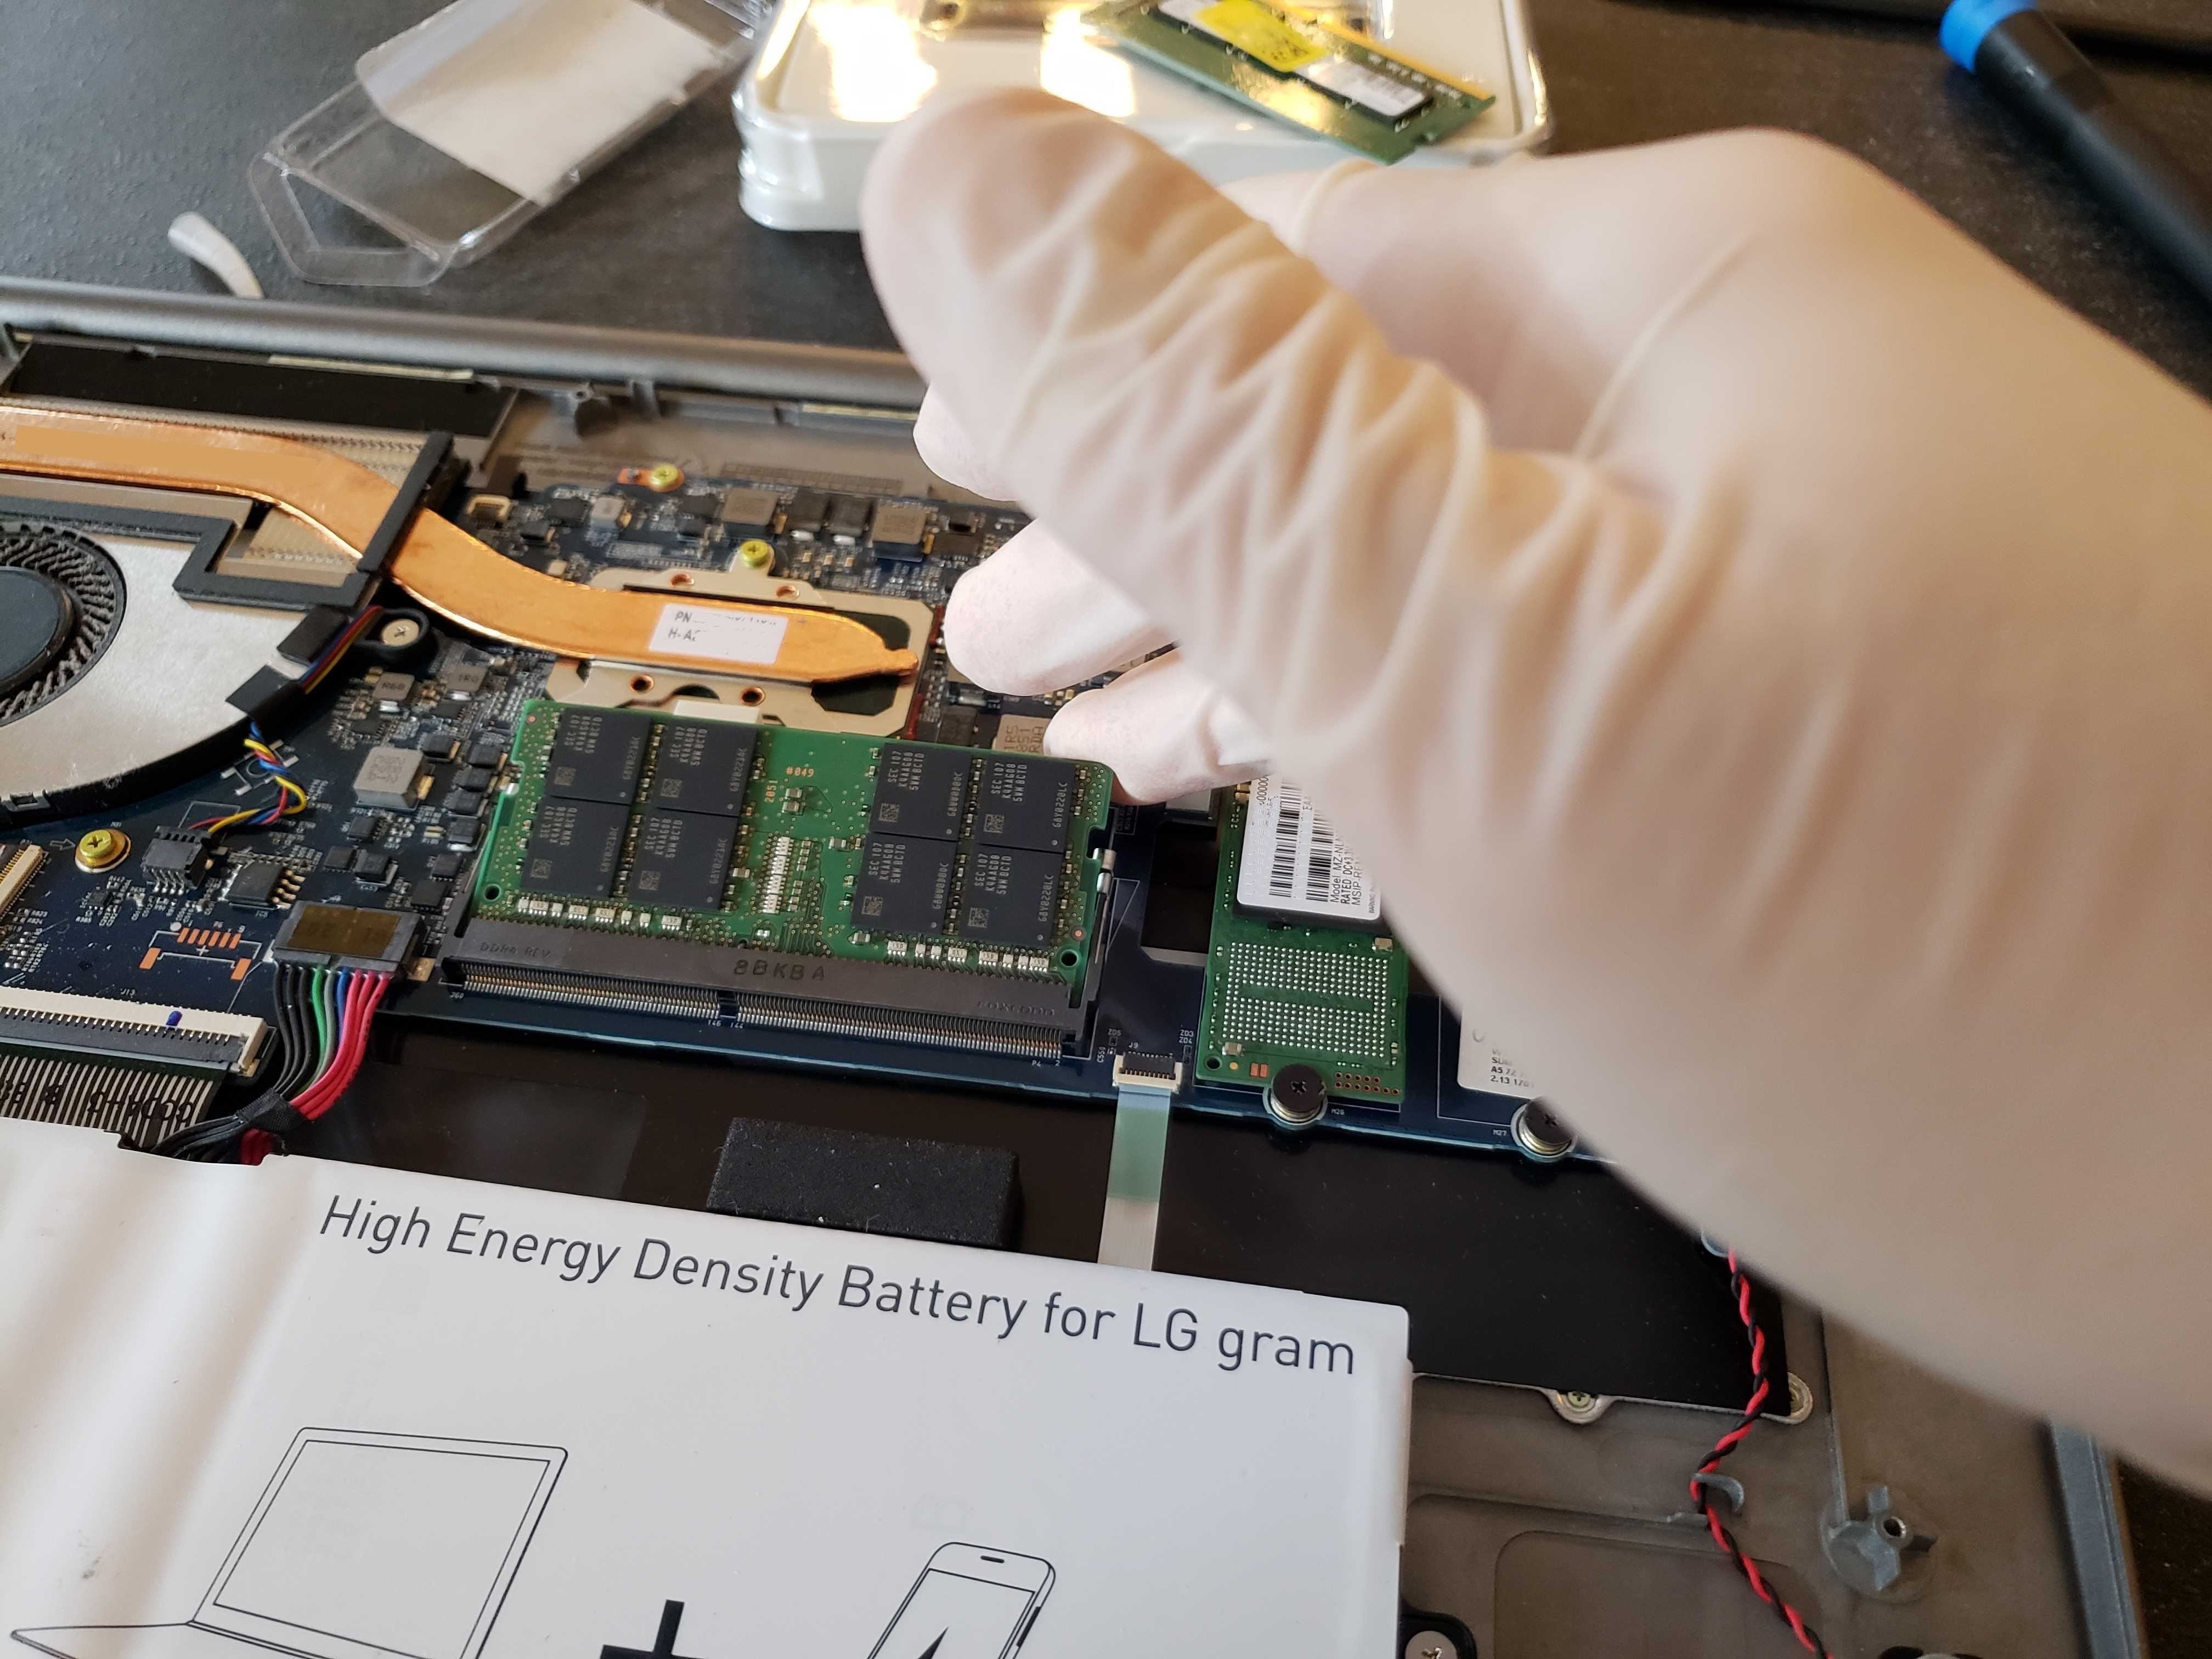
Step 3: Install the New RAM Chip
Pull the side latches to disengage the old RAM chip and remove it at a
Step 4: Boot the Laptop Post RAM Upgrade
Here's where I differ from other tutorials of this kind in that I err on the conservative side. I recommend you put the backplate back on temporarily (don't put the screws back in yet), turn it right side up, and then boot up to make sure that the laptop accepts the new memory.
First, hold F2 at boot time to get into the BIOS. It may take a little longer to boot the first time.
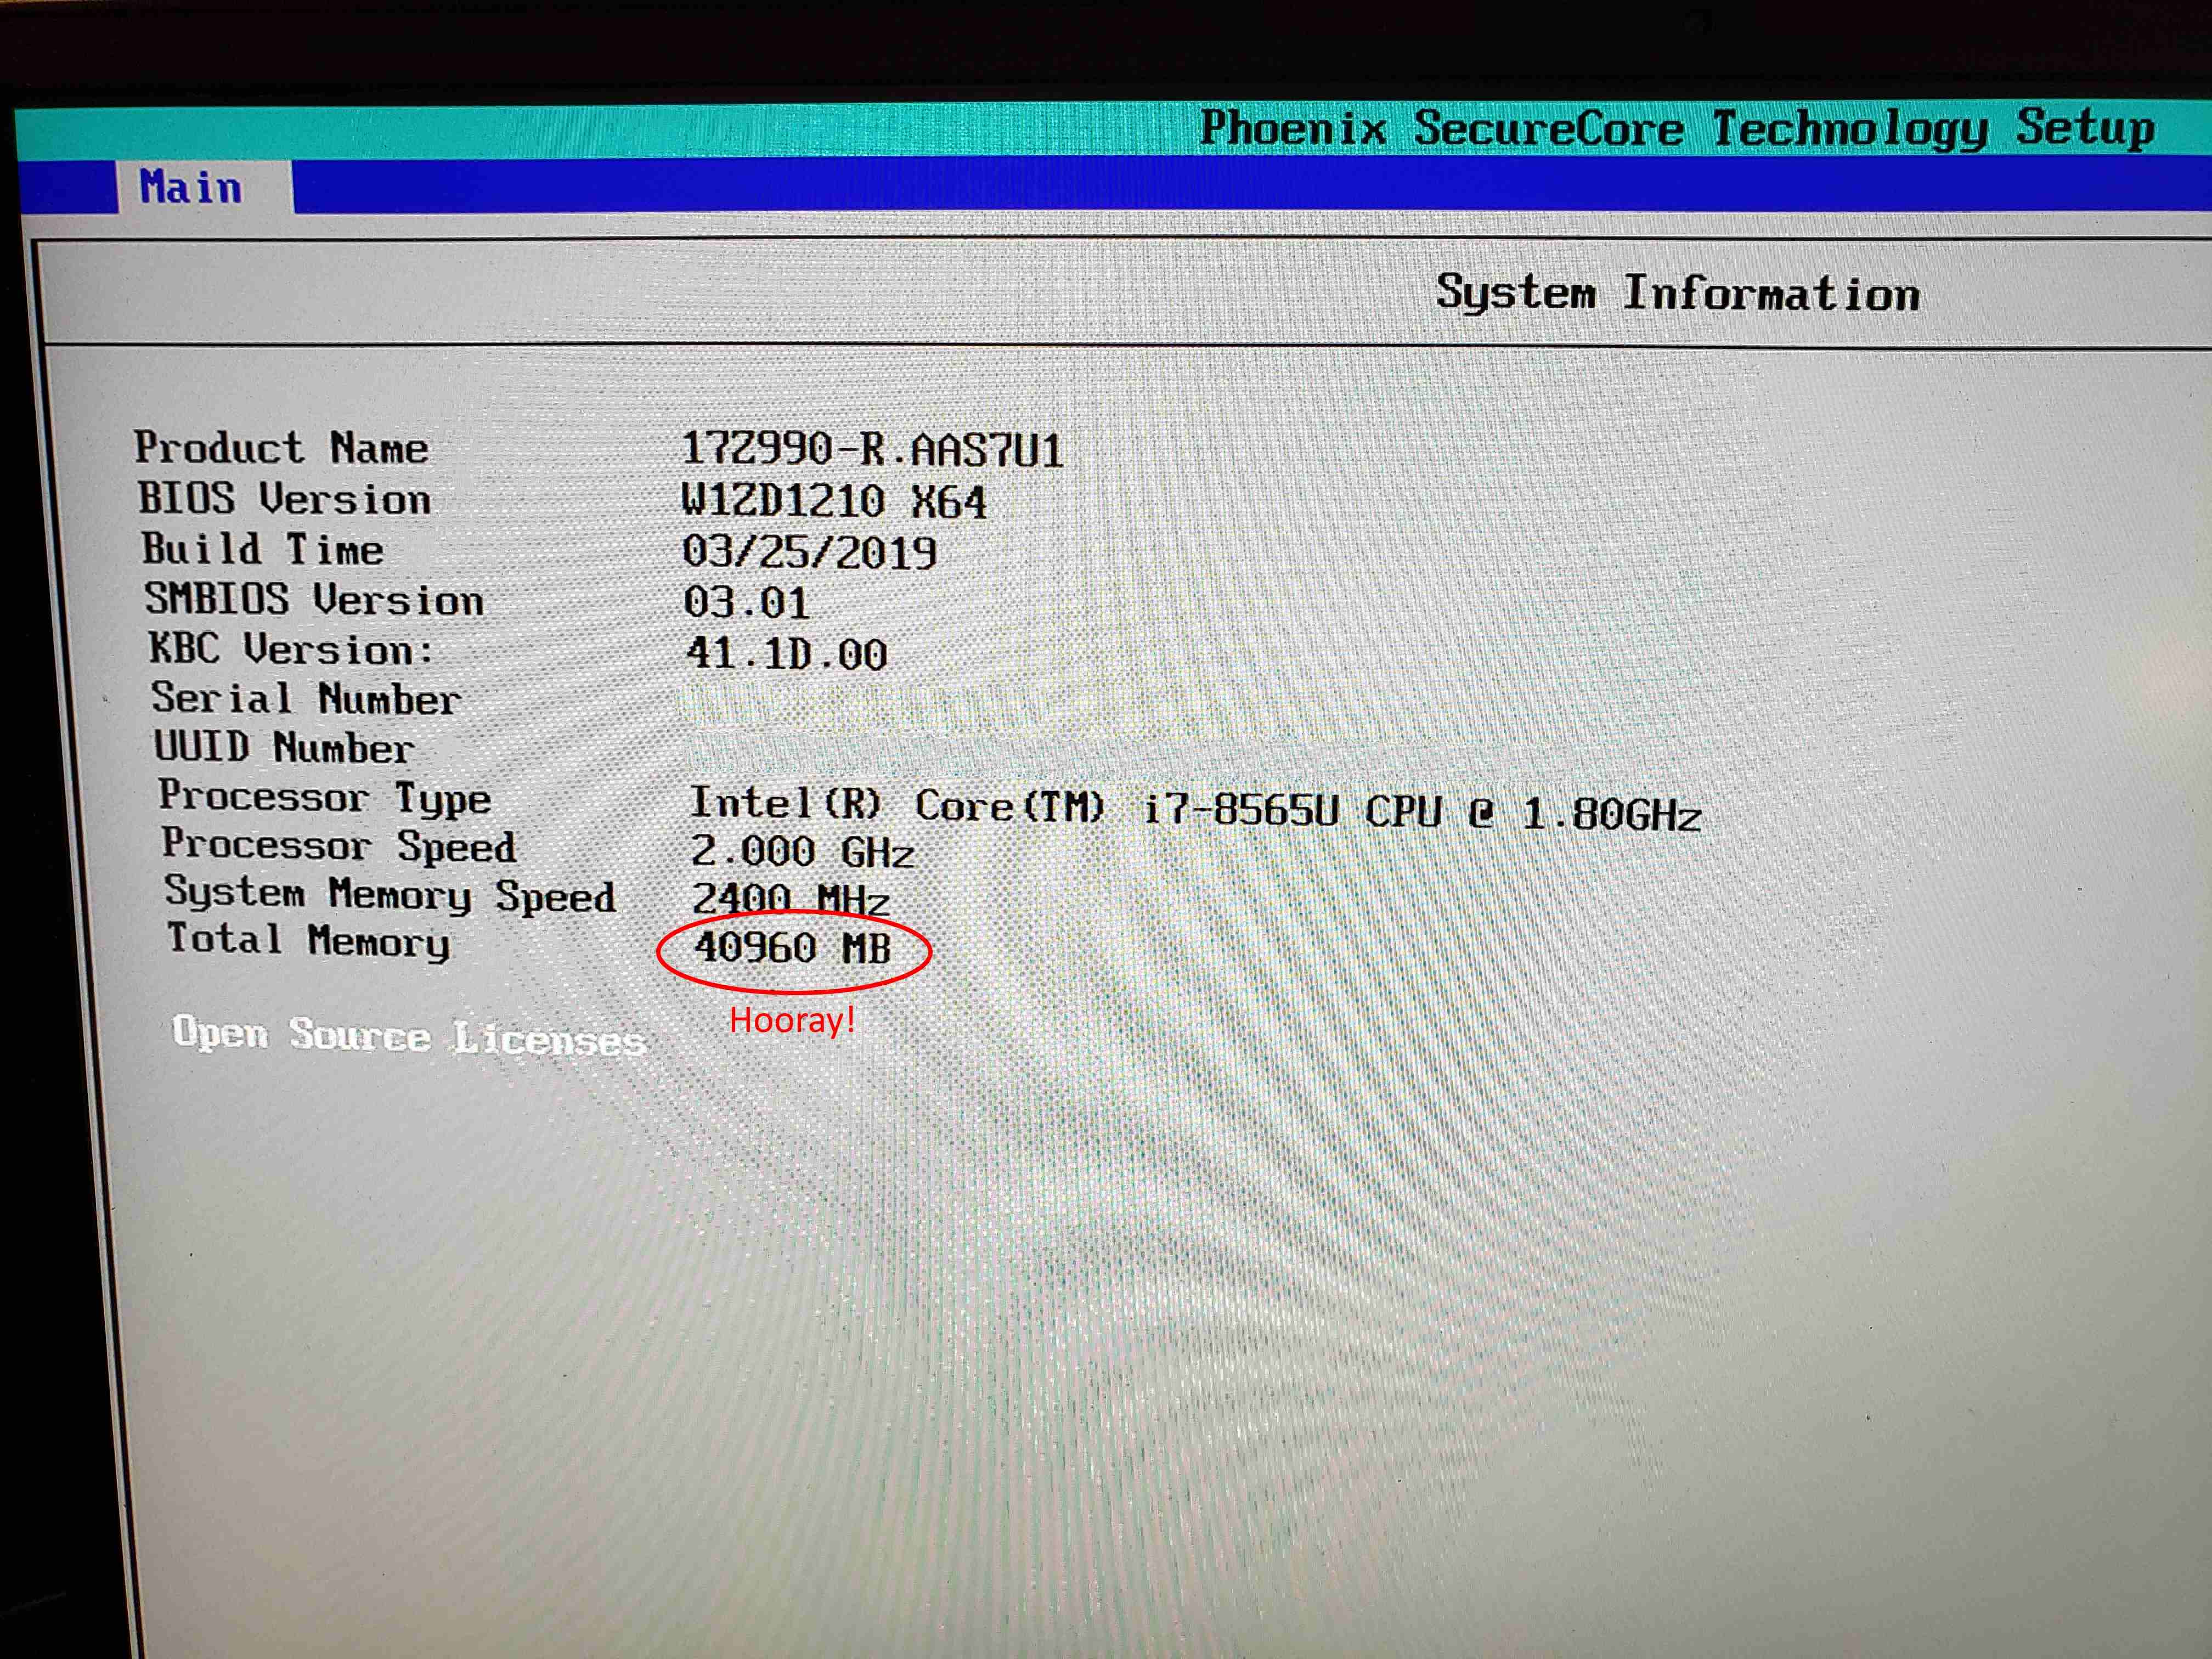
The BIOS recognizes our new memory. Hooray!
After that, boot to Windows.
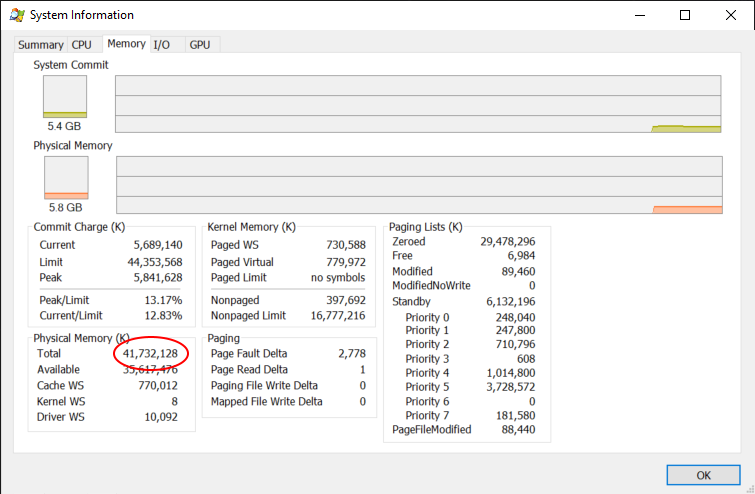
ProcMon shows us that the operating system recognizes and can utilize all the memory. Awesome!
Step 5: Install the New SSD
We are now going to install the new solid-state drive. Remove the backplate from the laptop again and unscrew the screw from the empty SATA x2 slot. Insert
the new SSD at a
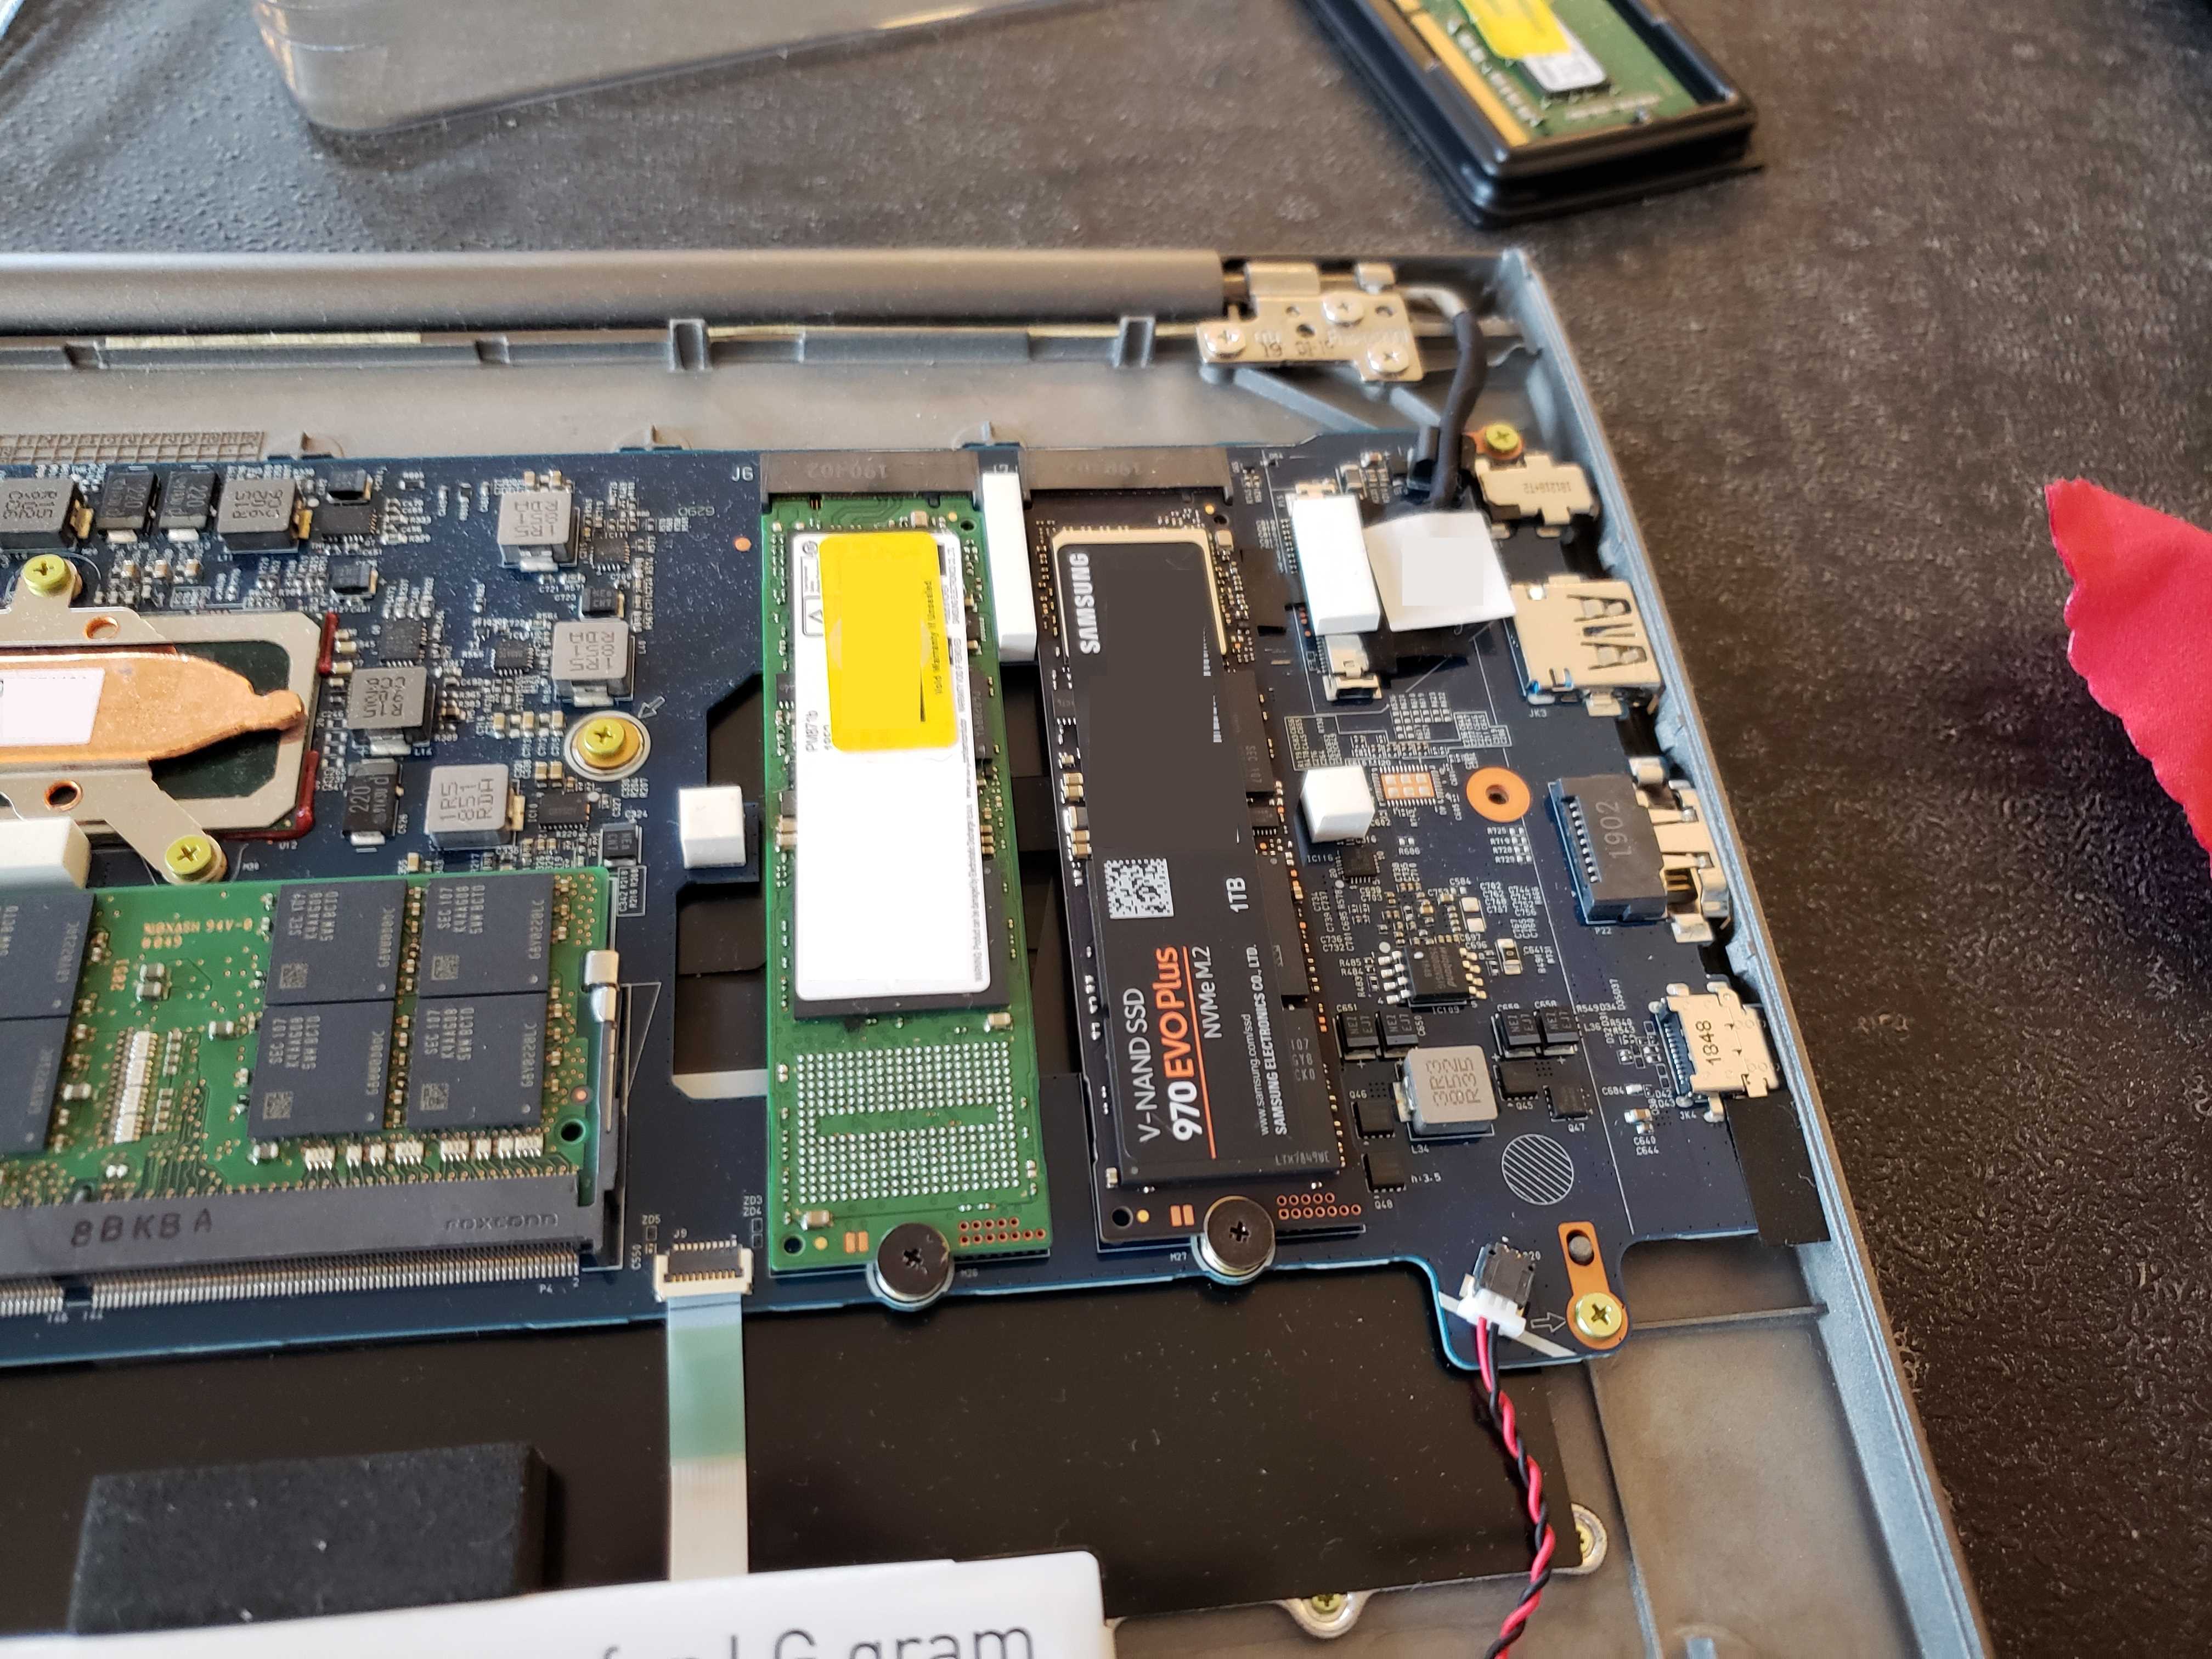
Both SSDs are now installed. Put the backplate back on temporarily again. Turn back on the laptop and boot into Windows.
Step 6: Use Samsung Software to Copy Over the Image of Your Operating System
Our goal here is to move EVERYTHING onto the new SSD so that we can swap out the old one and move the new, better one into the faster SATA x4 slot. To do this, we need to copy over:
- The Windows (C:) partition.
- The EFI boot partition.
- The OEM operating system recovery partition.
If you go into Disk Management in Windows, you should see something like this.

We want to copy over all of them. If you purchased a Samsung SSD then you should be able to copy over the Windows partition EFI boot partition and recovery partition from the OEM SSD that came installed in the LG Gram by using the Samsung Data Migration tool.
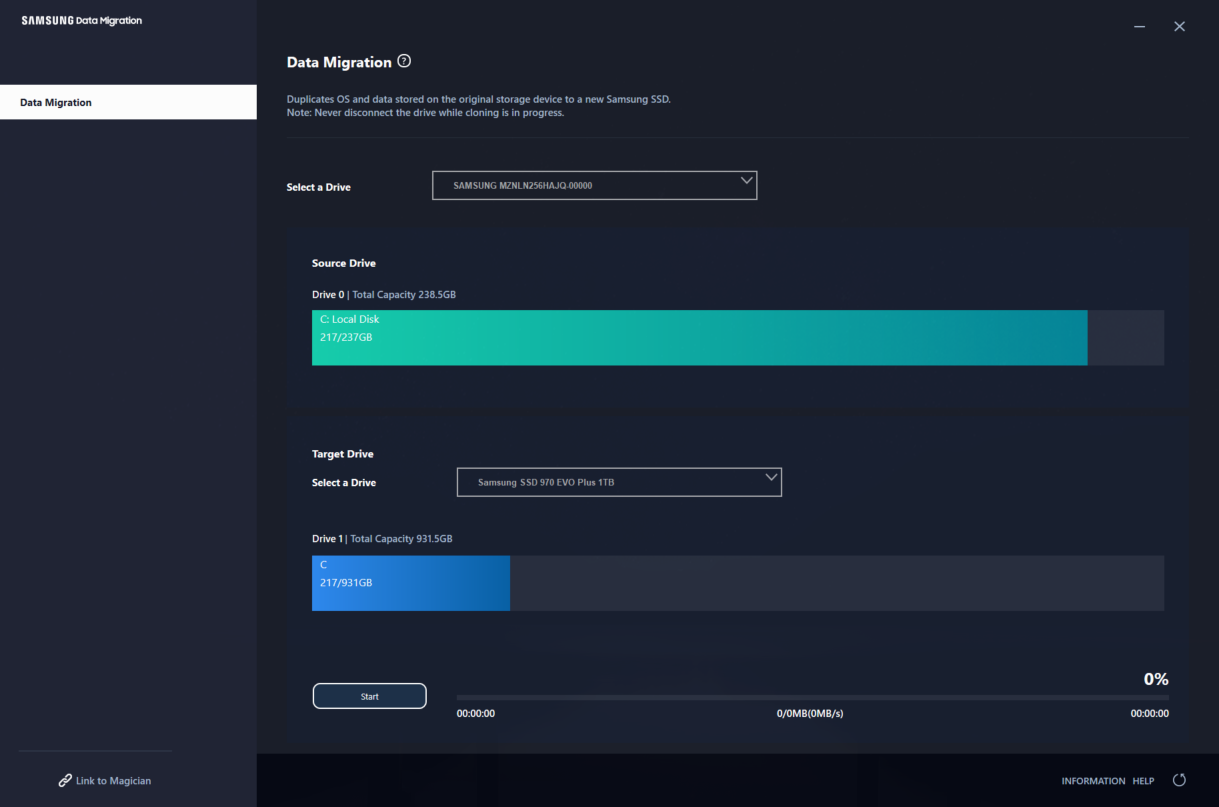
At first, I thought that it would only copy over the Windows OS partition since the tool refers to the SSD as C: (a logical partition name). However, it will copy over the entire SSD contents.
Once you have copied over the partitions from the old SSD to the new one, you should see something like this on the new SSD.

As stated in the comment section of Jay Chen's blog post, if you try to boot your laptop with two SSDs in it, each of which has a Windows system partition on it, then your laptop won't boot and you'll get an error like what you see below.
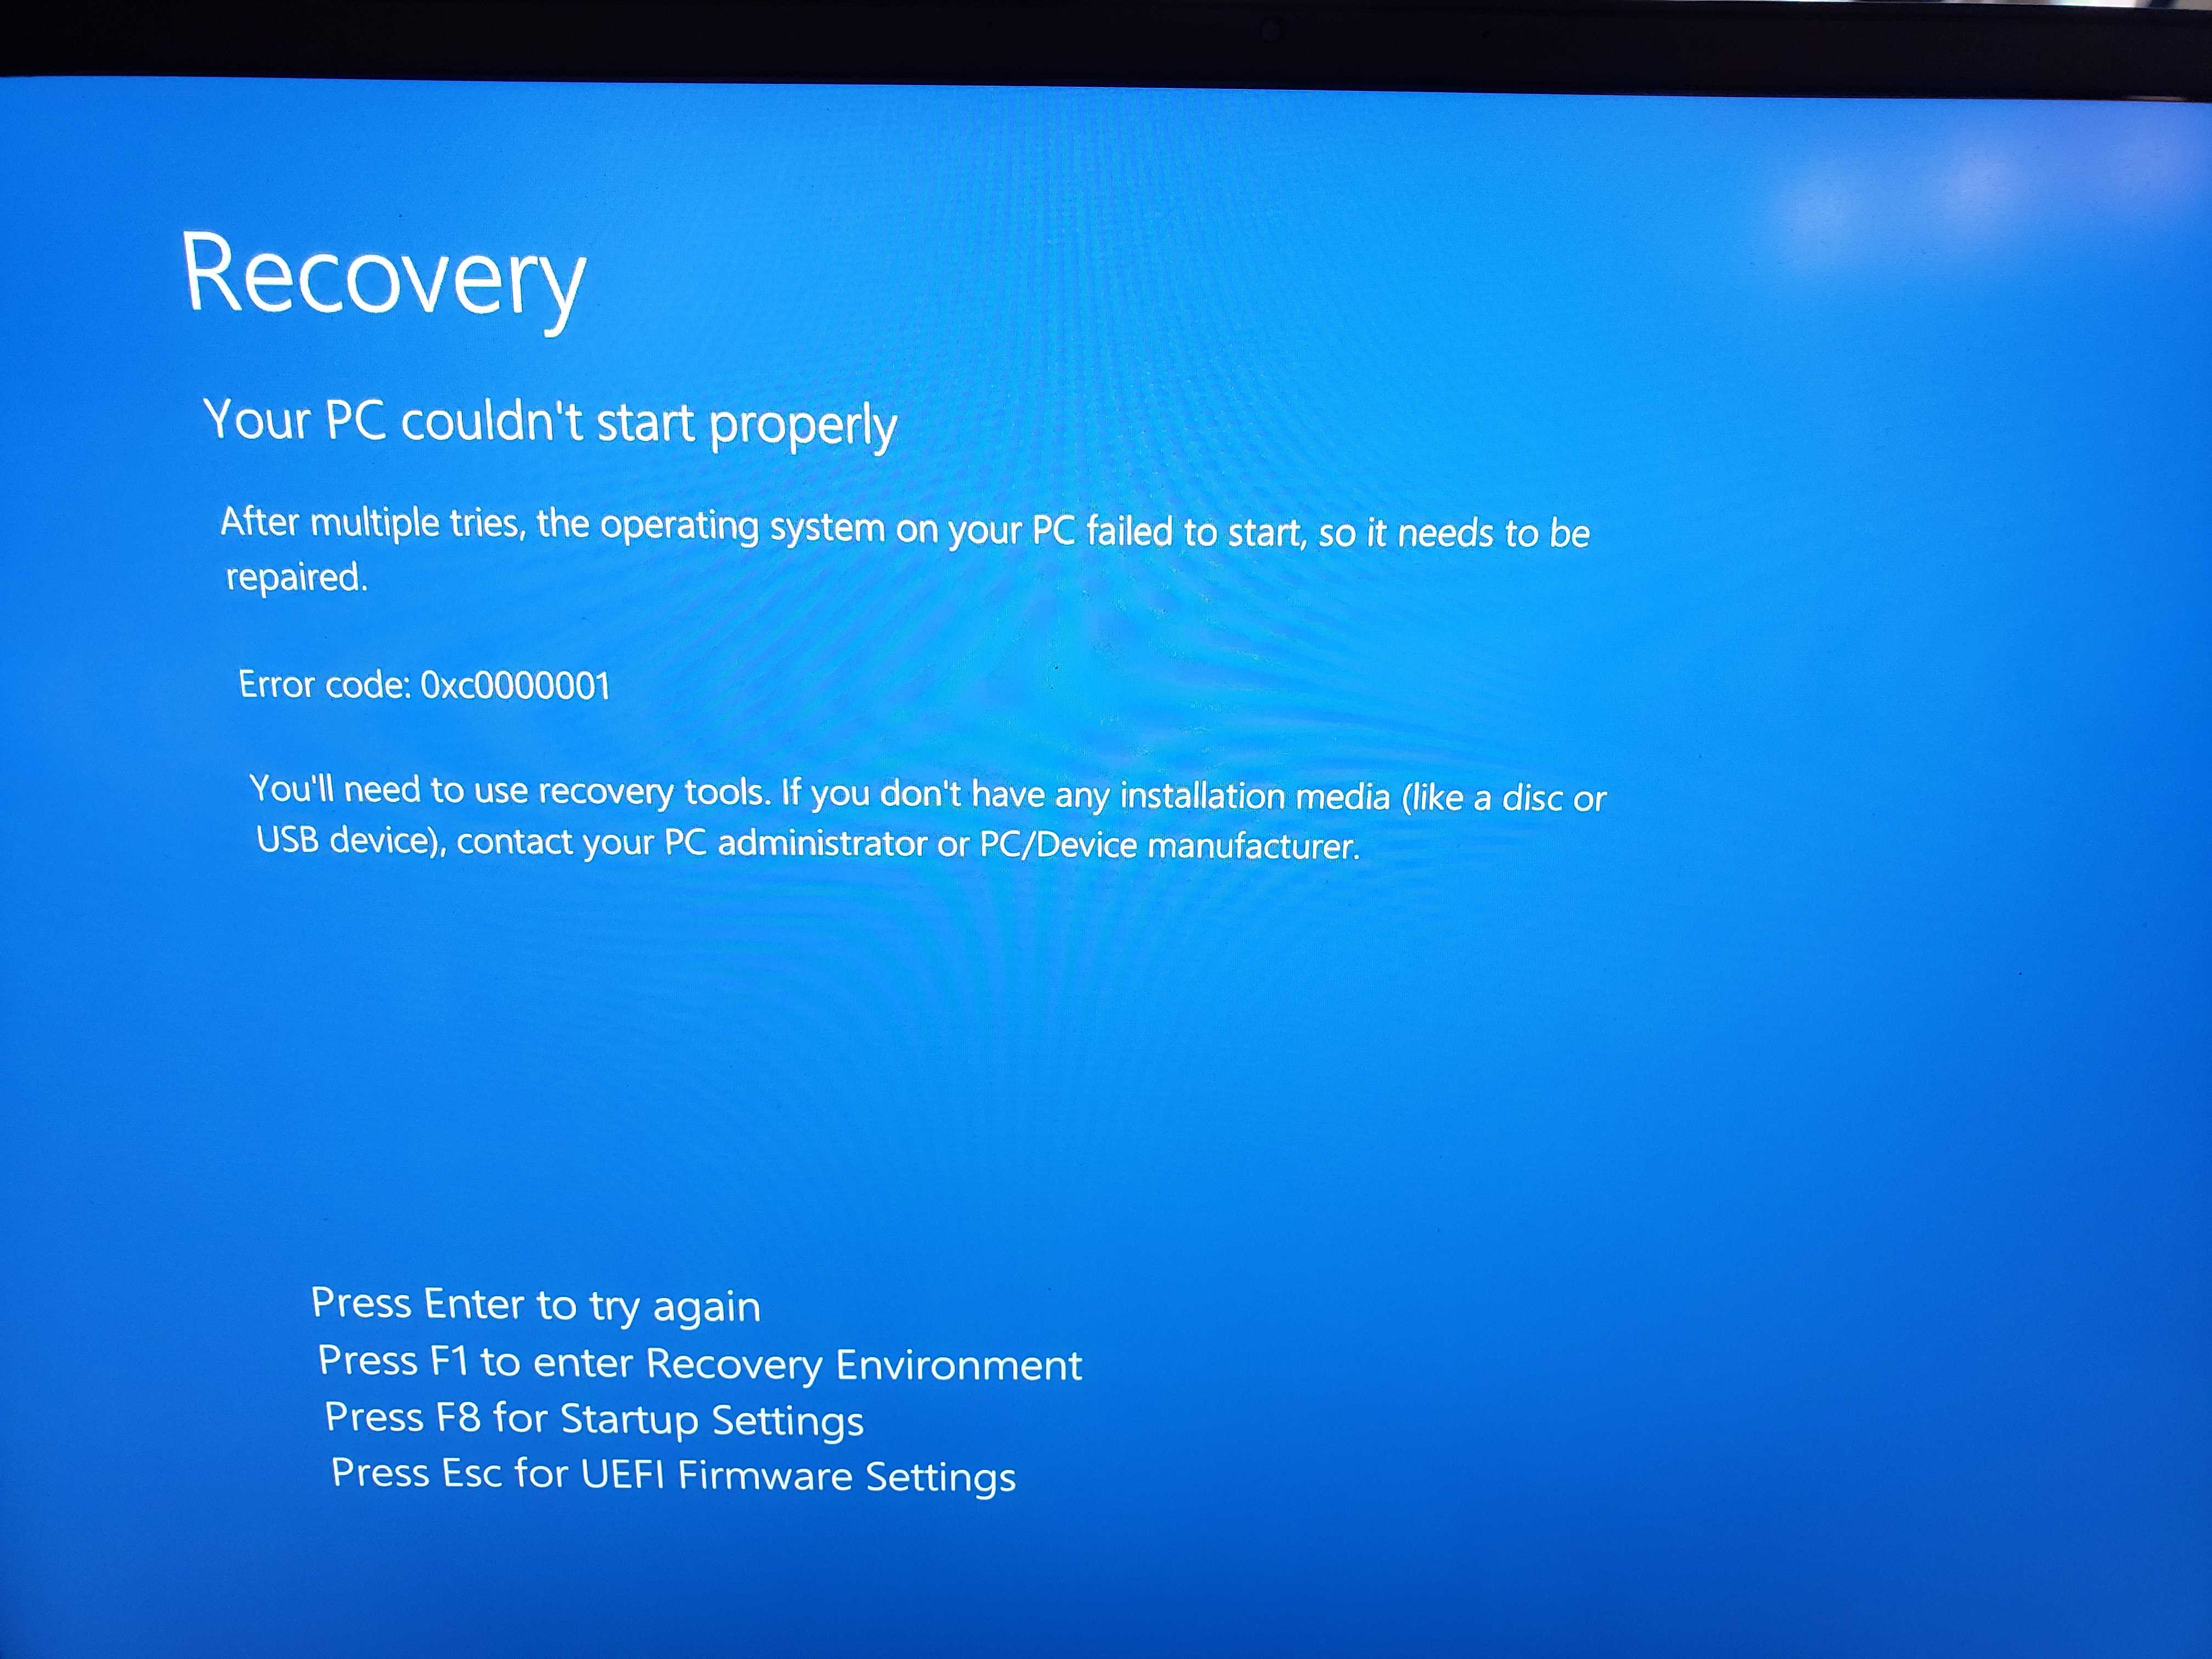
You can either boot to a recovery USB stick at this point and wipe out the partitions on your old SSD, or you can just remove the old SSD and keep it around somewhere as a backup, which is what I chose to do. The final step, then, is to open up the laptop one last time and move the new SSD to the faster SATA x4 slot.
Step 7: Remove Old SSD and Move New One to the SATA x4 Slot
Open up the laptop again and gently unscrew the screws securing the SSDs into their respective slots. Remove the old SSD from the primary (SATA x4) slot and set it aside. Insert the new SSD into the SATA x4 slot at a
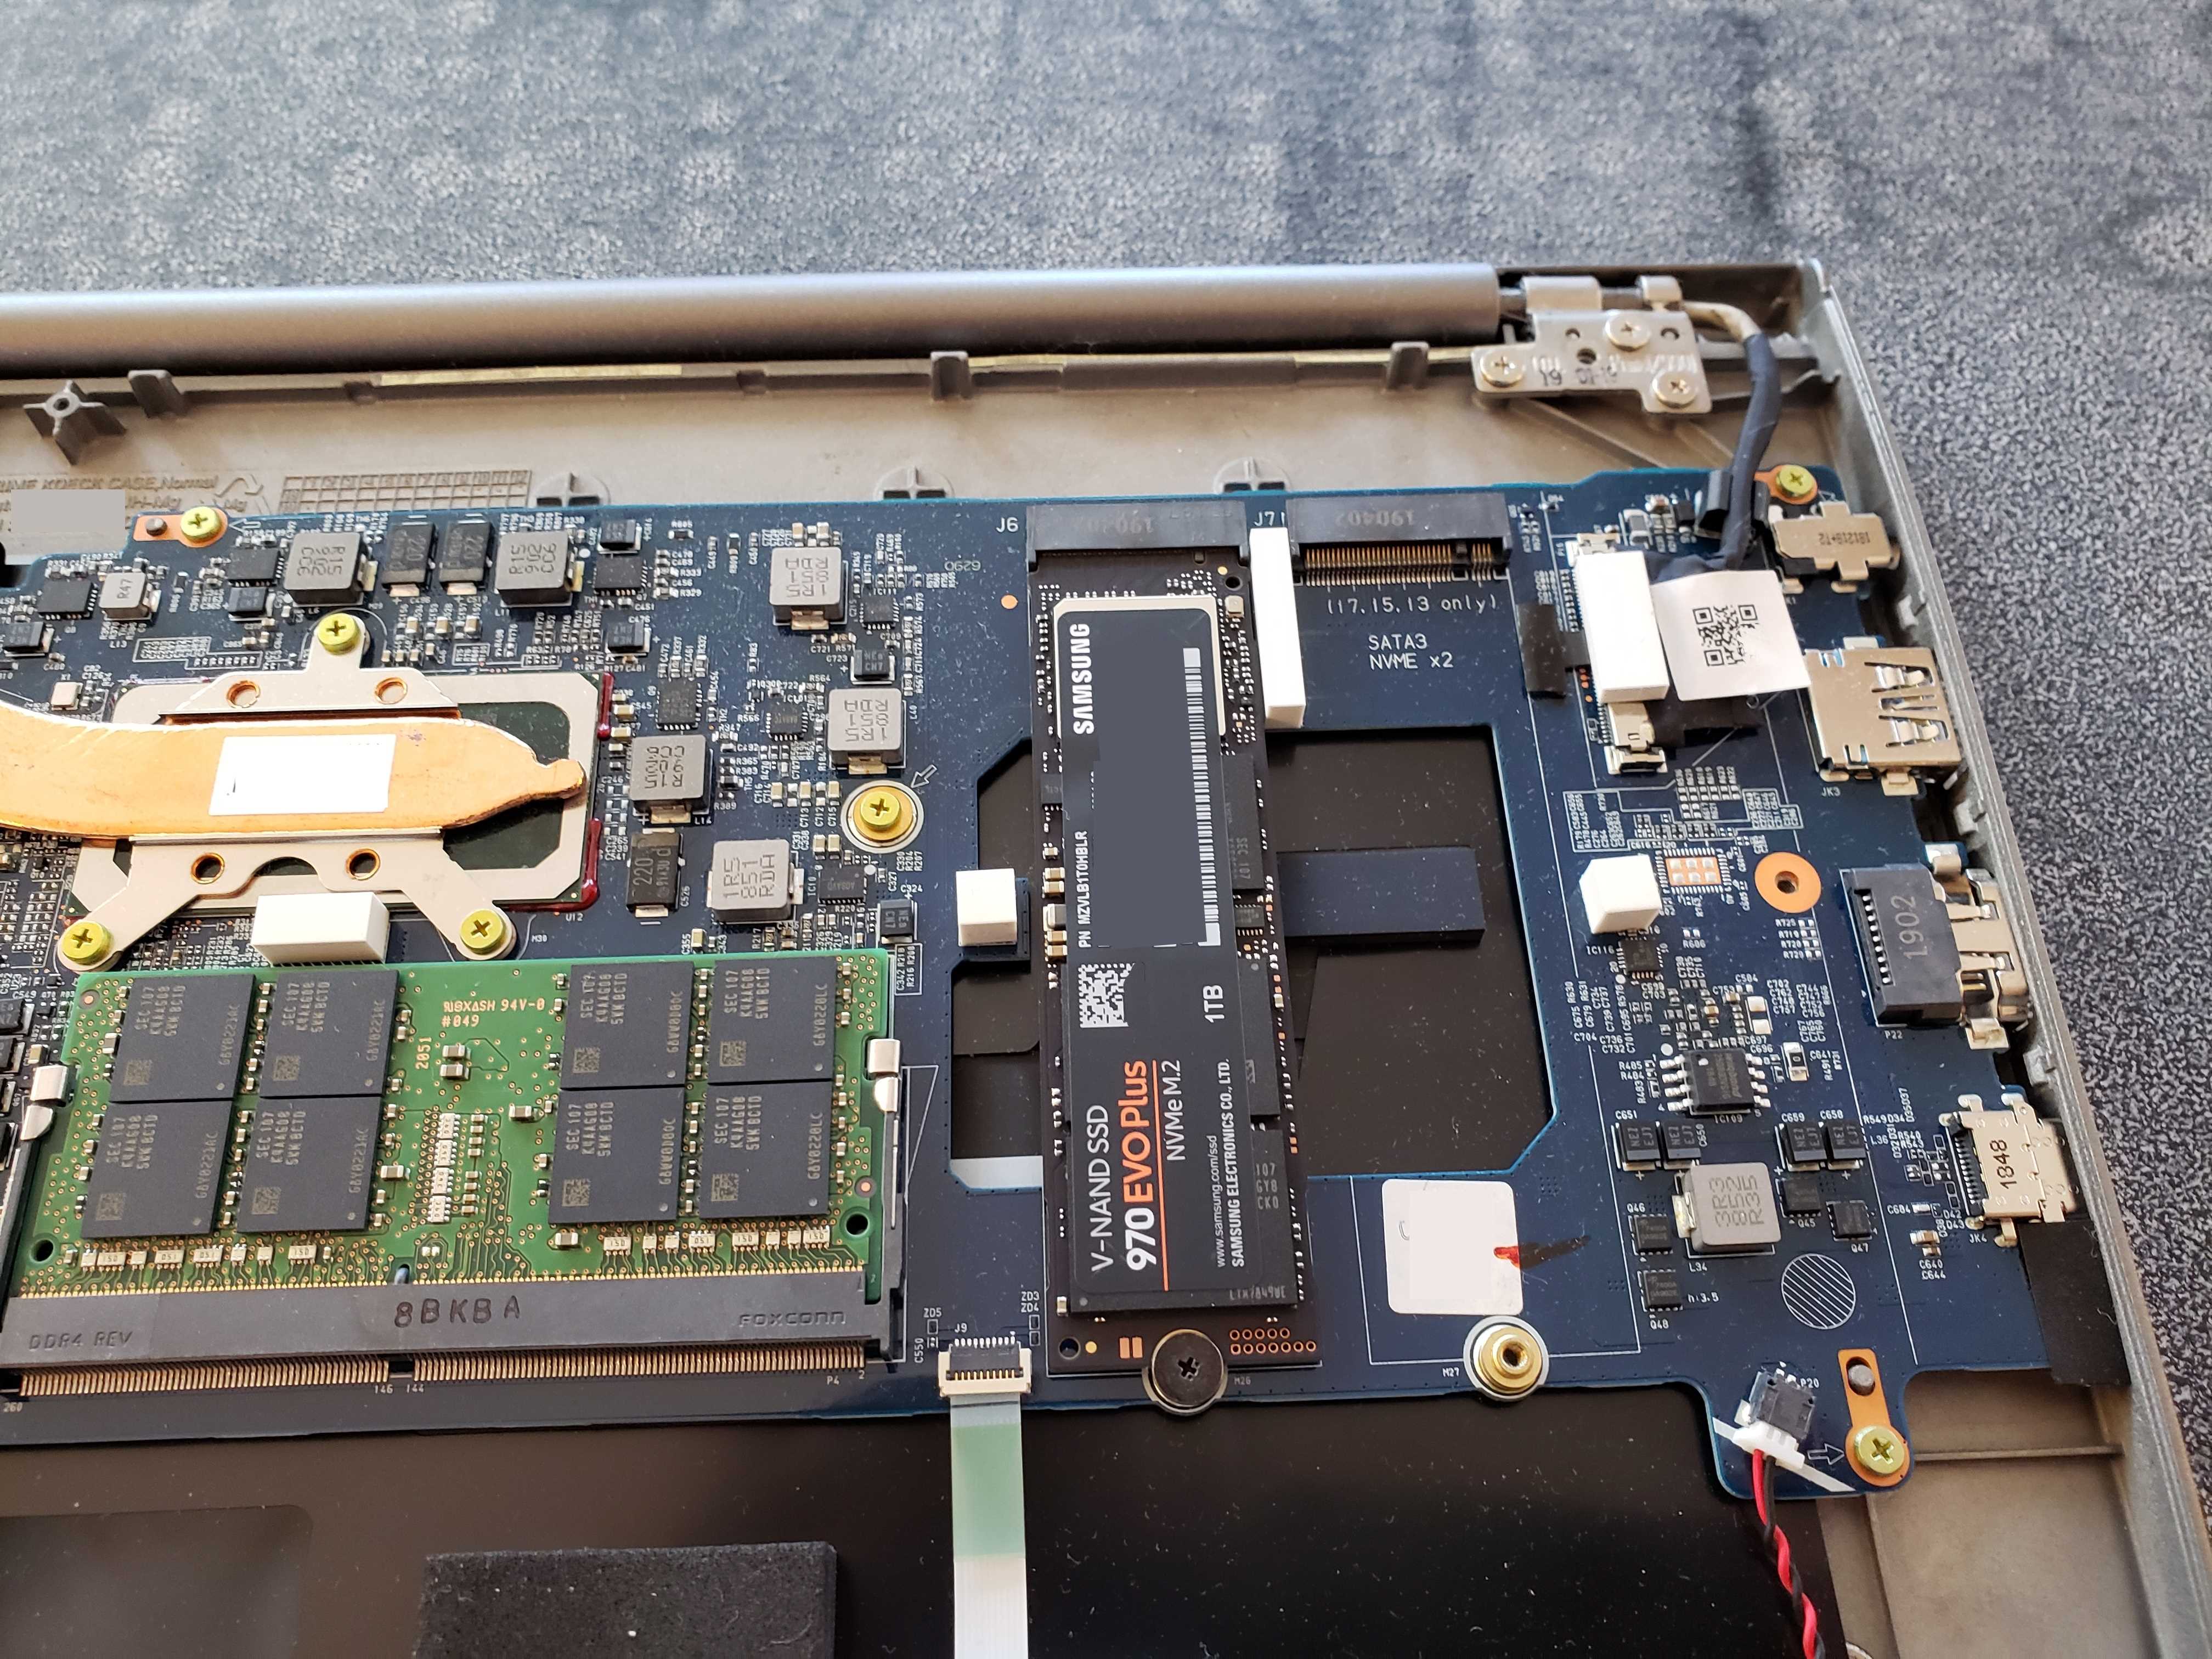
If you choose to keep the old SSD in the secondary slot so that you have more storage, just be aware that this will affect the heat generated in your laptop (see the airflow diagram above).
Step 8: Benchmark the New Hardware
Here comes the fun part. Now that both the new RAM and SSD are installed, we're going to benchmark the new hardware. Put the backplate back on temporarily (don't screw it back together yet, just in case) and boot up the laptop.
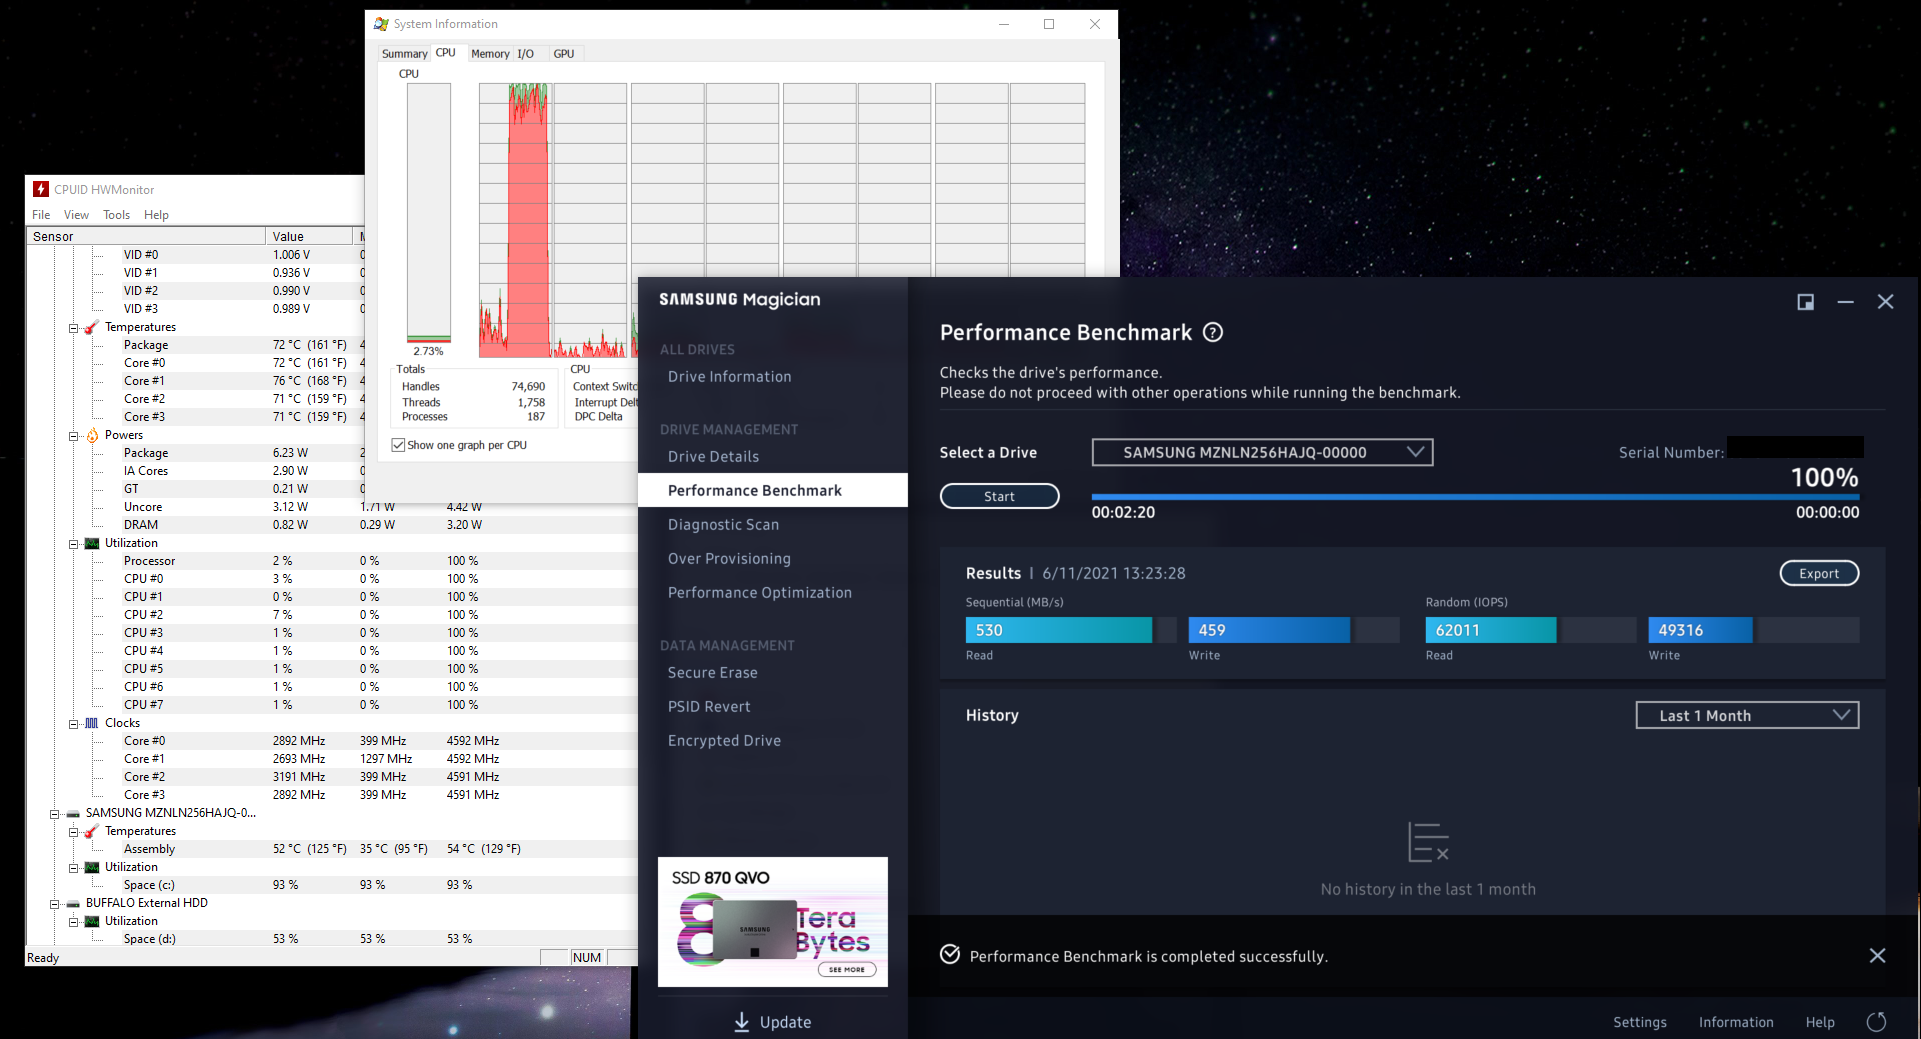
First, we'll test the 970 Evo Plus SSD using Samsung Magician and compare the results to the original 256 GB SSD that came with the laptop.

Awesome! What a difference in performance! Let's compare the two…
- Sequential read: 3182 MB/s vs. 530 MB/s
- Sequential write: 2980 MB/s vs. 459 MB/s
- Random Read: 175292 IOPS vs. 62011 IOPS
- Random Write: 105468 IOPS vs. 49316 IOPS
That's a non-trivial improvement. Just looking at sequential read/write, that's roughly 6x better performance!
However, that performance boost comes at a cost…
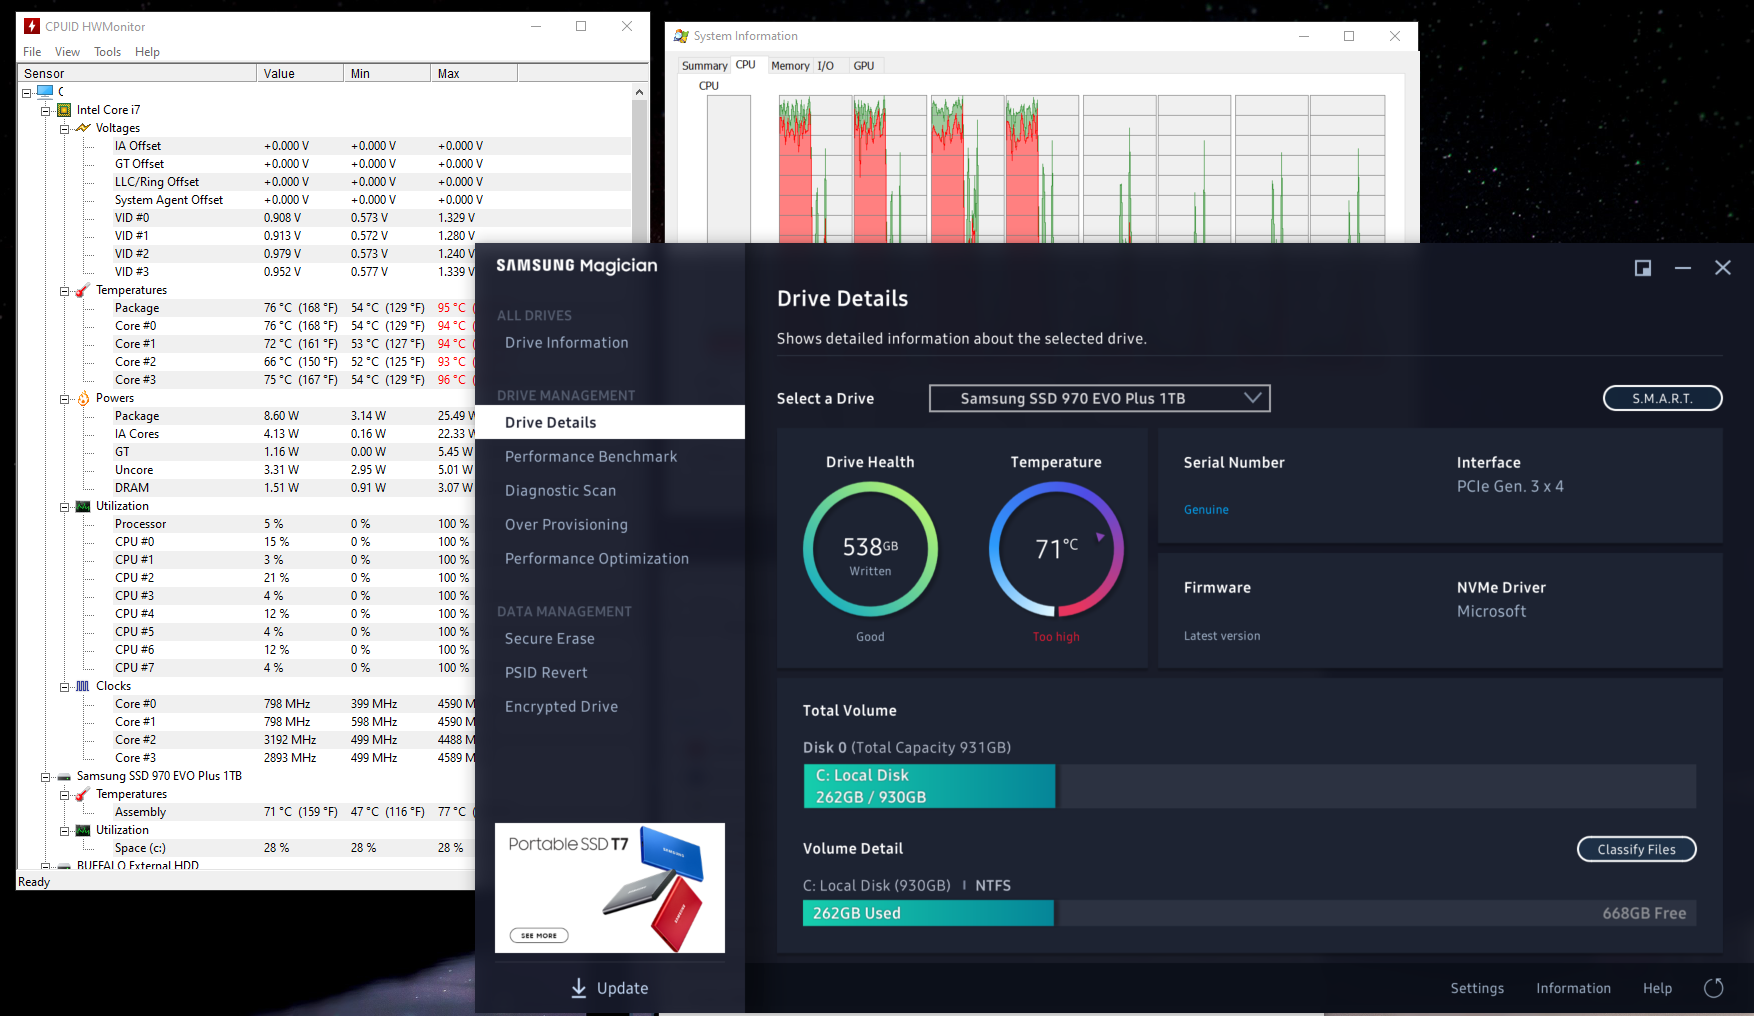
Holy cow, the SSD benchmark test cranked the heat of the SSD up to 71°C (160°F)! Hopefully, you won't be hammering your new SSD like this all the time, but be aware that heat is now something you need to be mindful of.
What does the baseline CPU temperature look like with the new hardware in there?
At first glance, it seems to be pretty comparable to the temperate profile with the original hardware, however, keep in mind that it WILL run hotter, just because of the hot air from the SSD blowing across the CPU, among other factors.
What about our Prime95 tests?
Test 1

Test 2
Test 3
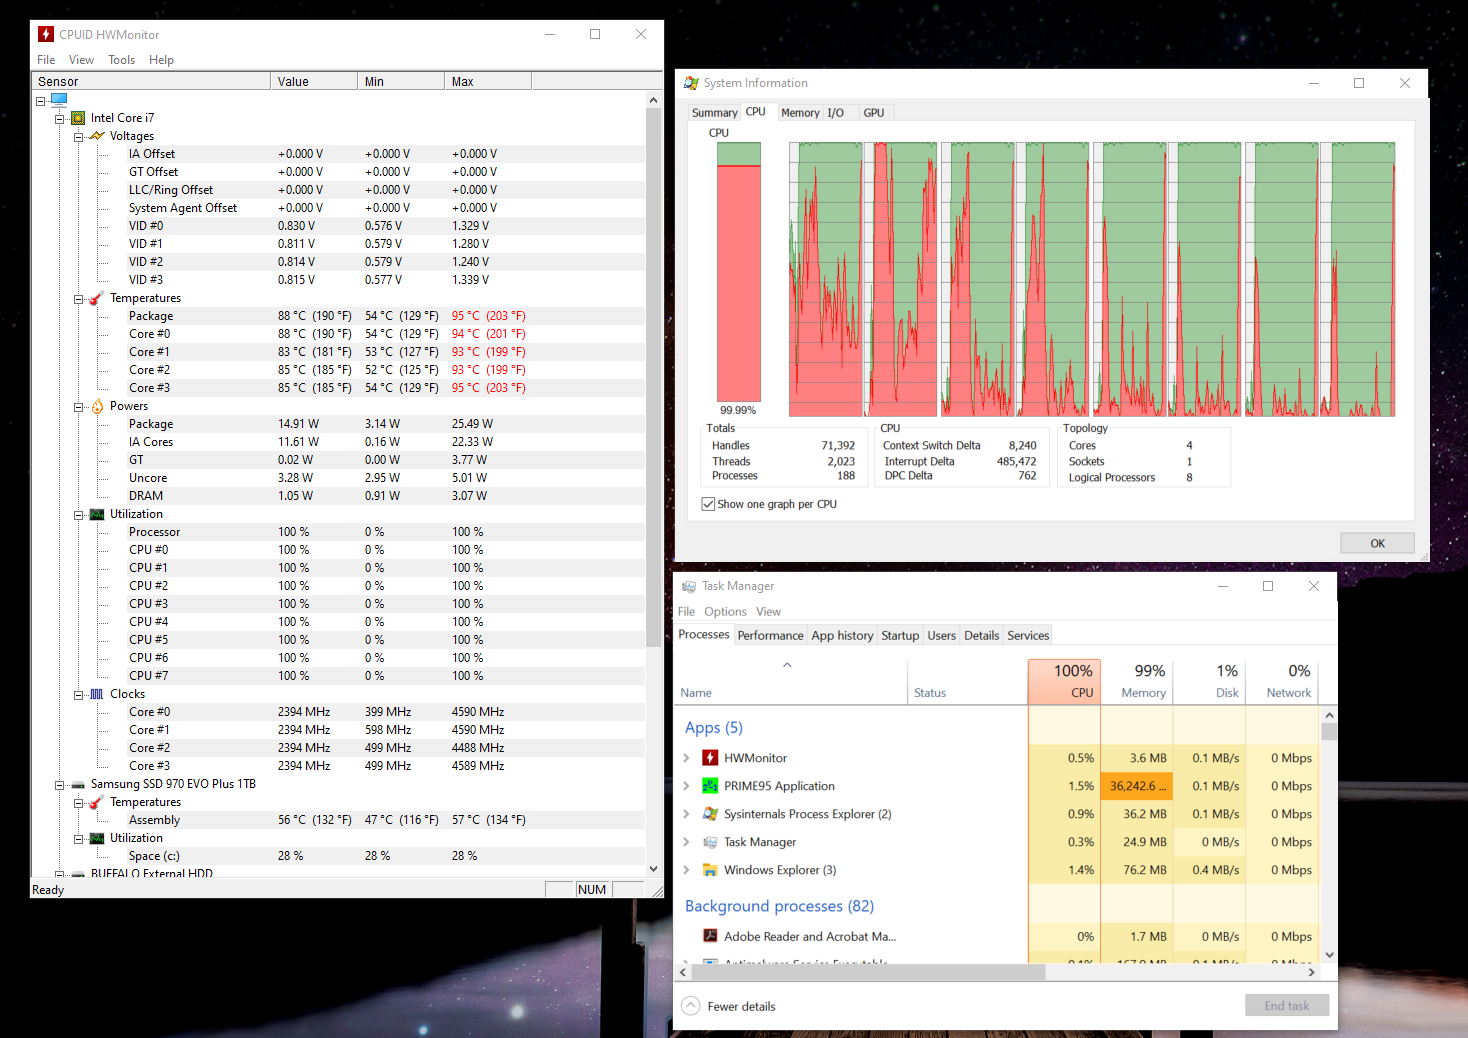
Again, slamming on the processor yields results that are somewhat comparable to our tests from the original hardware. Nothing to be too alarmed about here.
Step 9: Clean Up
Only AFTER you've tested your new hardware and are confident that your shiny new RAM and SSD won't cook like an egg, THEN go ahead and reattach the backplate by putting the screws back in and replacing the rubber footings. Your ultra-modded software engineer's laptop is good to go.
What's Next?
Be Mindful of Heat, Be Kind to Your Laptop
As I've reiterated many times, heat may now be an issue for your laptop. You can mitigate that by:
- Only using the laptop on a flat surface, like your desk.
- Maintaining good airflow. Do not block the air vents on the back!
- Keeping it clean. Periodically clean dust out of the vents using an air duster can or vacuum cleaner with gentle suction.
- Purchasing a cooling pad. This may provide marginal improvements in temperature control. I purchased a Cooler Master cooling pad with a fan [No affiliate relationship] and I'm fairly happy with it. I don't use it all the time, but it's there if I need it.
"Do Work, Son!"
Put it to good use and go write some serious code! You should already be seeing some productivity gains from the SSD alone. What about the memory? Even at this time, in the back half of 2021, 40 GB of RAM is truly sick! What are you going to do with all that? If you're writing code, have sixty browser windows open, and are running a development database on your local machine, you're likely to not even come close to utilizing all that memory! You could try running video editing software or something, but honestly, the LG Gram isn't really built for that and its other limitations (like lack of a dedicated graphics card) alone are going to bottleneck you to the point that it's not worth it.
So, you can utilize some of that abundant memory by configuring a RAM disk and going to town. Even a "mere" 8GB RAM disk can be fun to play with and help you boost your productivity. In case this is unfamiliar to you, a RAM disk is a virtual partition that your operating system thinks is a hard drive or SSD, but reads to/writes from system RAM. The performance you get from it is orders of magnitude better than an ordinary hard drive, but the caveat is that it is temporary, and any files on your RAM disk are lost when you power down your laptop. To set one up on Windows, you can download the ImDisk virtual hardware driver and toolkit, or get it from Chocolately:
choco install imdisk
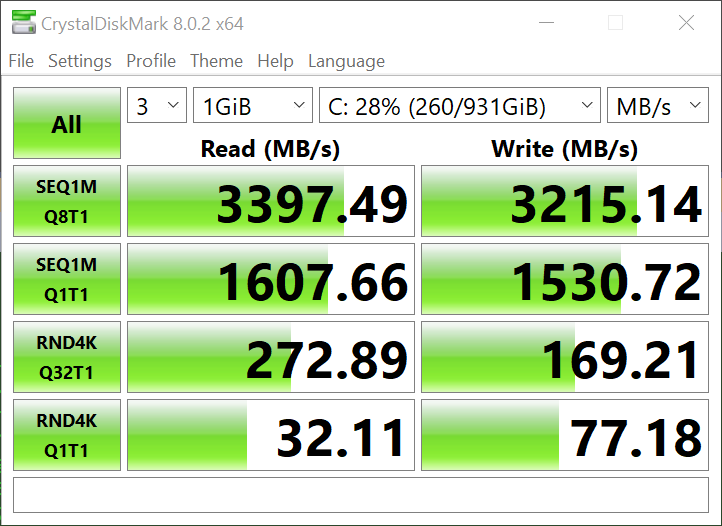
choco install imdisk-toolkitHere are a couple of screenshots showing the performance of an 8GB RAM disk vs. our new Samsung Evo 970 SSD using CrystalDiskMark.
SSD:
RAM Disk:
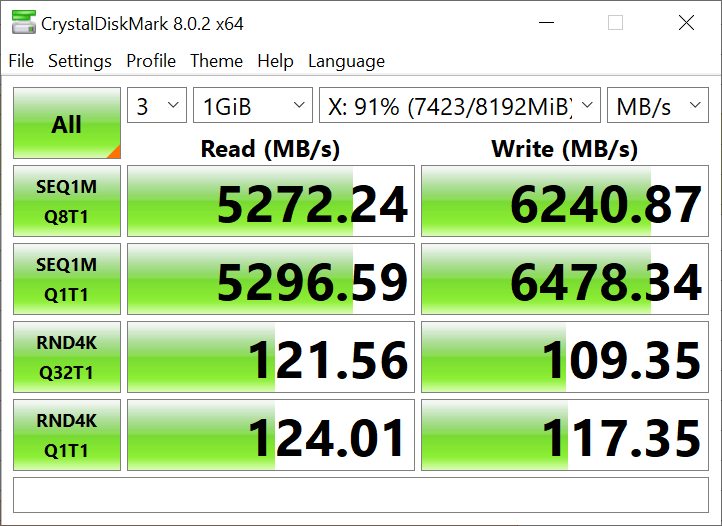
You can see that the RAM disk beats even our high-end SSD on sequential read/write tests, though oddly, it's a
Conclusion
In this blog entry, I discussed the steps I took to upgrade my venerable LG Gram 17" [2019 model] laptop and laid out a basic process you can follow for any hardware upgrade project. This one, in particular, is a fairly well-known mod that many people on the Internet have accomplished, however, there are
some pitfalls to watch out for, which not all bloggers mention. I talked about the importance of backing up your data and creating emergency restoration
media in case something goes wrong. Then I talked about the value of benchmarking your system before you upgrade it so that you can have an
In future blog entries, I'll get back to talking about software, but I hope you enjoyed this detour and got a lot out of it!
Experts / Authorities / Resources
LG Gram Laptop, Hardware Components
- LG Gram 17" 2019 Model
- Samsung 970 EVO Plus 1TB Solid State Drive (SSD)
- Samsung 32GB DDR4 2666MHz RAM Memory Module for Laptop Computers
- iFixit Essentials Toolkit
Blogs, YouTube Videos, Forums
Testing, Benchmarking
If you want to view or submit comments you must accept the cookie consent.